How to Create a Delay Longer than 30 Days with Google Calendar

  • 16 December 2020
  • 5 replies
  • 2095 views
How to Create a Delay Longer than 30 Days with Google Calendar
Userlevel 5
Badge

Introduction

Hi there, this is Erin Oz from the Zapier Support Team with another workflow idea to share. 

Background Info

Have you ever wanted to create a Delay in your Zap that lasted longer than 30 days? 

Or, have you ever wanted to make changes to your Zap but you can’t, because you’ll break Tasks that are currently in a delayed status?

Here’s how you can use Google Calendar to create better, more flexible Delays. 

Workflow Example

A Zapier user would like to send a followup email to their clients booked through Acuity. They’d like to email to go out 45 days after the appointment took place, in order to prompt their client to book again. 

The user has created a calendar on their Google account called “45 Day Followup Email Calendar” that will only handle the events created for this workflow. This helps keep the Zap from triggering on other events by mistake and cluttering other calendars. 

This set up will require two Zaps: 

Zap 1

Trigger - Acuity, Appointment Start
Formatter - Set the Event Start Time
Formatter - Set the Event End Time
Action - Google Calendar, Create Detailed Event

Zap 2

Trigger - Google Calendar, Event Start 
Action - Acuity, Find Appointment by ID
Action - Gmail, New Email 

Zap 1 Setup

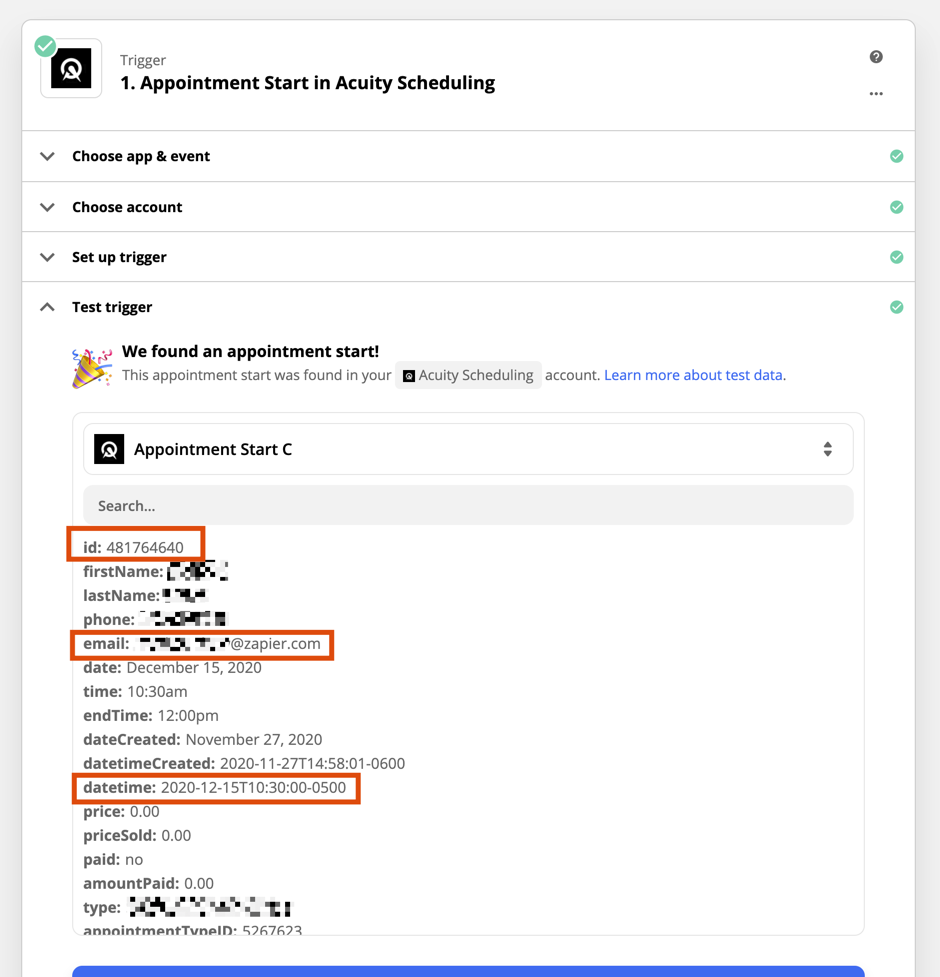
First, we’ll set up the trigger in Acuity for the Appointment Start. This will pull in data around the appointment and the client’s information. 

The important pieces we’ll be working with here are the appointment ID, the client’s email, and the datetime field showing when this appointment took place. 

cOyPKRgX2LGHogMgLi022MsG1dqvKsNeT0wwktN3CVGlA3SsnoshgQfRhvA6axtt4nDNIMsC0GJvm91WihsKZJHs381DvIUdCpu8Ft2M2a4BHuIXHhoBuXj3vnpLJipXba1TmWPO

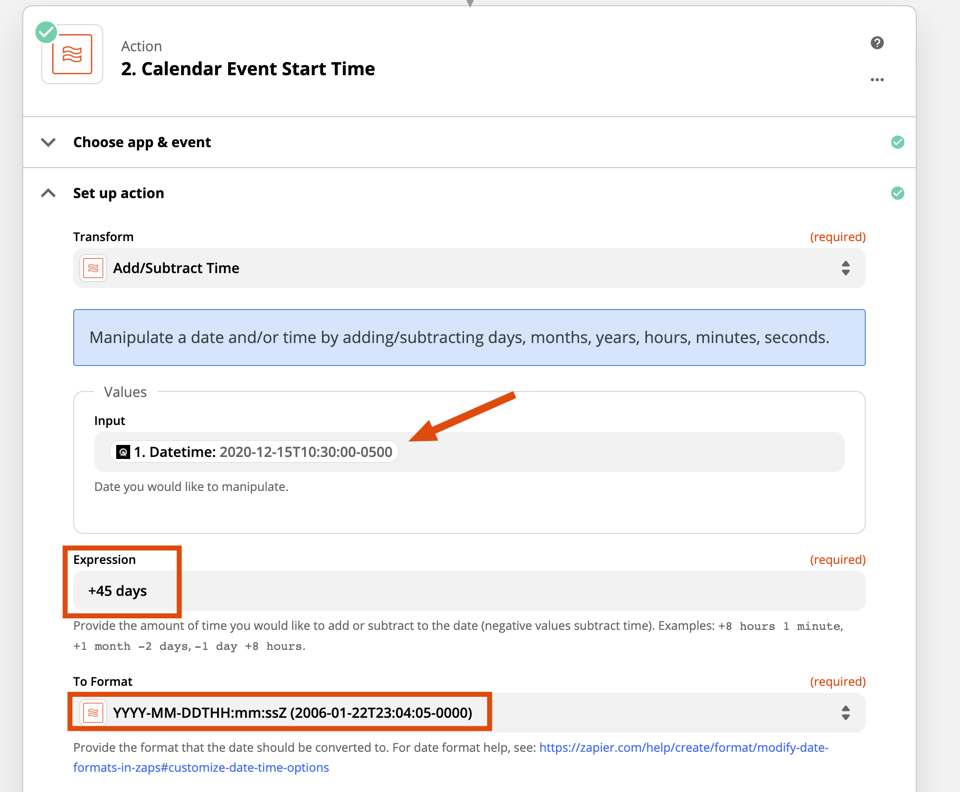
Then, we’ll use a Formatter step to add 45 days to the date/time of the appointment. This will help us create a Google Calendar event 45 days after the appointment took place!

tfDXFKak5bpy4v22N4rANBEemAmGiyC8KLg2qWQ7lq9EvAHgYC4VmfGeev0nzUhjwsw5OQqkxNz-8F7lFjHR7x7GX1jcdQGd1gzo0RlIXG1-hZDrbDNGh4lm6Z00EuIvm4wWGWOg

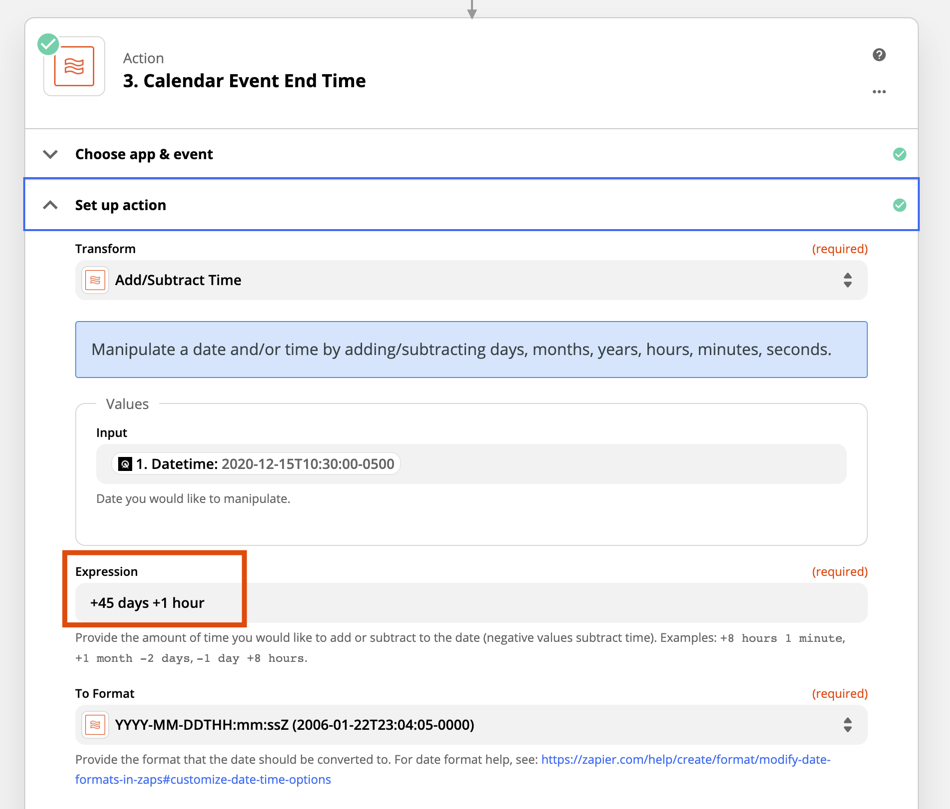
We’ll create a similar step for the end time, but add an extra hour in the expression: 

_vX2NjYPd_U2VVPEexLlx6G9mE5LNpikljkKCfzU1EVeqDV2-RmUlGFEAvAQ_Zpykx0dft6dtShEdirB17arqPQW_dNZoWwpDx2AAW6EYRtdtF8PPMzhqcpliUCUuYw58BTSu9y1

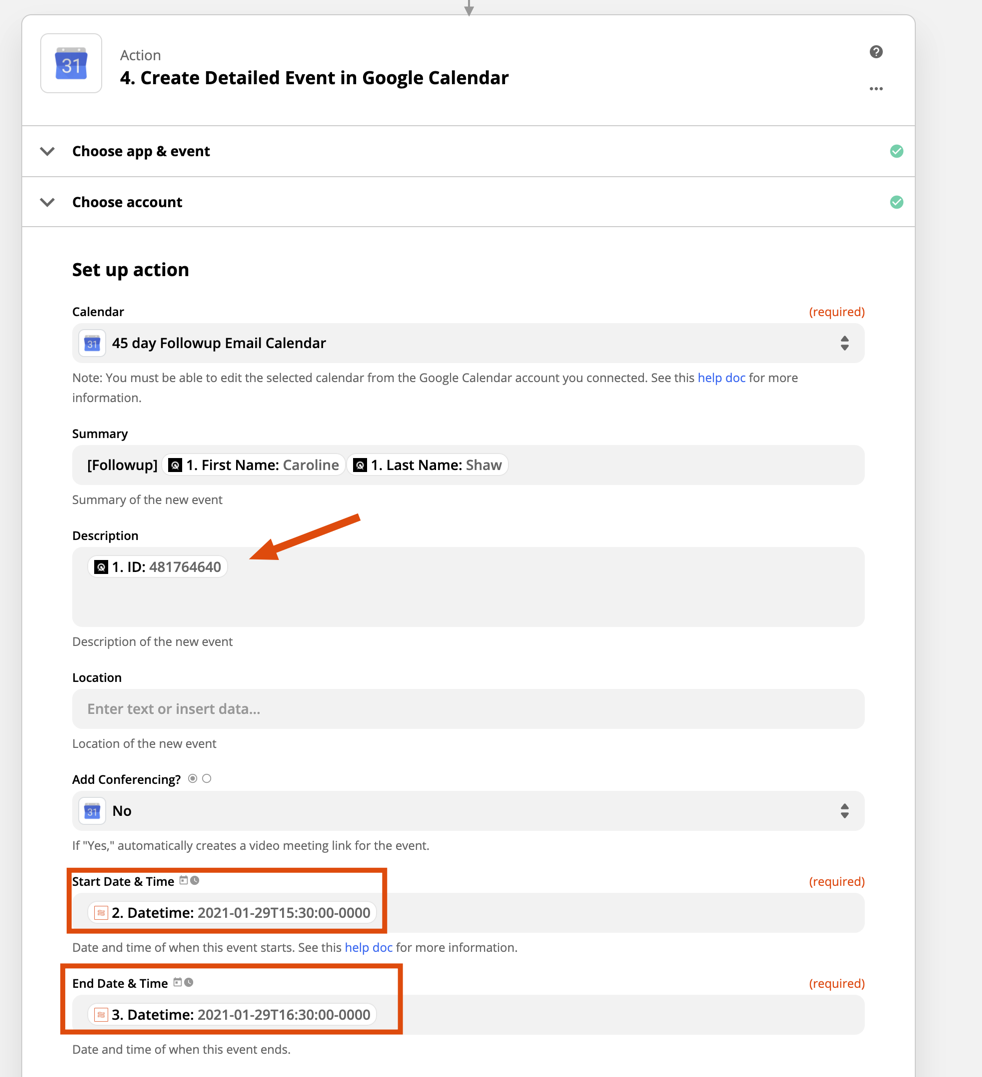
Then, we’ll set up the Google Calendar event. I’ve mapped the appointment ID into the description of the event, as we can use this in the second Zap to pull in all of the relevant client information. That will likely be needed so we can create a personalized email to send the client! 

1UOeGwxzxyzDKSy55_wJgOZ6Sxl63AK9GbQBoC1OL2aw5ROis75BHgpL1dcQEDSUqIZNkTM-UZHTVCRsASIySRaEvPDRIJk440rQP1JQ11eXkcjP_xHPCHJ5b23MwHv2c7AXsENT

Zap 1 complete. :sunglasses:

Zap 2 Setup

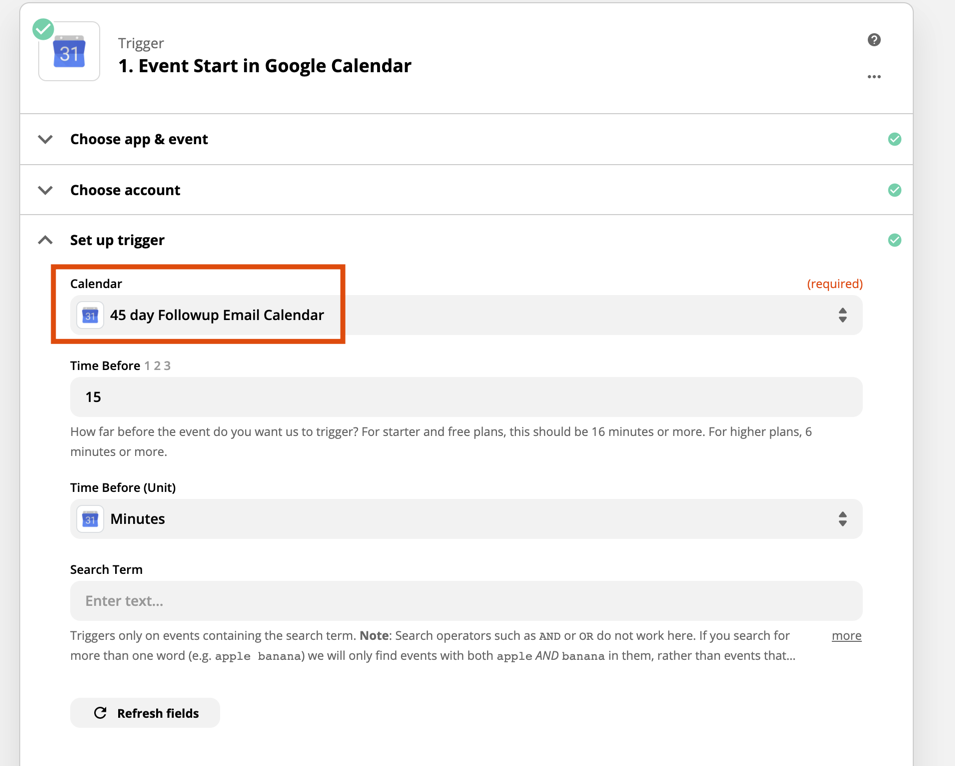
We’ll use the Event Start trigger in Google Calendar to start our workflow. Since we made a calendar on our Google account specifically for this workflow, I can simply select that calendar from the dropdown and don’t need to worry about search terms. 

ZWOeGbYNgefU2mirzePmjA1QUR9qWbvEFc2V5mf1Cq5Xu1FGcZgDgDon48y68NE3Q_2j8GxdJ-4UGQyrnbUpp8Pdc2w26r5VfqzKRS8-sM21QUoViJnceLhB4Eyz_Oxr65U0AkO-

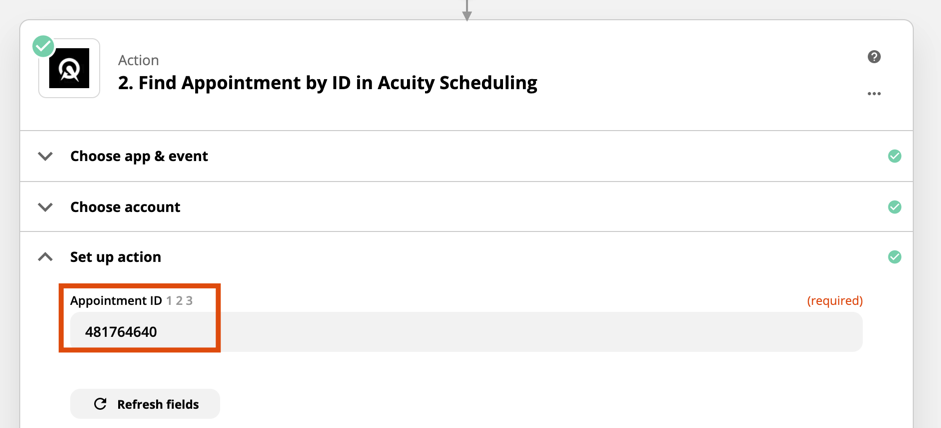
Then, I’ll map the description field from the Google Calendar event into a Find Appointment by ID step in Acuity. 

Because I set up the description to only contain the ID from Acuity in Zap 1, this search will be successful when the Zap runs live. 

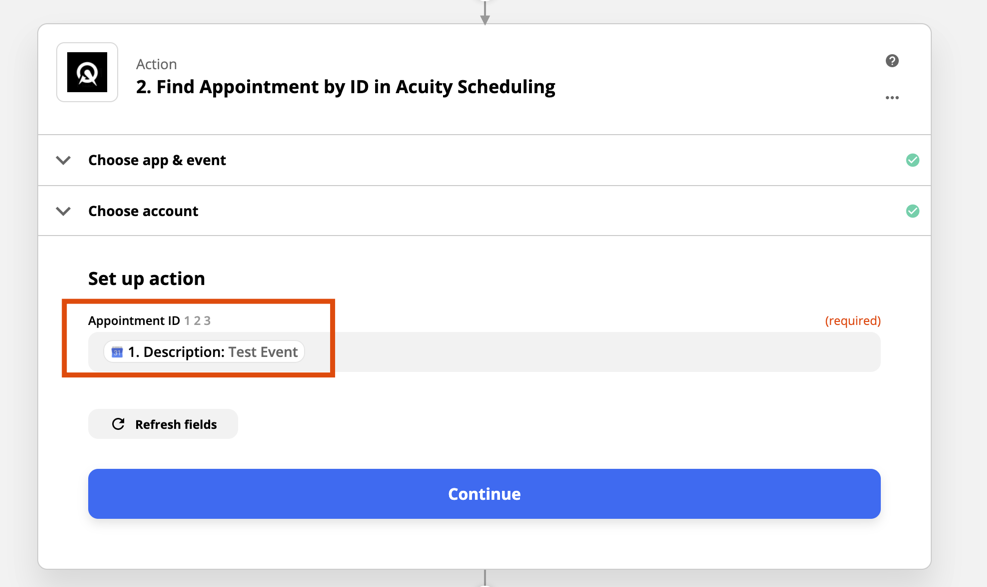
Right now, the sample data shows “Test Event” as I’m working with a default sample from Google Calendar. Because the event created in Zap 1 is 45 days into the future, we will likely not see it pulled into the sample data when setting up Zap 2. 

To work around this, I will temporarily add the Appointment ID into Step 2 manually. 

v-8G_eDlrw1Z3ntsimBjd4HEI9xfeE-39xVkKM3eClGQiPAIqP8F5ThrydrQjRVGi21bRfOH0rEzX4wuzKOeYn-f2NF2zqpsoQ-7DjgAFin7SfqwoZbIgrmMXacKjIYUv57BKKa9

After pulling in the sample data for Step 2, I can use fields like client name and appointment type in the email template.

Then, I will map the description field into the search. This will allow me to pull in all of the appointment information when the Zap runs live!

VKseYh8pBDVk9VBvF3AnU4HogHwQOrWrV9saXiO8OdH9mqvHcddmByre0k8vBvyR2UNc1wqdvkJ1agvuEasxrSP2kzhc3b5CVDraF6by4YXRYO_IM9sIgdNPdyfy00XN1YXANzmc

Now with the sample pulled into Step 2, I can create my email in Gmail using client data, and pull in the client email address: 

mXbfWw7B_n-wJw4aNBDRASVWa1G--EFfqEITsiSrvcb8oNp97_BIdFAjTXv47vzMWK6OIUKA78aYjYWb7N3J2dEDJ5fJF2bG4bFRKz7DZLh_c8fyC31yElHcdJOhZuMasgV-rzqo

Now when a client appointment in Acuity starts, an event 45 days later is automatically created in Google Calendar. On that date, my client will receive a personalized email prompting them to book another appointment. 

Please let me know if you have any questions about this workflow in the comments below!


5 replies

Userlevel 1
Badge +1

I have a Zap that is triggered by a new event added to a calendar. That calendar event already has the start date entered. 


I want to send a MailChimp email 7 days before that start date.


Am I able to use “delay until” in the original zap if that delay-date is more than 30 days away? Or do I still have to use the Google Calendar “Event Start” workaround?


Detailed explanation:


Thank you!

Userlevel 1

Came here via Learn.Zapier and it seems like a very interesting use case. However, found it a bit difficult to follow, especially with Zap 2. Adding a video tutorial would be great. 

If I want to create this zap for multiple appointment types do you just do Zap 1, as the Zap 2 will work for all the Zap 1’s - I wouldn’t need to have multiple 2nd zaps would I?

Userlevel 1

How can I use the logic behind this workaround if I use tidycal instead of acuity for my scheduling? Right now, TidyCal only has three triggering events to choose from. Canceled Booking, New Booking, and New Contact. I also have two other calendars that are all integrated together - an outlook calendar and a calendar in my CRM (wealthbox). I can make a google calendar to try and match what the workaround is showing, but I need to figure out what to do without using Acuity.

Userlevel 7
Badge +11

Hey there folks, really sorry we missed everyone’s messages here! 
 

@DavidLGS: Am I able to use “delay until” in the original zap if that delay-date is more than 30 days away? Or do I still have to use the Google Calendar “Event Start” workaround?

I expect you’ve already got this figured out but thought I should confirm for anyone that comes across this thread that yes, you’d need to use the Google Calendar workaround as the Delay app is still limited to 30 days.
 

@J_M: Came here via Learn.Zapier and it seems like a very interesting use case. However, found it a bit difficult to follow, especially with Zap 2. Adding a video tutorial would be great. 

Thanks for your feedback here that’s a great idea! I can’t make any promises but I’ll pass it over to the team for consideration. If you’re still stuck at all please create a new topic in the Community to let us know and we’ll will be happy to assist! 
 

@Jmess89: If I want to create this zap for multiple appointment types do you just do Zap 1, as the Zap 2 will work for all the Zap 1’s - I wouldn’t need to have multiple 2nd zaps would I?

Assuming you’re using the same Appointment Start (Acuity Scheduling) trigger as mentioned in the guide above then yes. The Appointment Type field for that trigger is optional so if no value is selected it will allow the Zap to trigger for multiple appointment types. 


@Tcox090: How can I use the logic behind this workaround if I use tidycal instead of acuity for my scheduling? Right now, TidyCal only has three triggering events to choose from. Canceled Booking, New Booking, and New Contact. I also have two other calendars that are all integrated together - an outlook calendar and a calendar in my CRM (wealthbox). I can make a google calendar to try and match what the workaround is showing, but I need to figure out what to do without using Acuity.

I did some checking and the New Booking (TidyCal) trigger appears to provide the start time for the event so you could use that as the Input value in the Formatter action. If you run into any trouble with that please let us know in a brand new topic so we can help troubleshoot any issues there separately.

Hope that helps! 🙂

Reply