Hi, I have to connect an API for my work, but I have multiple issues to connect it to Zapier. First of all here’s the API documentation: https://docs.roller.app/
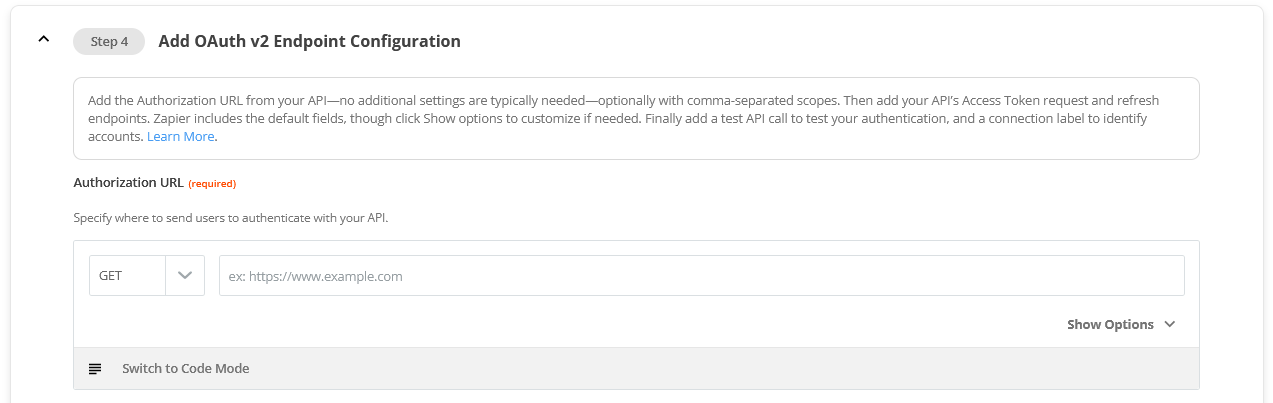
So, this API works with OAuth2, so I first tried to use the OAuth v2 Authentication method, But It seems I can’t use this method since my API doesn’t give any “Authorization URL”.
I didn’t modify anything in code mode. I wonder if what I do is even the right way to do it, or even possible with Zapier. Thanks in advance to anyone who help me. Have a good day.
Best answer by Linnchoeuh
Well, I was able to solve my problem myself, so I will explain how I did it in case someone else needs it.
I will show you the way I connected my API with only a POST call to get a token that require a client_id and a client_secret. So you don’t need an Authorization URL nor than a test call.
I did my connection with the roller API (https://docs.roller.app/), if you use another API (Which is very probable), some manipulation may differ a bit but I assume you’ll be able to manage them.
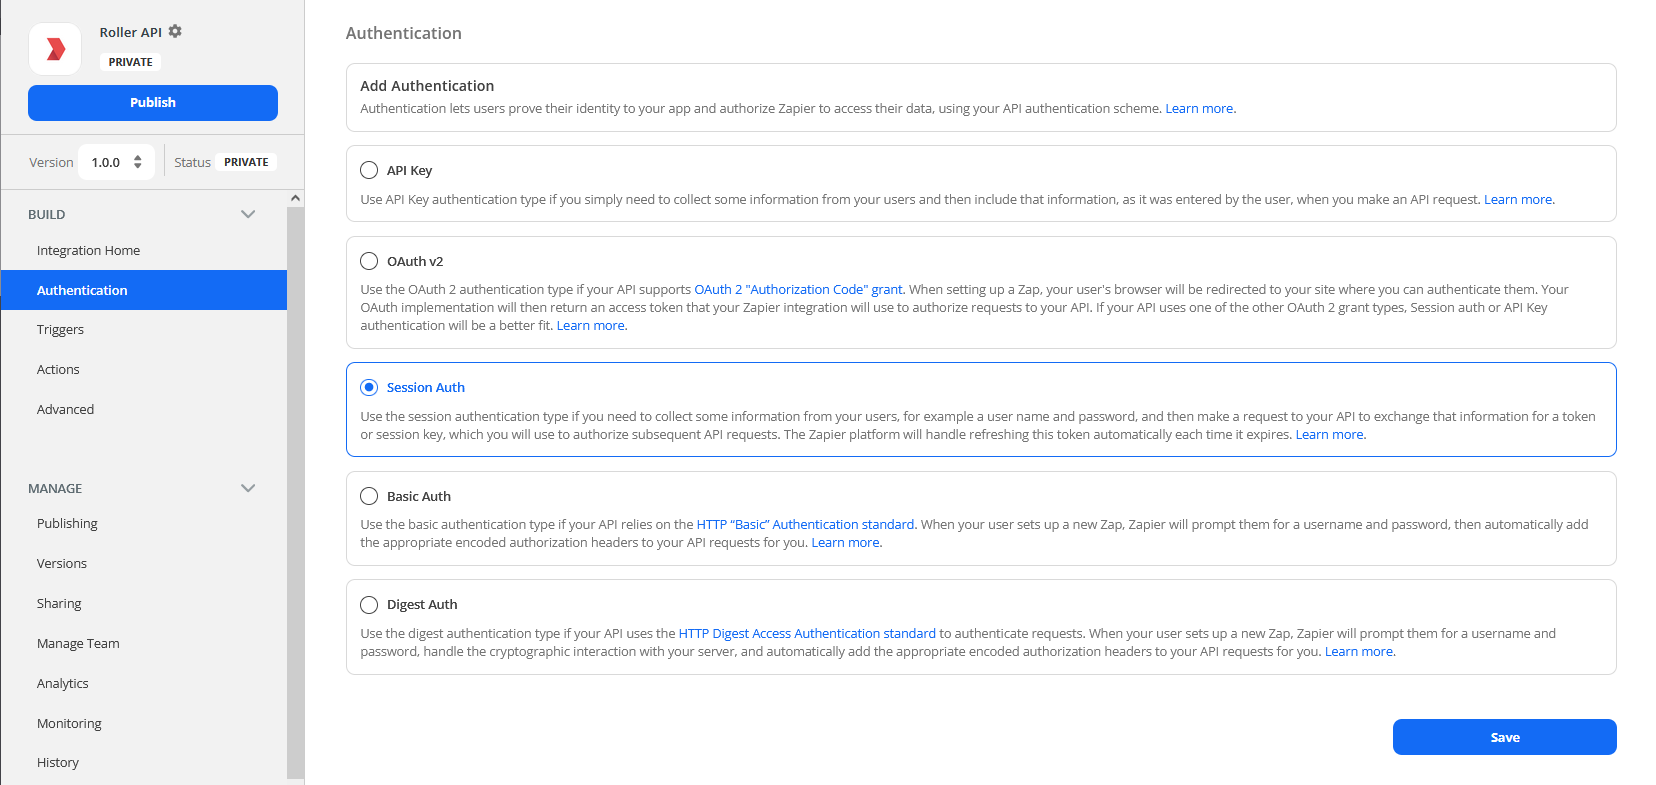
Let’s start, the authentication method you need to use is Session Auth. Select it and click on Save.
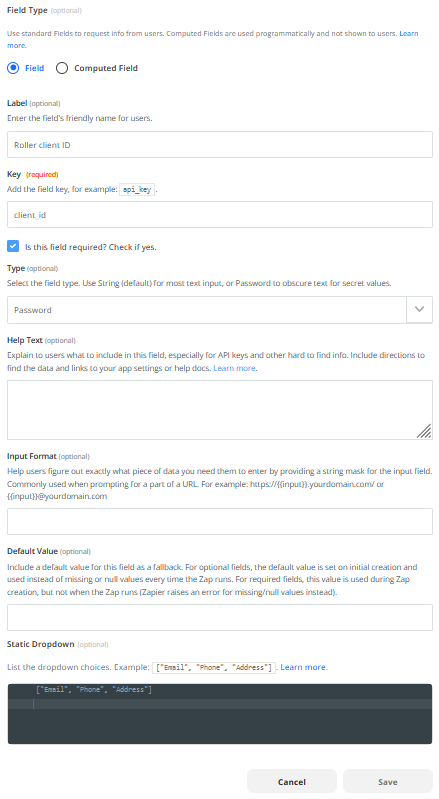
We’ll first add some fields that’ll be useful for after: - The Client id (Field type: Field, Key: client_id, Required, Type: password) - The Client secret (or secret id, check your API documentation) (Field type: Field, Key: client_secret, Required, Type: password) - The token (Field type: Computed Field, Key: The same name as the one referenced in your token POST call documentation, in my case it’s access_token.)
Here’s an example how I do a field:
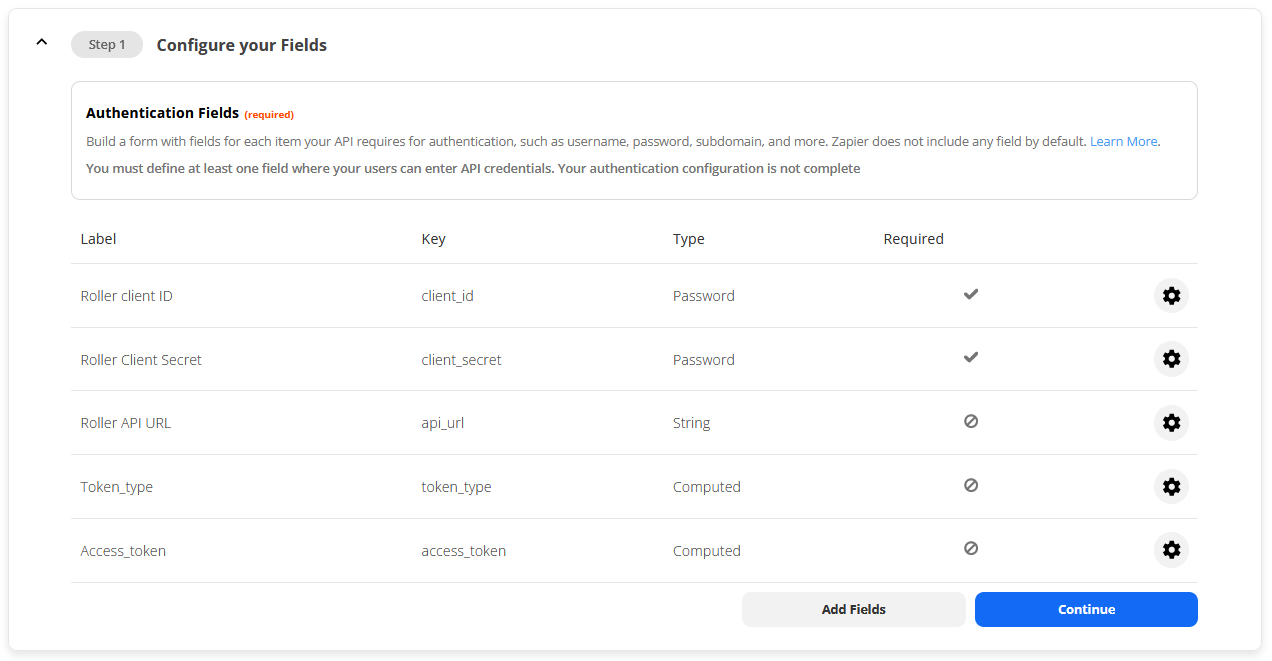
It supposes to be approximately looking like that:
I’ve added the fields api_url and token_type because they are useful for me but, they can be useless for you. The field api_url is simply the URL of my API this one can change, so I add it for easier maintenance. The field token_type just contain the string “Bearer”.
We’ve finished setting up the Step 1, let’s go for the Step 2.
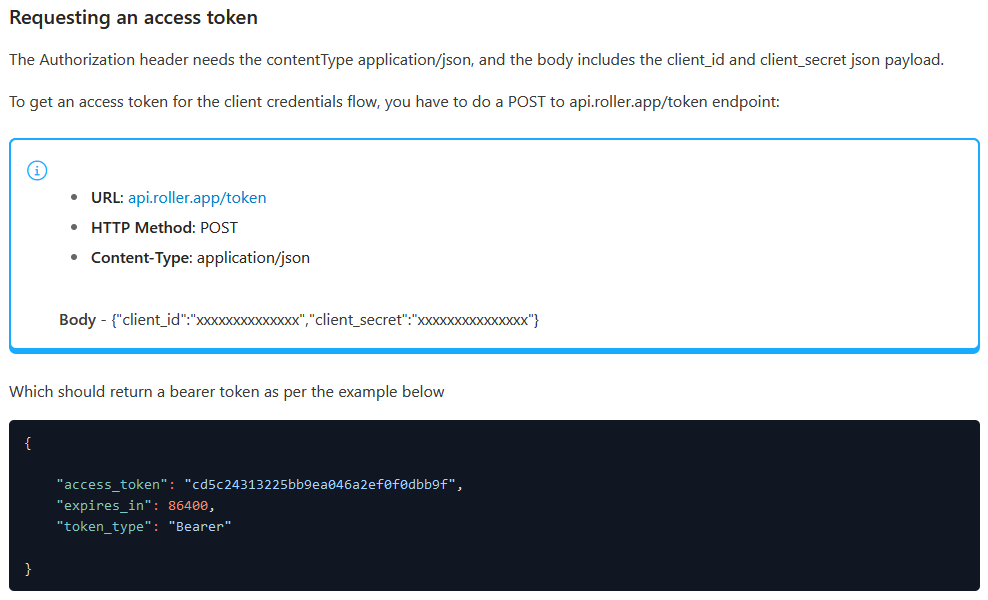
We can see the access_token and the token_type on this screenshot, this is the reason why I named my keys this way, to make them match. This is really important to make them matching (It’s even case-sensitive) or it will not work, be careful.
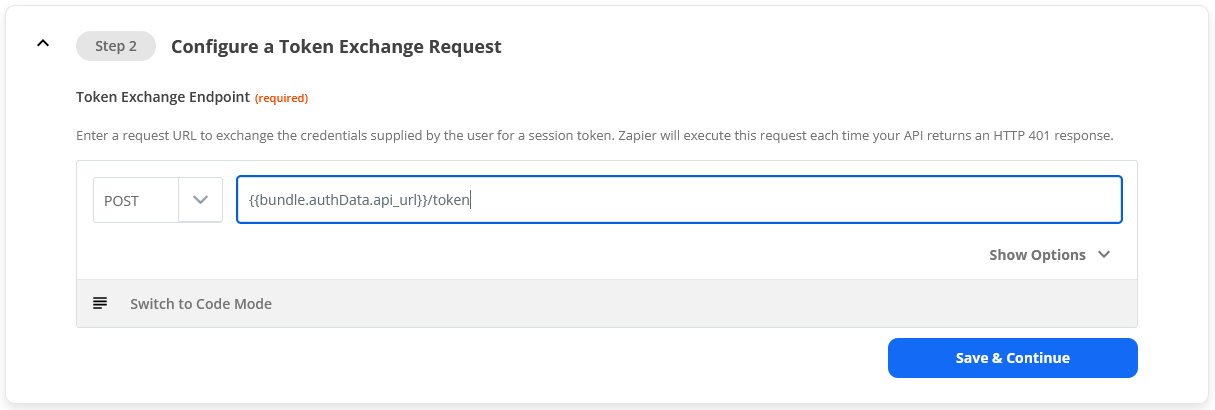
First, let’s write token POST call URL:
{{bundle.authData.api_url}} is just the variable that contains my API URL as I just mentioned before, if you don’t have this variable just copy the full URL that correspond to the token request. In my case, it will look like this: https://api.roller.app/token
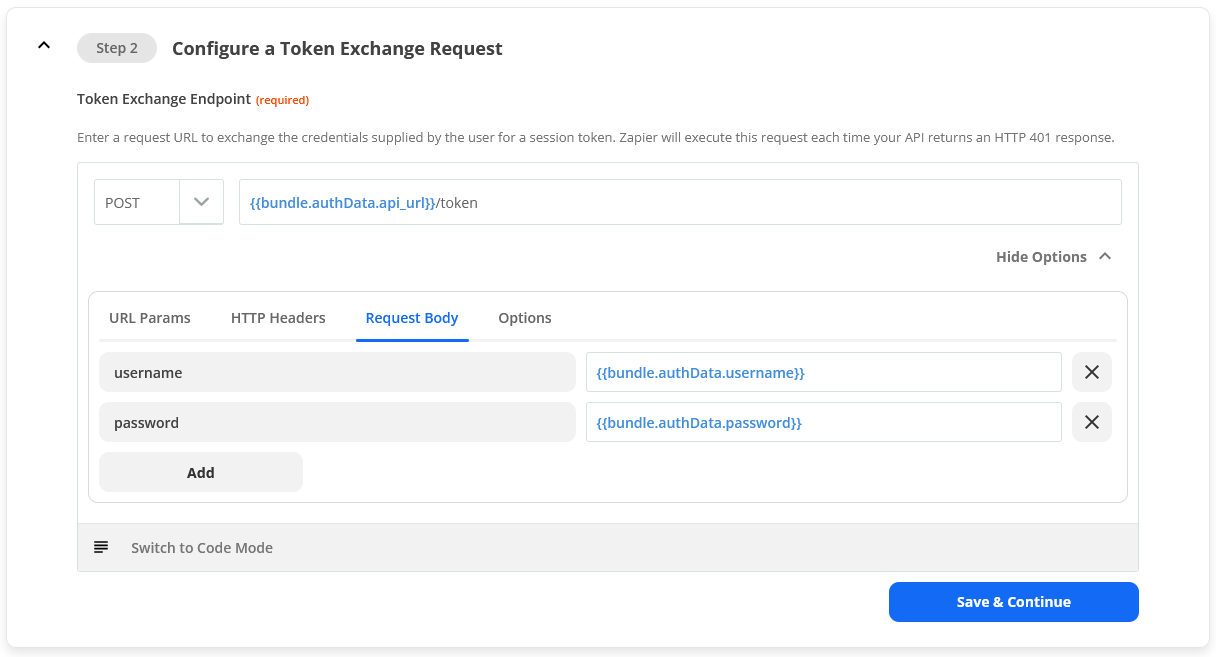
When you’re done with that, click on Show Options button. It normally shows something like that:
Replace the body values by what you need (Your documentation is supposed to tell you this). Whatever your documentation tells you, make sure to put the variables we created before, the way that {{bundle.authData.client_id}} correspond with your client_id field and {{bundle.authData.client_secret}} correspond with your client_secret field. In my case, the documentation tells me to create a body like that:
Body - {"client_id":"xxxxxxxxxxxxxx","client_secret":"xxxxxxxxxxxxxxx"}
And this how it looks for me:
Go then to the HTTP Headers tab and modify it according to your API documentation. For me, I start with this:
And end up with this:
Think to modifying your URL Params tab if you have to. In my case, I don’t need to.
We’ve finished setting up the Step 2, let’s go for the Step 3.
For this step, I don’t have any test request available in my API (But if you have one I’ll recommend you to use it of course). If, like me, you don’t have a test request, we’ll simply bypass the issue by using a random GET API call available in our documentation. I personally decided to use this call: https://docs.roller.app/docs/roller-api/67bddadddf571-get-customers
The only thing we need, is make sure that the call will not fail, and successfully return a 200 HTTP Code, Zapier will recognize this call as successful test.
Same as the step 2 paste the API call URL and also click on Show Options button:
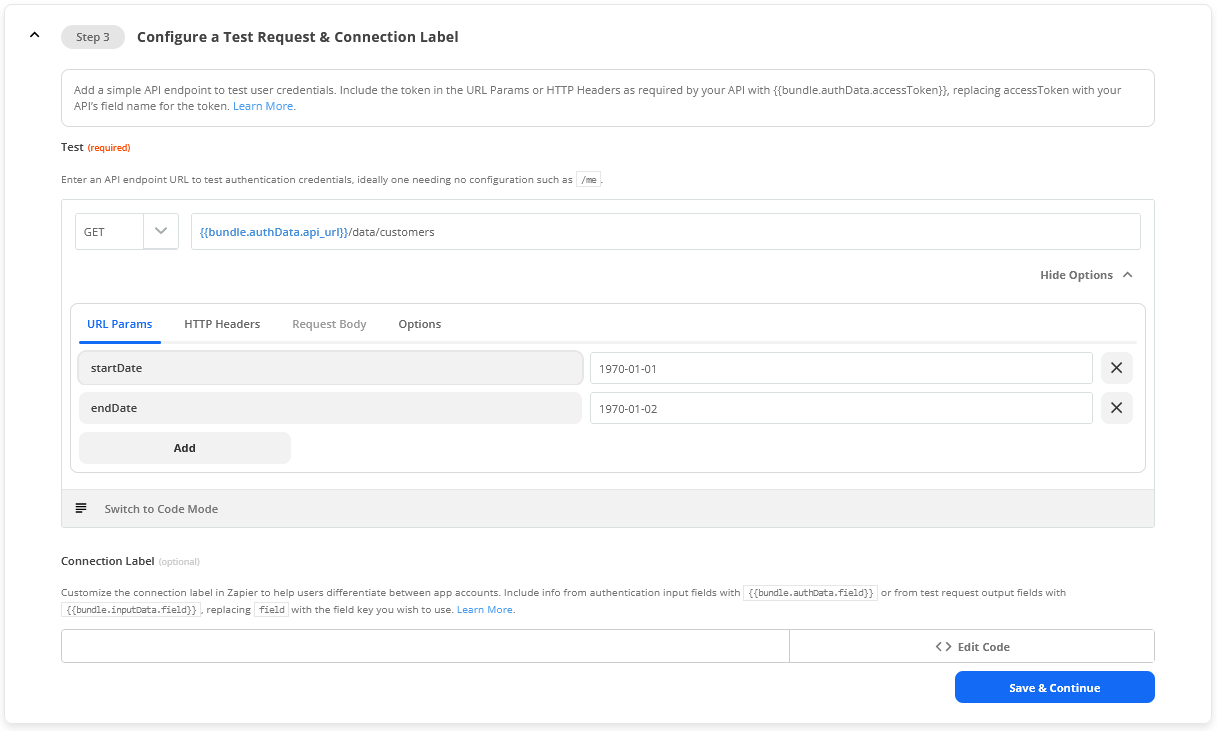
You will be normally in the URL Params tab. This should be a bit messy, so remove everything, and set the parameter (Params) your API call require (Refer to your own documentation).
These are the parameters I need for my request, but I will only set the ones that are marked as required.
This is how it looks for me:
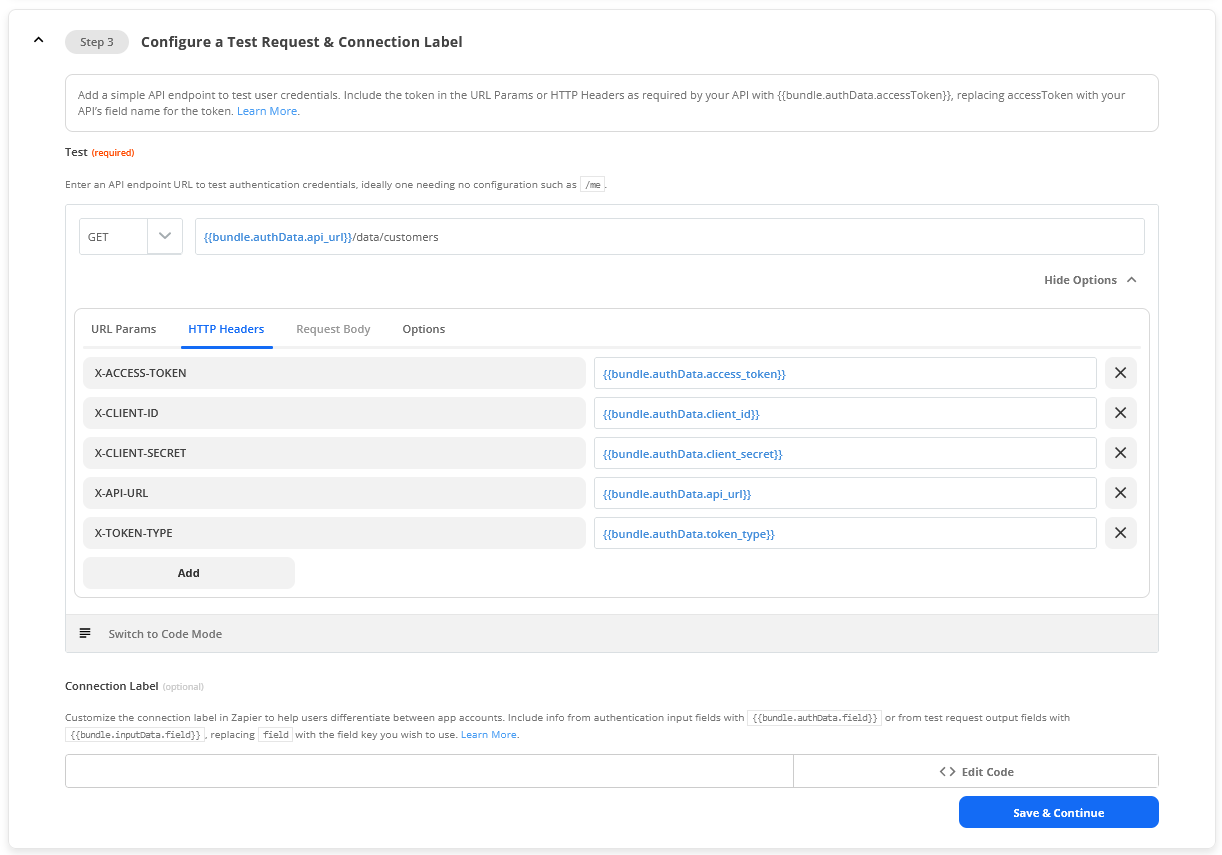
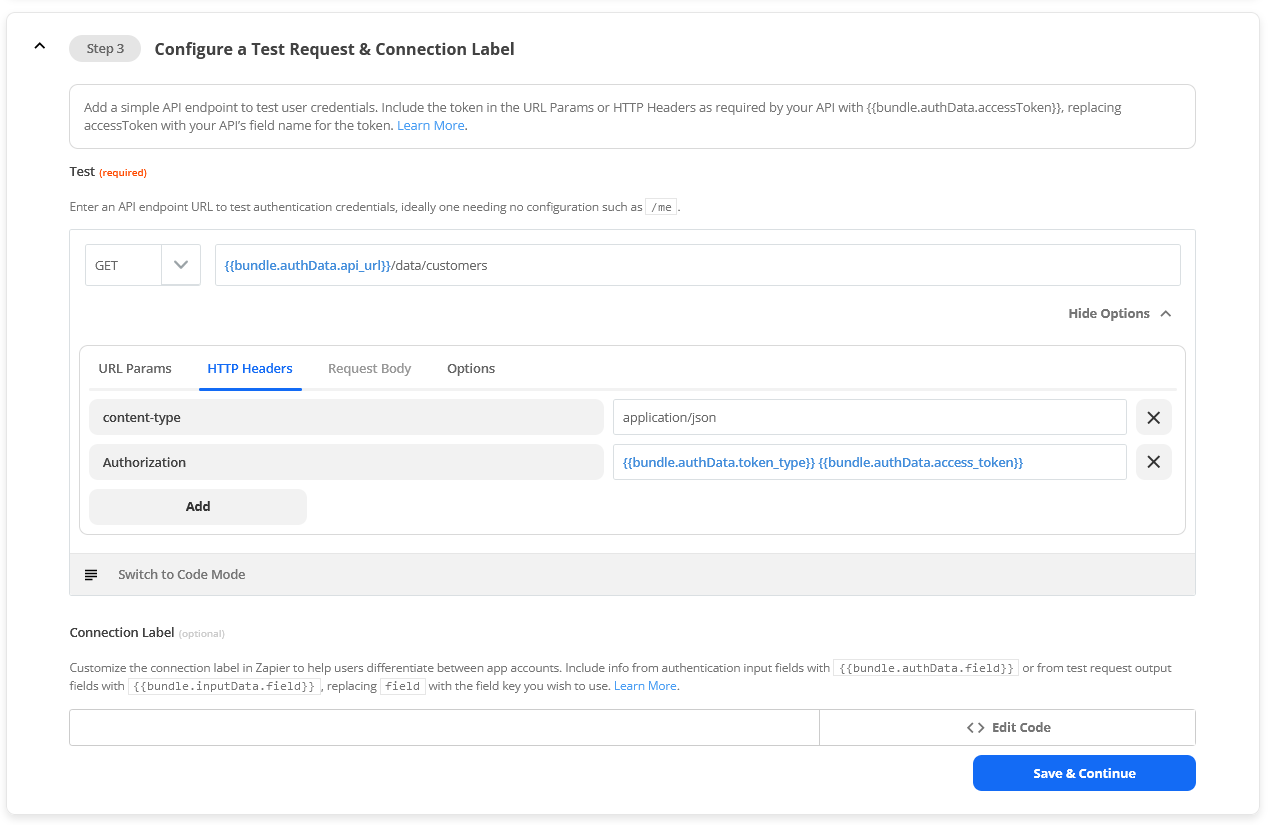
You also need to set the HTTP Headers tab that should be also messy.
This must be here where you need your token, so don’t forget to use the variable {{bundle.authData.access_token}} (Where access_token is the name of the key corresponding to the field of your token. We set up in the first step, don’t forget to have a name that match with the one you get in the token call). This look like this for me according to API documentation:
{{bundle.authData.token_type}} {{bundle.authData.access_token}} correspond to a string that must look like that: Bearer cd5c24313225bb9ea046a2ef0f0dbb9f (This is not a valid token no need to try)
After you’ve done that, you normally ended the step 3. But make sure you didn’t have forgotten anything that I don’t mentioned because I don’t need it in my call, but not in yours.
Don’t forget to click on the button Save & Continue !
We’ve finished setting up the Step 3, let’s go for the Step 4.
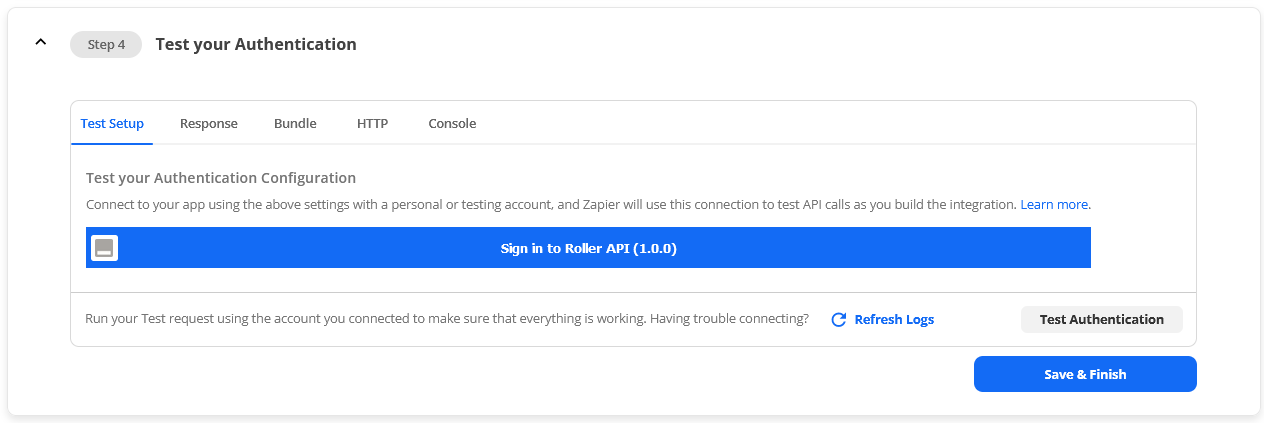
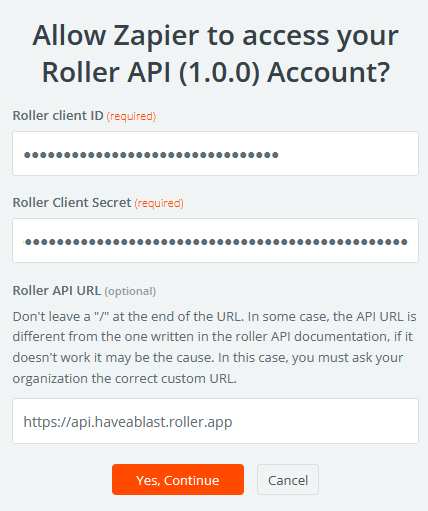
This last step is the easiest of all, start by just clicking on this big blue button that start with “Sign in to the_name_of_your_integration” :
Fill the fields with the values you need:
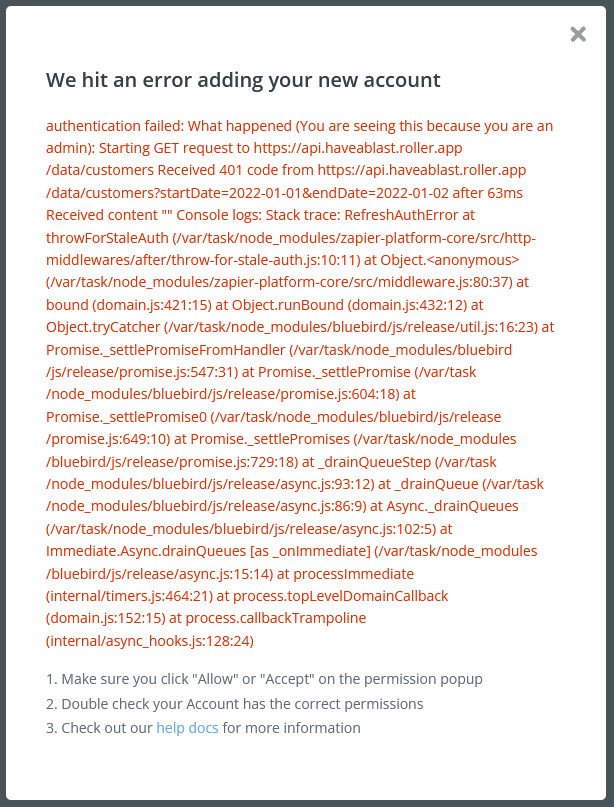
And click on Yes, Continue. It will normally close after few seconds, if not, you may have an error message, in this case make sure you correctly followed all the step of the tutorial, and check that your request are made accordingly to your API.
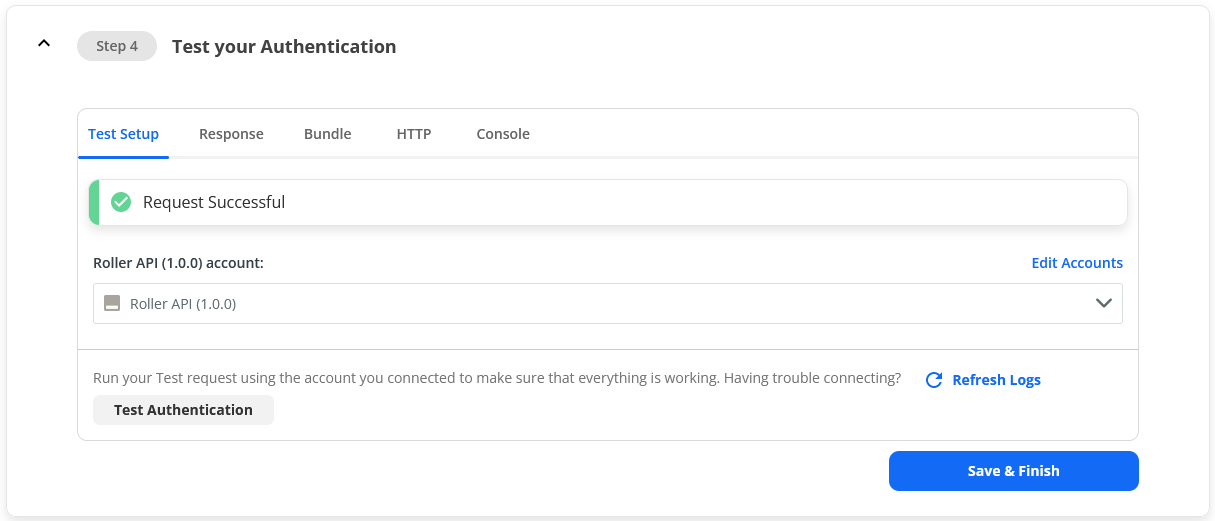
Then click on the button Test Authentication and you normally got a little notification saying:
“Request Successful”
LET4S FCKING GOOO
If that’s the case, congratulation, you’ve made it! 👏 You just have to click on Save & Finish.
In other case, good luck 👍. (Joking, feel free to ask questions.)
This post has been closed for comments. Please create a new post if you need help or have a question about this topic.
Well, I was able to solve my problem myself, so I will explain how I did it in case someone else needs it.
I will show you the way I connected my API with only a POST call to get a token that require a client_id and a client_secret. So you don’t need an Authorization URL nor than a test call.
I did my connection with the roller API (https://docs.roller.app/), if you use another API (Which is very probable), some manipulation may differ a bit but I assume you’ll be able to manage them.
Let’s start, the authentication method you need to use is Session Auth. Select it and click on Save.
We’ll first add some fields that’ll be useful for after: - The Client id (Field type: Field, Key: client_id, Required, Type: password) - The Client secret (or secret id, check your API documentation) (Field type: Field, Key: client_secret, Required, Type: password) - The token (Field type: Computed Field, Key: The same name as the one referenced in your token POST call documentation, in my case it’s access_token.)
Here’s an example how I do a field:
It supposes to be approximately looking like that:
I’ve added the fields api_url and token_type because they are useful for me but, they can be useless for you. The field api_url is simply the URL of my API this one can change, so I add it for easier maintenance. The field token_type just contain the string “Bearer”.
We’ve finished setting up the Step 1, let’s go for the Step 2.
We can see the access_token and the token_type on this screenshot, this is the reason why I named my keys this way, to make them match. This is really important to make them matching (It’s even case-sensitive) or it will not work, be careful.
First, let’s write token POST call URL:
{{bundle.authData.api_url}} is just the variable that contains my API URL as I just mentioned before, if you don’t have this variable just copy the full URL that correspond to the token request. In my case, it will look like this: https://api.roller.app/token
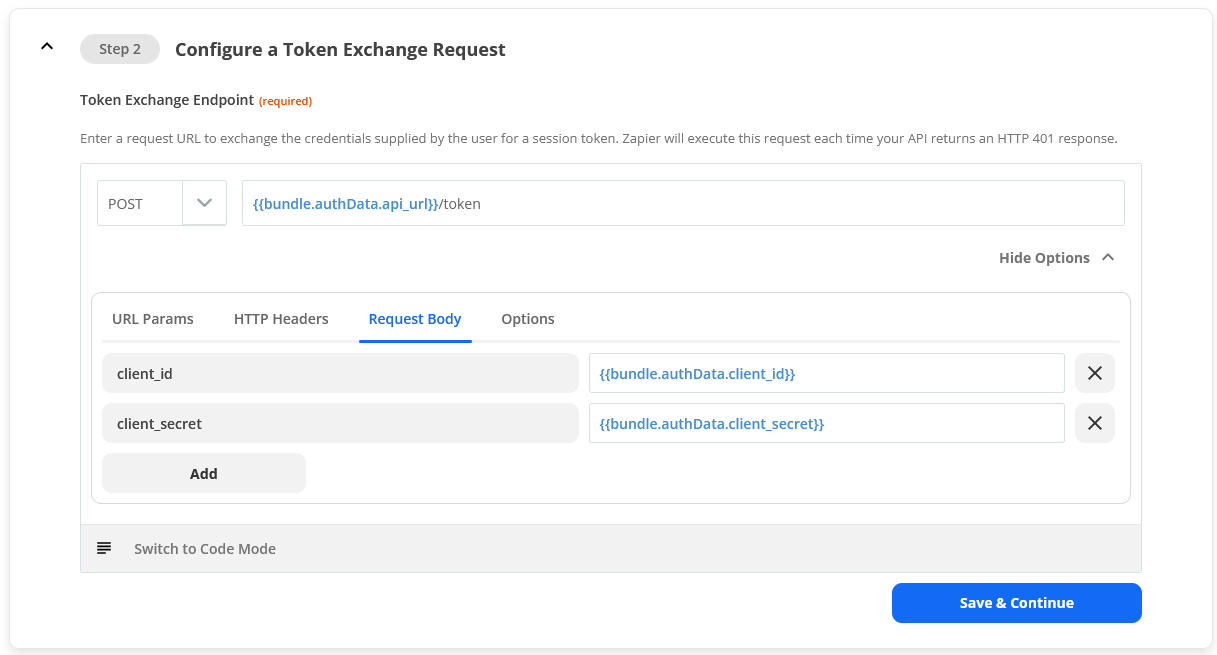
When you’re done with that, click on Show Options button. It normally shows something like that:
Replace the body values by what you need (Your documentation is supposed to tell you this). Whatever your documentation tells you, make sure to put the variables we created before, the way that {{bundle.authData.client_id}} correspond with your client_id field and {{bundle.authData.client_secret}} correspond with your client_secret field. In my case, the documentation tells me to create a body like that:
Body - {"client_id":"xxxxxxxxxxxxxx","client_secret":"xxxxxxxxxxxxxxx"}
And this how it looks for me:
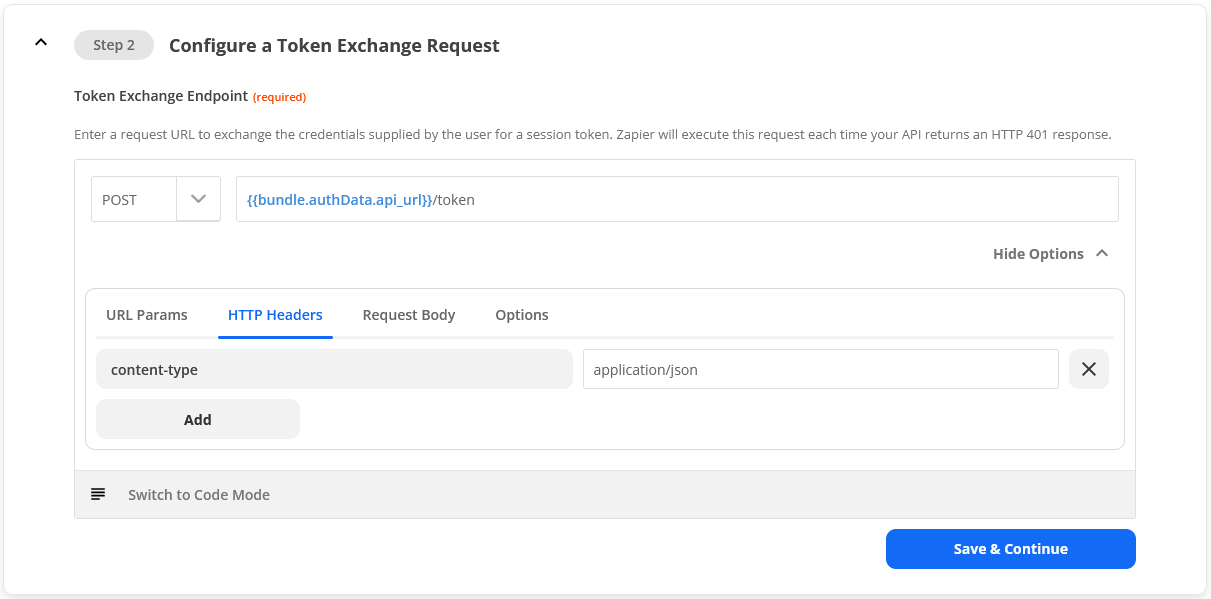
Go then to the HTTP Headers tab and modify it according to your API documentation. For me, I start with this:
And end up with this:
Think to modifying your URL Params tab if you have to. In my case, I don’t need to.
We’ve finished setting up the Step 2, let’s go for the Step 3.
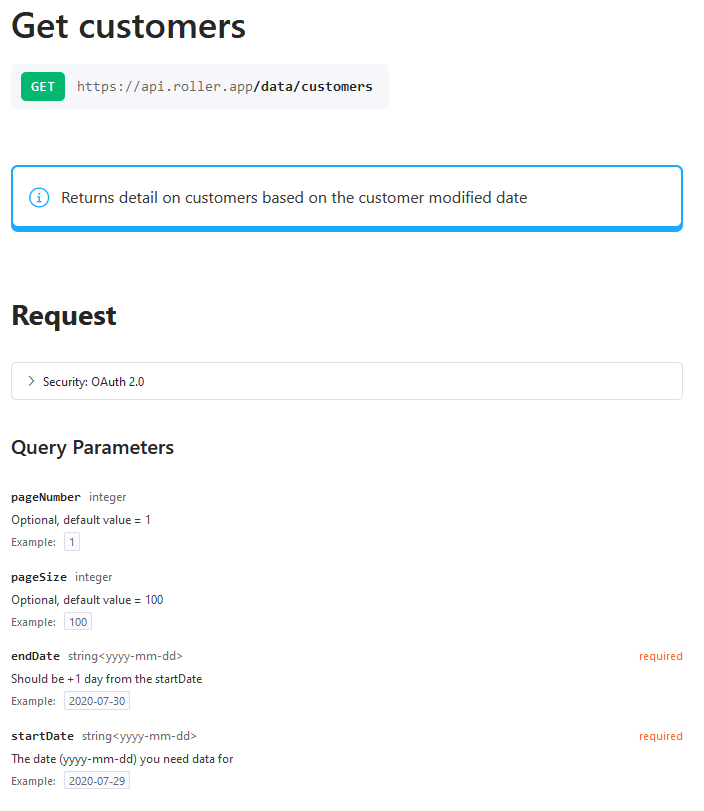
For this step, I don’t have any test request available in my API (But if you have one I’ll recommend you to use it of course). If, like me, you don’t have a test request, we’ll simply bypass the issue by using a random GET API call available in our documentation. I personally decided to use this call: https://docs.roller.app/docs/roller-api/67bddadddf571-get-customers
The only thing we need, is make sure that the call will not fail, and successfully return a 200 HTTP Code, Zapier will recognize this call as successful test.
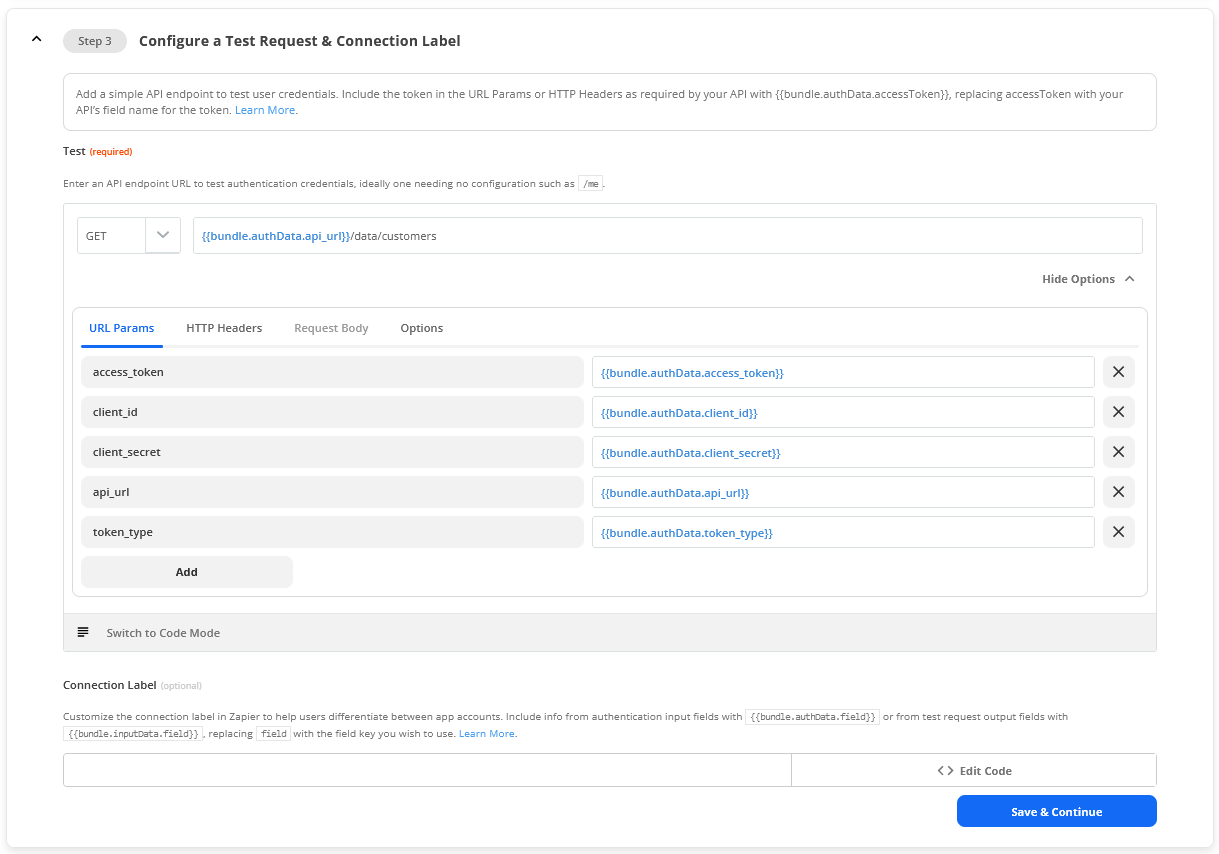
Same as the step 2 paste the API call URL and also click on Show Options button:
You will be normally in the URL Params tab. This should be a bit messy, so remove everything, and set the parameter (Params) your API call require (Refer to your own documentation).
These are the parameters I need for my request, but I will only set the ones that are marked as required.
This is how it looks for me:
You also need to set the HTTP Headers tab that should be also messy.
This must be here where you need your token, so don’t forget to use the variable {{bundle.authData.access_token}} (Where access_token is the name of the key corresponding to the field of your token. We set up in the first step, don’t forget to have a name that match with the one you get in the token call). This look like this for me according to API documentation:
{{bundle.authData.token_type}} {{bundle.authData.access_token}} correspond to a string that must look like that: Bearer cd5c24313225bb9ea046a2ef0f0dbb9f (This is not a valid token no need to try)
After you’ve done that, you normally ended the step 3. But make sure you didn’t have forgotten anything that I don’t mentioned because I don’t need it in my call, but not in yours.
Don’t forget to click on the button Save & Continue !
We’ve finished setting up the Step 3, let’s go for the Step 4.
This last step is the easiest of all, start by just clicking on this big blue button that start with “Sign in to the_name_of_your_integration” :
Fill the fields with the values you need:
And click on Yes, Continue. It will normally close after few seconds, if not, you may have an error message, in this case make sure you correctly followed all the step of the tutorial, and check that your request are made accordingly to your API.
Then click on the button Test Authentication and you normally got a little notification saying:
“Request Successful”
LET4S FCKING GOOO
If that’s the case, congratulation, you’ve made it! 👏 You just have to click on Save & Finish.
In other case, good luck 👍. (Joking, feel free to ask questions.)