How to extend any app's API possiblities using Pipedream
Background
For people like me, who love to use no-code / low-code tools like Zapier but still like to have a lot of functions and possibilities, sometimes miss the needed API option. For example I have created a few of extensions within Zapier which does the following;
- Upload a youtube thumbnail
- Create zoom meetings with dynamic passwords
- Subscribe on multiple Google Drive folders
- etc
This kind of needs are sometimes needed to finish an automation. But what if Zapier doesn't support this (yet) ? How can we get it done anyway?
Well…..webhooks and Pipedream! Yes, I do love webhooks and yes I do a bit of programming (don't call me a programmer though, I still lack a lot haha).
About
So let me tell a bit about them (feel free to skip).
What are webhooks?
Webhooks are a way to send or retrieve data from 1 system (API) to the other. With webhooks you can push data to some system, which will then take care of this. OR you can call for some data which you can then use again. Within webhooks you got 2 most common types:
- HTTP POST
- HTTP GET
As you might have guessed, POST will send data and GET will retrieve data. Now I will not go into deep now, but feel free to google some of these to understand it more.
In this case, I will use a webhook to send & retrieve data between Zapier and Pipedream, so they can do something with the data.
What is Pipedream?
As they explain it themselves: Pipedream is a serverless integration and compute platform that makes it easy to connect apps and develop event-driven workflows.
Basically what they do is the same like Zapier, but Pipedream only works on code (Nodejs in this case). They give you a Graphical Interface so you can create some code, connecting API's of systems and automate workflows.
Why is Pipedream so amazing?! → They provide you with a 100.000 monthly free invocations!
So why use webhooks and Pipedream?
With the combination of both, you can extend Zapier's capabilities a LOT. Imagine you want to do something with Google Drive, Youtube or Zoom but Zapier doesn't have it included as Action/Trigger yet. All you have to do is google the specific API you need, create some code in Pipedream and send a webhook towards it. And the great thing about Pipedream: There are over 200apps and 1000s of actions already made as template
Prerequisites
To get started, I recommend you have the following. But anybody could do this:
- A premium Zapier account (since webhooks are premium ony)
- Some basic Zapier knowledge
- Some basic programming language (javascript)
But if you don't have this, there are tons of courses, documents and videos online.
Setup
To get started, we need to do the following things:
- Creating a Pipedream account and start a new workflow
- Creating a new Zap workflow with some sort of trigger
- Making some code
- Sending a webhook test
1. Creating a Pipedream account and starting a workflow
Simply create a free account at pipedream here: https://pipedream.com
Then once done, go to the Workflows section and click New Workflow.

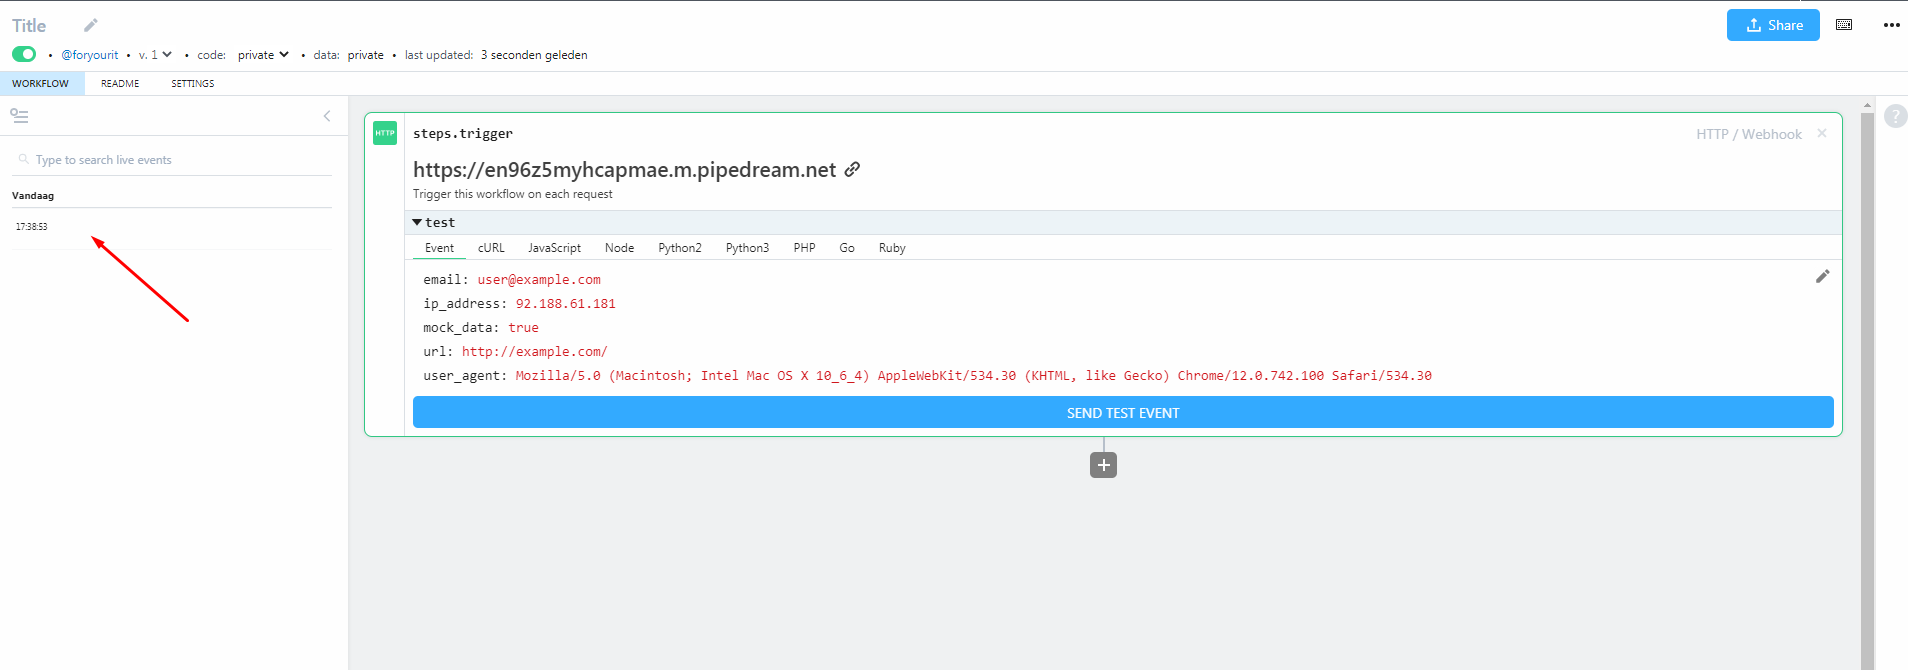
By creating a new workflow, we can now select what kind of Trigger we want (same like Zapier). In this case, we want to use a HTTP/Webhook trigger so select that. Once selected, you will get a unique webhook URL which we can use for our Zapier workflow.
For now continue with the Zap workflow.
2. Creating a new Zap workflow
If you are already used to Zapier then this shouldn't be a problem. Just create a new Zap and give it some trigger. In this case I will use a “Push by Zapier” trigger just for testing.
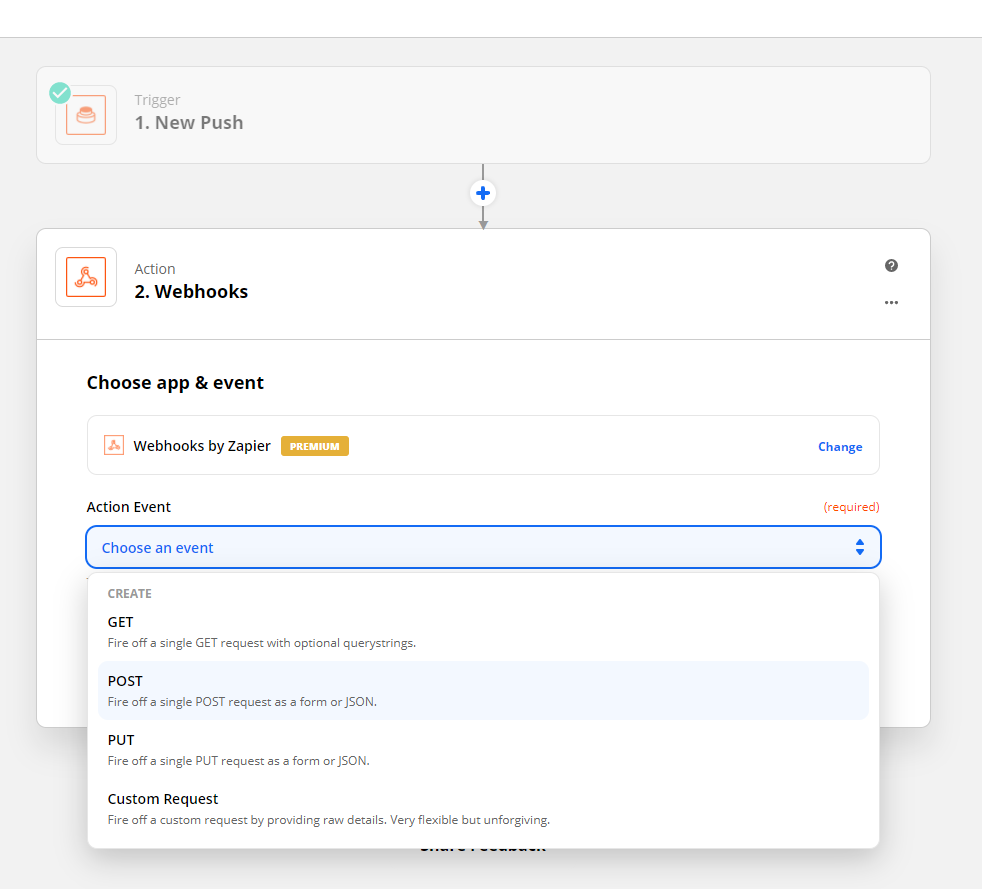
The next would be creating a "webhook by zapier” action. This will allow us to send and retrieve some data with Pipedream.
Since we are going to send data to Pipedream now, we are going to make a POST request.

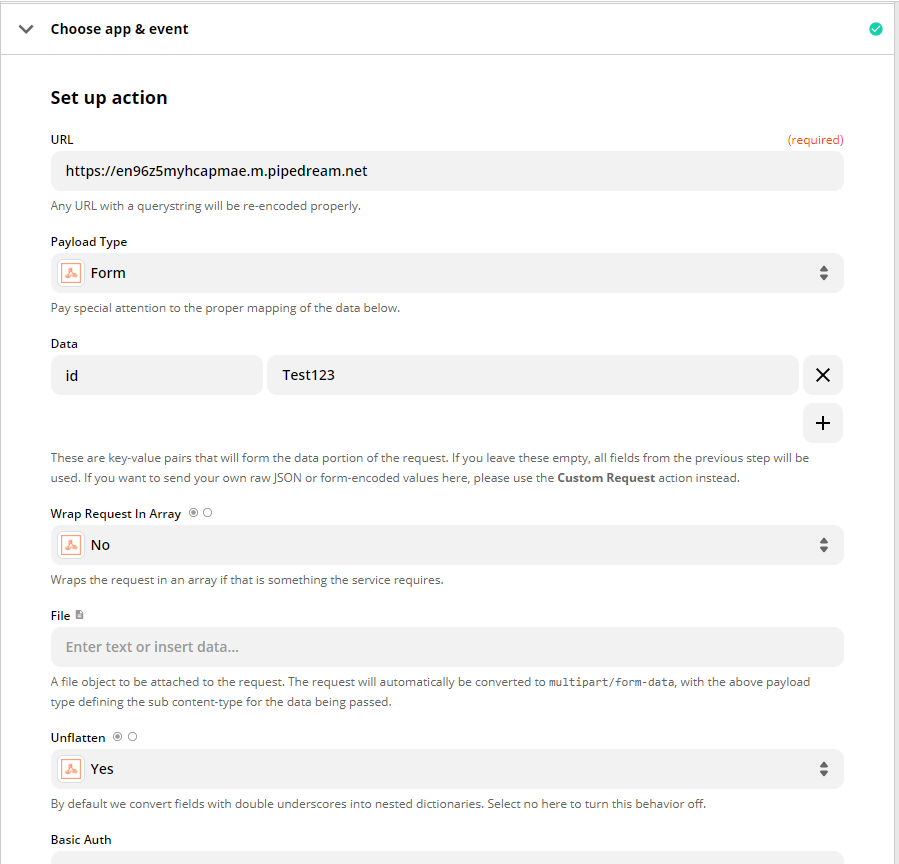
Next up is copying the URL you got earlier at Pipedream and inserting it in the URL section of the Zapier webhook. In this case, let's setup the following options:
- Payload Type: Form
- Data: id - Test123
- Everything else on default settings

Now Save & Continue and give it a test run. Click on Test & Review and once you do that, you should see an action happening on the left side of Pipedream. Once that is the case, let's continue.

3.Making some code
Now we got all basic things setup, we can create some basic code in Pipedream. First of all let's give the workflow a name. You can do this at the left top section.
Now we can add an action (or step) in the pipedream workflow (by clicking the + icon) . This is the same as Zapier and will perform some kind of action. As you will see, there are A Lot of templates available which you can just use of the shelf. In this case we want to keep it simple, and just send back some response to Zapier once we get a webhook.
Choose the Run Node.js code action. Since we want to make it simple, we are basically going to response on a webhook call from Zapier, and add 2 fields. You can do that with the following code:
$respond({
  status: 200,
    body: {
      "id": event.body.id,
      "text": "Well done, we got a response!"
    }
});
A few interesting things you see here:
status
This is an HTTP status code. 200 means its all okay
body
This is the body we return to the Zapier webhook. This we can use again as fields later on in the Zap workflow.
event.body.id
This is an object from the event that happend. In this case, an HTTP POST was the event that happend, and we have sent the id as body data.
Within pipedream you can re-use event objects and step objects. This way you can use data that was created in one step, into another. More information can also be found on the pipedream site.
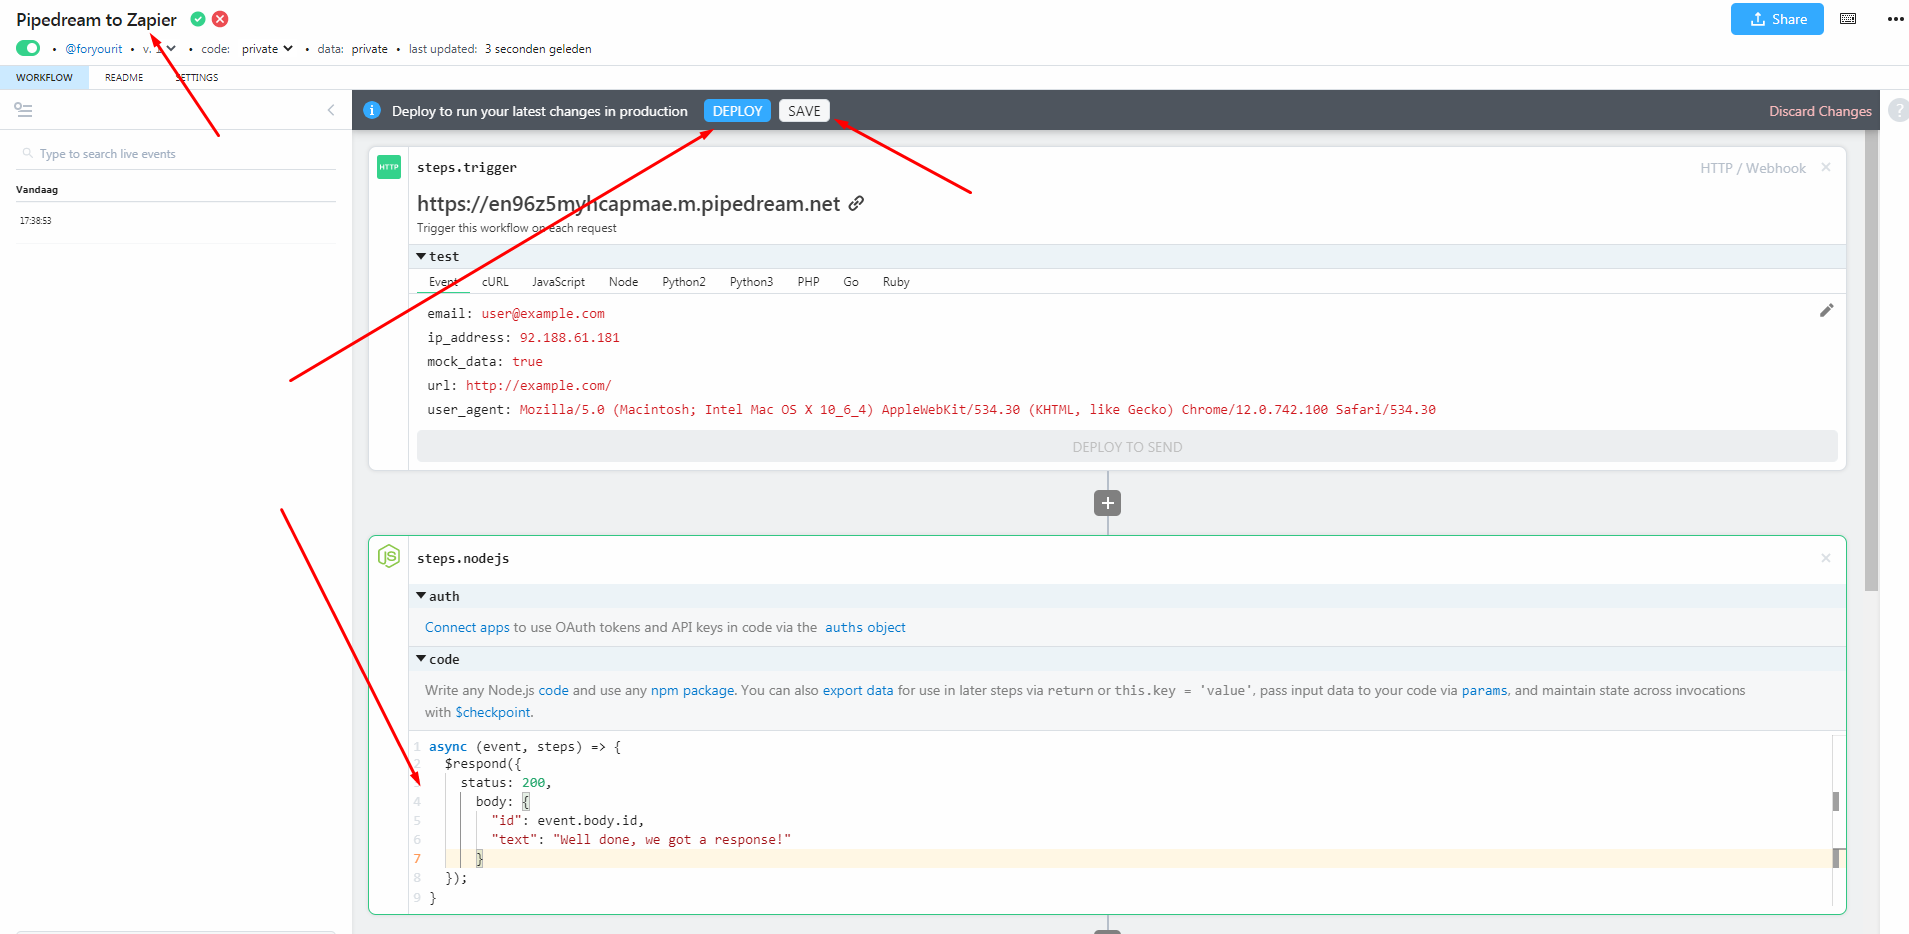
If you followed along, the workflow should looke like this:

Here we see the
- Title
- Save & Deploy
- and first step
The save & deploy each got their own functionality. With the save button you will save any changes that you made in the workflow, but it will not deploy yet.
With the deploy button, you will save & deploy the new workflow which will mean that any trigger will be runned with this new workflow.
Testing
Finally we can Deploy the workflow and run our first test. Go back to Zapier and re-run the Test & Review. You should now get the fields back from Pipedream which we coded in the response, and also see a new event happening at Pipedream.

Yess! We are done ![]()
![]()
With this, the possibilities are basically unlimited. In the next few topics I will show some more possiblities and real life integrations asked here in the community.
Copying my workflow automation
With pipedream you can make workflows public and easily sharable. Feel free to take a look at my automation created with this tutorial:
https://pipedream.com/@foryourit/add-api-s-to-zapier-with-pipedream-p_pWCYg5J
Let me know if you have any questions, and have fun!
Happy automating!
~Bjorn
ForYourIT


