Setting up Zaps as a beginner can be frustrating.
We’ve all been there. Honestly, the more advanced the Zaps, the more potential for an error to pop up. That’s why it’s important to consider how our Zaps are “mapped out” to ensure we set ourselves up for success.
We have tons of users that come into our community looking for assistance, and one of the most common mistakes we see involves mapping fields.
So what is “mapping”?
Essentially, it is how a user sets up their Zap, and connects information being pulled from the trigger to the action.
It’s how your Zap gets from point A to point B. Like if you were to follow a map yourself, it tells that Zap where to go to be successful in reaching its designated location (i.e., information from one Google Sheet to another).
Your trigger is the “when” a Zap is set-off, the action is your “then this will happen” in response to your trigger, and your mapping of fields is your “what” in relation to data being pulled from your trigger to your action.
I find that information makes the most sense when a scenario is given.
Let’s say you’re a local landlord with a few rental properties around your city, and you keep track of tenants in your handy dandy Google Sheets workbook.
You also want to keep track of “Increase Notices” in another Google Sheets workbook, but you’d like to automate it so that when you draft one letter, it also drafts the others simultaneously.
The first step you want to tackle here is to create custom column headers. This is so you can choose a column to pull from the specific data cells from your Tenant List in your trigger.
Now, you’ll want to set up your action. “Create Spreadsheet Row” seems most appropriate for this. This is where we’ll connect the custom column headers from both sheets.
This is done so you can map over each data cell to be replicated in your Increase Notice sheet.
After testing this out, although the trigger is labeled as instant, I found that this Zap works with about a 5-minute delay. Keep in mind, even though while setting up your Zap you’ll be mapping a single sample value, this value is just a representation of what will be there in the future.
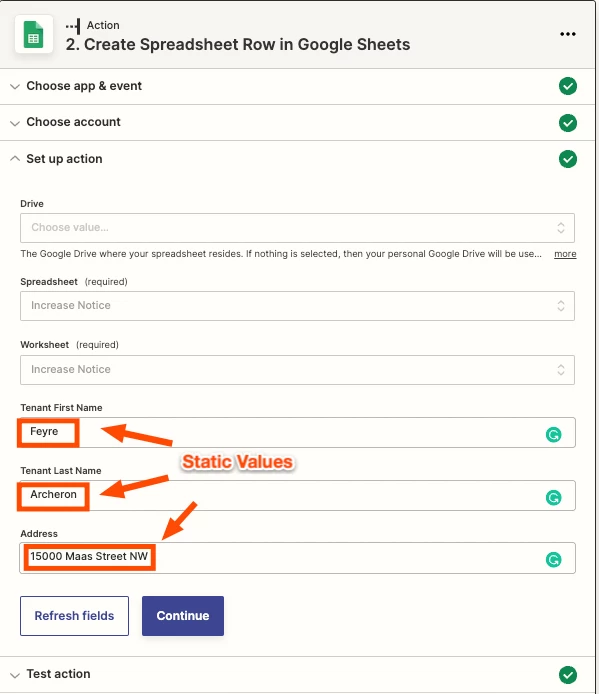
The opposite of mapping fields would be typing in a static value. If you enter a static value, the same value that you enter will remain constant every time the Zap runs.
Thus, why dynamic values (mapping fields) is the best route when you want to set up a Zap with ever-changing data.


If you are interested in learning more, we have an excellent resource video that goes a bit more in-depth.


