Best answer

How to create a CSV from form data and add its link to a Google Calendar event using Zapier?

  • 23 February 2024
  • 25 replies
  • 142 views

Userlevel 1
Badge

Hi there,

I'm trying to build a complex zap and I'm not even sure that it's possible in the way I imagine it. So this zap is supposed to do the following things:

1) I have a form in youcanbookme that I'm are using for confirming booking with clients and there is a field "Hints" there where contact info is being put in like this: First name, last name, e-mail address First name, last name, e-mail address First name, last name, e-mail address The number of contact infos varies.

2) Filling out this form also triggers creating a calendar event in google calendar.

3) When those steps are done I want a zap to get those contact infos and create a downloadable csv (a link). And the csv should have the headers "Vorname", "Nachname", Startdatum", "E-Mail".

4) Then the zap should find the calendar event created by youcanbookme and update it so that the downloadable csv link is in the description of the calendar event. But it shouldn't overwrite the infos that where already in the description. I tried building a zap but I didn't get very far since I don't know how to create a csv link and I don't know how to format the data in the hints field so that it's in columns for the csv.

Is it possible to build something like this?

icon

Best answer by SamB 15 April 2024, 12:11

View original

25 replies

Userlevel 7
Badge +11

Hi @Revolution2019! 👋

You could try using an app like EasyCSV to create the CSV file that has a Create CSV File action which could generate a CSV file. Or perhaps you could create a spreadsheet with the information and generate a link to a CSV version of it using the workaround outlined here:


You’ll likely need a Formatter action to format the contact information that needs to be sent to the action creating the CSV file. But without seeing how it’s currently being output in that Hints field it’s a little difficult to give more specific advise on that. If you need any further help on that can you share a screenshot showing an example of how that contact information appears in the Hints field within the Zap? Please remove/hide any private information (like names, emails, addresses etc.) from any screenshots before sharing.

For updating the description of the Google Calendar event, in the Description field on the Update Event action I’d suggest selecting both the existing description for the event as well as the link for the CSV file that’s generated. That way when the event is updated it’s previous description will be added along with the link to the CSV file.   

Looking forward to hearing from you on this!

Userlevel 1
Badge


You’ll likely need a Formatter action to format the contact information that needs to be sent to the action creating the CSV file. But without seeing how it’s currently being output in that Hints field it’s a little difficult to give more specific advise on that. If you need any further help on that can you share a screenshot showing an example of how that contact information appears in the Hints field within the Zap? Please remove/hide any private information (like names, emails, addresses etc.) from any screenshots before sharing.


I can’t post a screenshot since the hints field only consists of private information 😅 But it looks like this

first name last name email position

first name last name email position

first name last name email position

When I try using Formatter → split text together with the EasyCSV it doesn’t really work. I’m using space as a separator but I guess it doesn’t work when you use a new line since it puts together the last word of the first line and the first word of the second line etc.


Userlevel 1
Badge

Sorry, UPDATE: 

So I guess I solved the problem I described above. New problem is that EasyCSV suddenly only recognizes one of the values I put in and shows the other values as being blank which they are not. 


Userlevel 7
Badge +11

Glad to hear you were able to solve the previous issue - great work on that, @Revolution2019! 🙌

On the second issue, I did some digging and it looks like the Create CSV File action is designed to handle a single row of data not multiple rows. But I found a guide written by EasyCSV on how to create a multi-row CSV file in Zapier which appears to be what you’d need to follow for this: 


Can you give the steps in that guide a try and let me know how it goes?

Userlevel 1
Badge

Glad to hear you were able to solve the previous issue - great work on that, @Revolution2019! 🙌

On the second issue, I did some digging and it looks like the Create CSV File action is designed to handle a single row of data not multiple rows. But I found a guide written by EasyCSV on how to create a multi-row CSV file in Zapier which appears to be what you’d need to follow for this: 


Can you give the steps in that guide a try and let me know how it goes?

Hi,

sorry for the delay

I tried using the solution you postet but it doesn’t work as I’m getting an JSON error.

Also I’m not sure if this solution really applies to my problem since in the video he’s talking about line items. However in the data coming from youcanbookme (my trigger) there are no line items. And I only have one single field that contains names and email addresses so I con’t think I can follow the solution correctly.

I’ve attached some screenshots (the name shown is my own, so no worries there)


Userlevel 7
Badge +11

Thanks for giving that a try @Revolution2019. Sorry it didn’t work as hoped.

Comparing the screenshot of the Formatter action with the example in the guide I shared previously it looks as though the line item data needs to be separated by // instead of a comma:
59fc472a4a576bcab28af92c620fcf42.png

Can you try changing the commas in the Formatter action to // instead and retest both the Formatter and Webhooks actions to see if that gets it working?

Userlevel 1
Badge

You’re right, I changed the separator and the POST step worked now. However I’m not sure what the next step is supposed to be now? Because the CSV that it creates isn’t correct. It’s got the correct headers but not the correct info below. All of the information is in every cell below the headers and there is only one row.

What am I supposed to do now?


Userlevel 1
Badge

@SamB Do you have any other ideas?

Userlevel 7
Badge +11

Apologies for missing your message here previously, @Revolution2019!
 

Ah, I think see the issue. Looking back at your previous screenshot it seems that the same (Hints) field is selected for the Vorname, Nachname and E-Mail - sorry for not picking up on that previously!

You’ll need to instead select the relevant fields being output by the Formatter (Split Text) action that was used to split the values in the Hints fields up into separate fields:

eab5f8355037e9be030334f779e92ce7.png

Can you give that a try and let me know if that gets the information added to CSV correctly?

Userlevel 1
Badge

Apologies for missing your message here previously, @Revolution2019!
 

Ah, I think see the issue. Looking back at your previous screenshot it seems that the same (Hints) field is selected for the Vorname, Nachname and E-Mail - sorry for not picking up on that previously!

You’ll need to instead select the relevant fields being output by the Formatter (Split Text) action that was used to split the values in the Hints fields up into separate fields:

eab5f8355037e9be030334f779e92ce7.png

Can you give that a try and let me know if that gets the information added to CSV correctly?

Hi @SamB I’m not sure what you mean. The line-item to text step is the step after the trigger. There is no other formatter output that I could put in that step. And the previous tries to use the split formatter didn’t split the data from the hints field correctly.

Userlevel 7
Badge +11

I’m so sorry for the confusion caused here @Revolution2019. The other formatter action step I was referring to was the Formatter (Split Text) action you shared a screenshot of previously, which I didn’t realise was no longer working. 

Looking again at the example format of the data in the Hints field (first name last name email position) I think you’d need to use a code step to have the first name, last name, email and position values for each new line grouped together by type. That will then allow you to select the values in the subsequent formatter action. 

I used our Code with AI feature to generate some Python code to create the necessary line-items. Here’s the code I used:

# Split the input data by new line to get individual user data
user_data = input_data["userData"].split("\n")

# Initialize empty lists for each user data type
first_names = []
last_names = []
emails = []
positions = []

# Loop through each user data
for data in user_data:
# Split the data by space to get individual values
values = data.split(" ")
# Append the first value to first_names list
first_names.append(values[0])
# Append the second value to last_names list
last_names.append(values[1])
# Append the third value to emails list
emails.append(values[2])
# Append the fourth value to positions list
positions.append(values[3])

# Create a dictionary with keys as user data types and values as the corresponding lists
output = {
"first_name": first_names,
"last_name": last_names,
"email": emails,
"position": positions,
}

For the userData input field you’d select the Hints field from the YouCanBookMe trigger
52be357def969464bb1c8157f4334d2e.png

That should then allow you to select the relevant line items containing the sets of each type of user data in the Formatter (Line-item to Text) action:
a18e17787d8d1e27254838f1f6522685.png

Can you give the above a try and let me know if that fixes it?

Userlevel 1
Badge


I used our Code with AI feature to generate some Python code to create the necessary line-items. Here’s the code I used:

For the userData input field you’d select the Hints field from the YouCanBookMe trigger


That should then allow you to select the relevant line items containing the sets of each type of user data in the Formatter (Line-item to Text) action:
a18e17787d8d1e27254838f1f6522685.png

Can you give the above a try and let me know if that fixes it?

@SamB Sorry for the late reply! The code worked, however it only parses the “first” first name, last name, e-mail and position. It doesn’t get the rest of the data. Or do I need to create completely different next steps after running the code?

Userlevel 7
Badge +11

No worries @Revolution2019! 🙂

That’s very strange. Can you share screenshots of the output from the Code step, as well as the current set up of the Formatter and Webhooks actions? I’d like to take a closer look at those to better identify what’s preventing it from picking up the rest of the information.

Keen to help get to the bottom of this so will be keeping an eye out for your reply!

Userlevel 1
Badge

No worries @Revolution2019! 🙂

That’s very strange. Can you share screenshots of the output from the Code step, as well as the current set up of the Formatter and Webhooks actions? I’d like to take a closer look at those to better identify what’s preventing it from picking up the rest of the information.

Keen to help get to the bottom of this so will be keeping an eye out for your reply!

@SamB Sure, I attached the screenshots :)


Userlevel 7
Badge +11

Thanks so much for sharing those additional screenshots here @Revolution2019.

It looks like there’s an issue with the Code action as it’s only outputting one set of data instead of multiple line items:
9be222afceda2da1c638b188028050e8.png

Can you confirm whether the Hints field was selected for the input on the Code action or did you manually type in the user data like I’d done on my example?

It should look something like this:
a351d995a07154316f2711e59c552824.png

If you did select the Hints field in that Code action, can you share a screenshot showing how the data in that field appears on test section of the YouCanBookMe trigger: 
4afd8a981131d33f6d263a6ff7fd0c53.png
Seeing how the data appears in the Hints field will help me to better see if there’s any nested line items or whether it’s just text. And help me to determine if any changes need to be made to the Code action to get it process the rest of the data in that Hints field correctly.

Once we’ve got this part sorted out, the data should then be sent over to EasyCSV correctly! 

Userlevel 1
Badge

@SamB Yes, I can confirm that the Hints field was selected for the input on the Code action.

The output for youcanbookme looks like this 


This post has been edited by a moderator to remove personal information. Please remember that this is a public forum and to remove any sensitive information prior to posting.

Userlevel 7
Badge +11

Thanks for sharing that @Revolution2019, I can see what’s causing this now! 

The different contact information isn’t separated by new lines as I originally thought. So I’ve used the AI feature to generate some different code which will allow a list of the different contact information that’s separated by spaces and output them in separate line items:

# Get the user data from the input
userData = input_data["userData"]

# Split the user data into a list of words
words = userData.split()

# Initialize empty lists for each type of data
firstNames = []
lastNames = []
emails = []
positions = []

# Iterate over the words in the list
for i, word in enumerate(words):
# If the index is divisible by 4, it means it's the first name
if i % 4 == 0:
# Append the word to the first names list
firstNames.append(word)
# If the index is 1 more than a multiple of 4, it means it's the last name
elif i % 4 == 1:
# Append the word to the last names list
lastNames.append(word)
# If the index is 2 more than a multiple of 4, it means it's the email
elif i % 4 == 2:
# Append the word to the emails list
emails.append(word)
# If the index is 3 more than a multiple of 4, it means it's the position
elif i % 4 == 3:
# Append the word to the positions list
positions.append(word)

# Initialize an empty list for the output
output = []

# Iterate over the range of the length of the first names list
for i in range(len(firstNames)):
# Create a dictionary with the first name, last name, email and position
# The index is used to get the corresponding values from the lists
item = {
"First Name": firstNames[i],
"Last Name": lastNames[i],
"Email": emails[i],
"Position": positions[i],
}
# Append the dictionary to the output list
output.append(item)

# Create a dictionary with the key "output" and the value as the list of dictionaries
output = {"output": output}

I’ve tested that code with multiple contact details that are separated by spaces, instead of new lines:
223fa5bafe5f39891a4e154fe69b5433.png

And it grouped the contact details into separate line items:
aa4e9ffab6e0a633ebe274d86a32822e.png

Can you try updating the code as shared above and let me know if that fixes it?

Userlevel 1
Badge

@SamB Yes that worked! Thanks!

But what d I do with the post in webhooks step after that? When I add all three output items I get an JSON error

Userlevel 7
Badge +11

Yay! I’m so pleased that got it working, @Revolution2019! 😁

I’ve been looking back through the screenshots here and wonder if the error could be due to the value in the Separator field on the Formatter action.

Looking at the latest screenshot of the set up of the Formatter action it appears it’s now using /// as the Separator:be643a3b2e783a4fe85223af74cfc5ef.png
But in the example in the tutorial it’s using three pipes | | | in that field: 
63a83e452e8876b2b370c975968ccd48.png

Can you try that changing the separator to the three pipes instead, then test the Formatter and Webhooks actions again. 

If it doesn’t work, can you share the full JSON error that it’s showing, that should help me to better identify what’s causing the error. Thanks! 🙂

Userlevel 1
Badge

@SamB I changed the separator to three pipes but Im getting the same error :/


Userlevel 7
Badge +11

Sorry to hear it’s still not working @Revolution2019.

It looks like you’ve selected the individual Output Item fields, but in the EasyCSV tutorial the Output Text field was selected:
183695158f7acc26ed542e85816efef3.png

Can you select the Output Text field instead as that should contain all the values. Then change the name of data_1 to data, and get rid of the data_2 and data_3 fields to match the set up shown in the above screenshot.

Please give that a try and let me know whether that fixes it. 🙂

Userlevel 1
Badge

@SamB yes it created a cvs now. But the data isn’t displayed correctly. There’s just on header and all the information is in the same column below


Userlevel 7
Badge +11

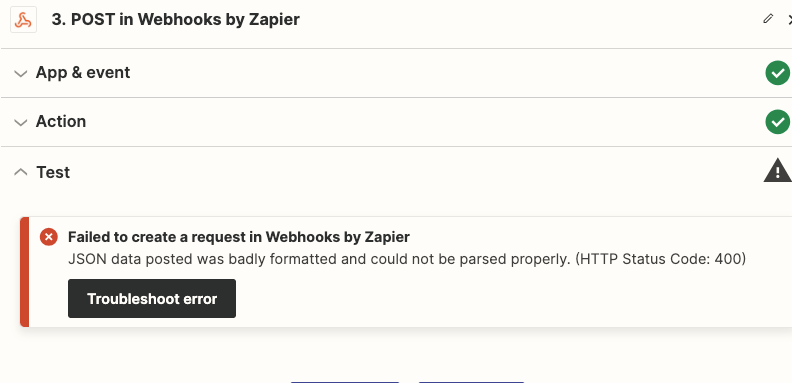
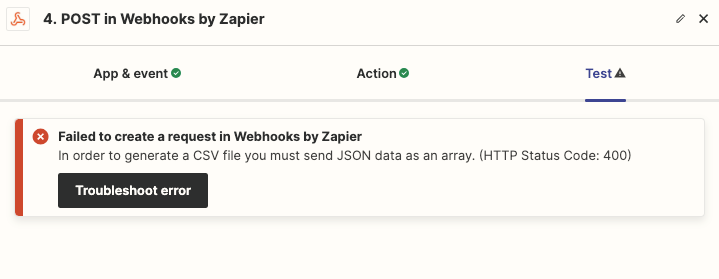
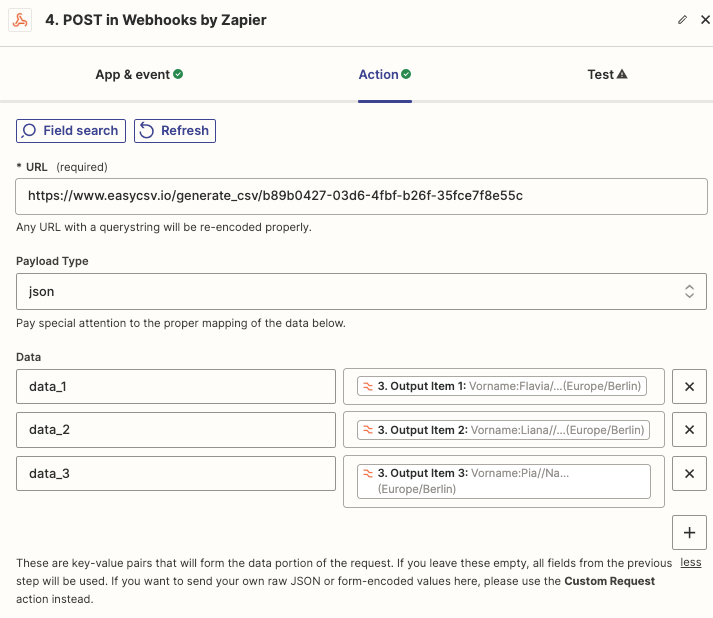
Thanks for letting me know @Revolution2019. I’ve just set up an account with EasyCSV following their tutorial to more fully test this on my end and I couldn’t get it working right either!

If you’re up for it, I’d suggest trying a different approach. I’ve just gone through and tested this approach with Google Sheets and Google Drive and was able to generate a new spreadsheet, add the data to it, obtain a CSV file and add it to the description of the event in Google Calendar, it’s not quite as efficient as involves an extra action than you would have needed when using EasyCSV, but I’ve tested it fully and know it definitely works!

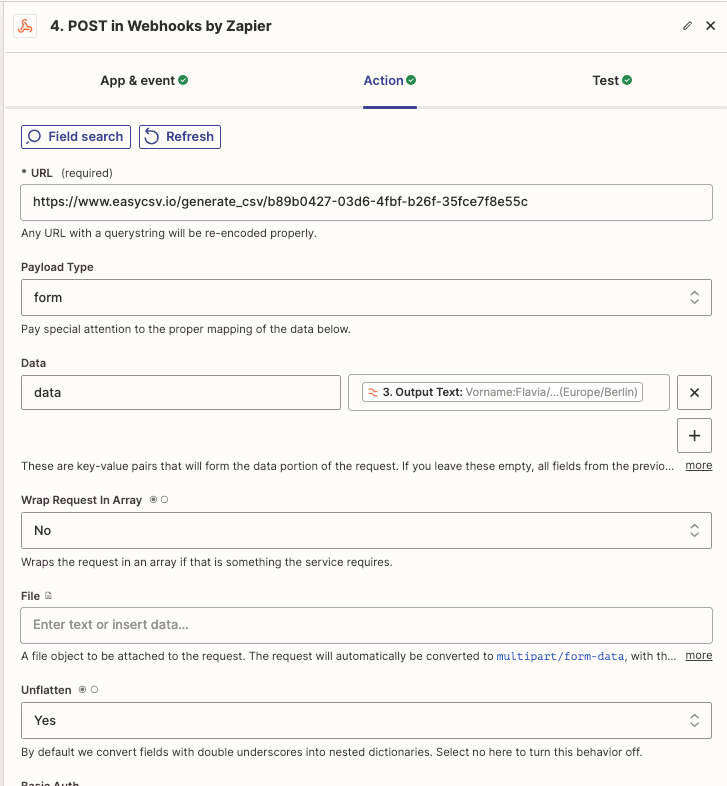
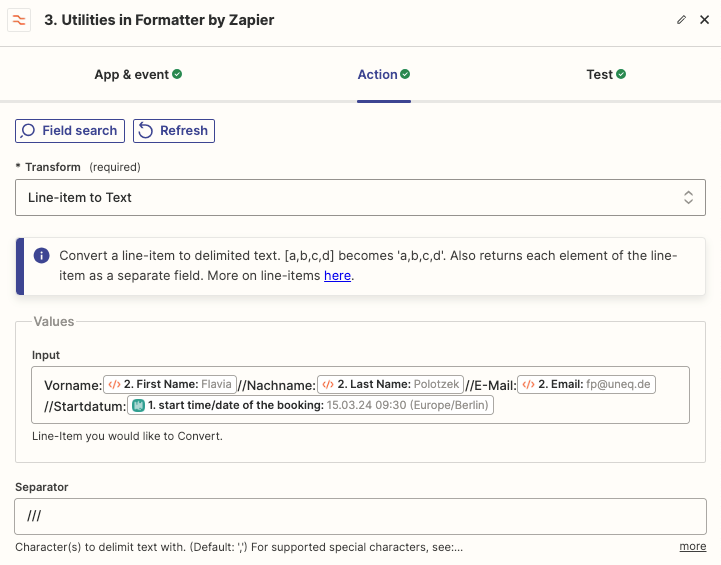
In Zap there would need to be two Google Sheets actions instead of the Formatter and Webhooks action. And it use a could of search actions - one to find the CSV file and another to find the event in Google Calendar so it can be updated.

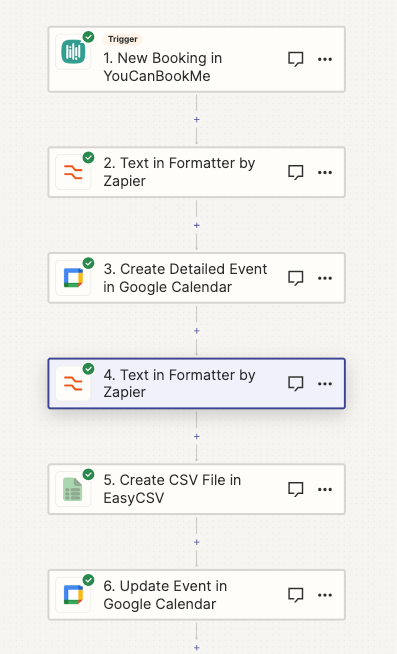
Here’s an outline of the trigger and action steps involved:
3803a9a62b09b268898f18446f39435e.png

The first Google Sheets action would be set up to create a blank spreadsheet with the necessary headers. For this example I’ve just used the booking reference for the file name so that we can easily find it later:
0611d6ca1bfdb1d210073c1c7be9636b.png

On the second Google Sheets action choose the Custom value option and select the ID from the previous Google Sheets action like so:

3ae94ffcb6d88712b8407265076b6bb3.png

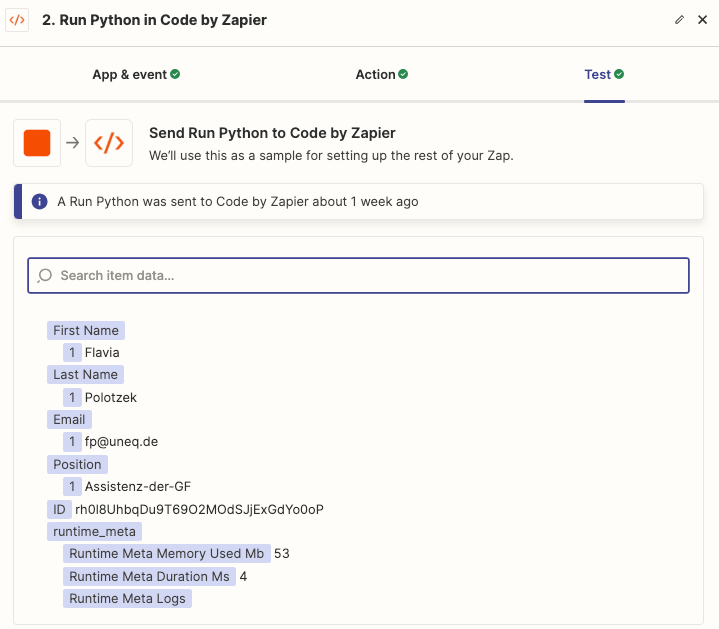
Then you’d select the relevant information from the YouCanBookMe trigger and Code actions like so:
461741223d9a8d306a24985d1b659ecd.png

This will allow the Zap to add the information into separate rows on the spreadsheet the previous action created:
726132f101339ebf81ec6431f42dd618.png

Next, to get the CSV file you’ll need to use a Find a File (Google Drive) to locate the spreadsheet that was created and obtain the file object. As I used the booking reference for the spreadsheet’s title I’ve selected that for the File Name field here:
e31e99196c6c89101617577a876c6f5f.png

This action will output the file in various formats, including CSV:
41e514b5f4831503ca26cb03e01f8c80.png

Now, in terms of adding the CSV file to the event, you’d need a Find Event (Google Calendar) action to find the event followed by an Update Event (Google Calendar) action to update it.

For the Find Event, as I’d created an event that used the booking reference for the title I just selected the booking reference for the Search Term field:
d5090be7744843b24c9b57c0dacb9731.png

NOTE: I’m not sure how the events are titled in your calendar so you might need to adjust what’s in that search term field to match the format of the event titles in your calendar.


In the Update Event action, select the Custom value option and select the ID of the event that’s found by the previous Google Calendar action, for example: 
25e8b7087f888c9eef27b49db174a1ab.png

This will ensure that the Zap will update the correct event.

Then select the existing description so that’s it’s not overwritten by the Zap. And add the CSV file to that field as well:
c2c5a6221311075af0e1c3afacf6a858.png

That should then update the event details providing a link that when clicked downloads the CSV file:

ca4e173f54f1c65bf1f2b7c68ed73179.png

If you give that approach a try and run into any issues or if anything is unclear do let me know - really keen to help get this up and running! 

Userlevel 1
Badge

@SamB Yes that worked! Thank you so much! :)

We’ll now test this in our day to day business - if I have any questions to this in the future, can I just respond here or do I need to open a new topic?

Userlevel 7
Badge +11

YAY! 🎉🎉🎉 That’s such fantastic news, @Revolution2019! I’m so happy that worked as hoped.

It’s quite a long thread here so it might be best to open a new topic to troubleshoot any new issues. You can always include a link to this topic though, so any folks that stumble across it can reference the previous conversation here for more context.

Best of luck with the tests, I look forward to hearing how they go! 🤗

Reply