I have a google sheet populated with all of the Sales Data I need to complete a New Sale
Customer Details
Pricing
Duration of Contract
Etc Etc.
What I would like to happen is for Zapier to
Open a new envelope in DocuSign
Populate a Contract Template in Docusign with all these variables
Send this envelope on to the Client and our MD for signing
How do I do this? I have completely drawn a blank and it feels as though it should be very simple!
I would like the trigger for this process to be when the New Sales data is entered into our system. We use a Google form for this.
Best answer by Troy Tessalone
@ABABAB
Feedback from ChatGPT
Configuring a DocuSign template with custom fields that can be used with Zapier involves a few steps. Zapier allows you to automate tasks between different web apps, including DocuSign, by creating workflows triggered by certain events. In this case, you want to use custom fields in your DocuSign template. Here's a step-by-step guide on how to set it up:
Step 1: Create a DocuSign Template
Log in to your DocuSign account.
Go to the Templates section.
Click "Create Template" or select an existing template to edit.
Step 2: Add Custom Fields to the Template
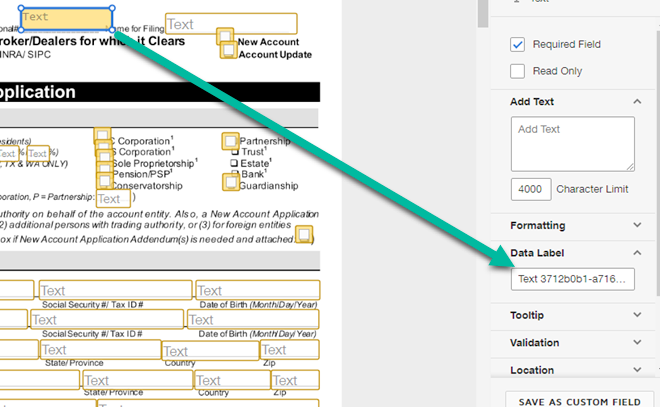
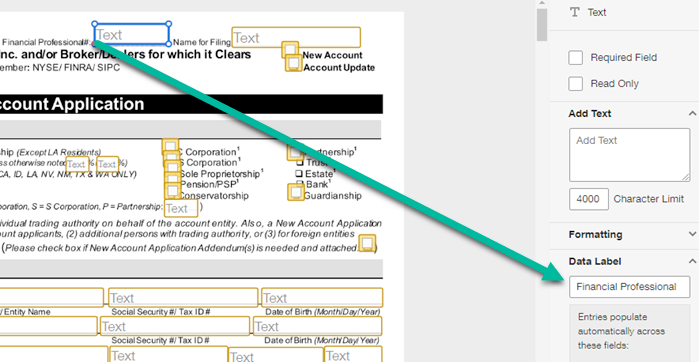
Within the template editor, drag and drop the custom fields you need onto the document. These can be text fields, checkboxes, date fields, or any other field type that suits your needs.
Click on each custom field to configure its properties. Ensure you give each field a unique name and set any necessary validation or formatting options.
Save the changes to your template.
Step 3: Integrate DocuSign with Zapier
Log in to your Zapier account or create one if you haven't already.
Click "Make a Zap" to create a new Zap (Zapier automation).
For the trigger app, search for and select the app or service that will trigger the use of your DocuSign template. This could be a CRM, email service, form submission tool, etc.
Configure the trigger event. This will depend on your specific use case and the app you selected.
Follow the Zapier prompts to test and set up your trigger.
Step 4: Configure the DocuSign Action
For the action app, search for and select "DocuSign."
Choose the action event you want to perform. In this case, you might select "Create Envelope from Template."
Connect your DocuSign account to Zapier by providing the necessary credentials.
Configure the template to use. Choose the DocuSign template you created earlier.
Map the custom fields from your trigger app to the corresponding custom fields in the DocuSign template. This is where you link the data from your trigger event to populate the custom fields in your document.
Set up any additional actions or conditions as needed for your workflow.
Test the Zap to make sure it's working as expected.
Turn on the Zap to start automating the process of populating and sending documents with your custom fields.
That's it! With these steps, you've configured a DocuSign template with custom fields that can be populated and sent using Zapier whenever a specific trigger event occurs in another app or service. Make sure to adjust the details according to your specific needs and the exact fields and data you want to use.
This post has been closed for comments. Please create a new post if you need help or have a question about this topic.
Thanks for this - but the options in Create Signature Request are very limited, and do not contain any fields for altering the content of the document - eg, customising my contract template in Docusign.
I feel like this will be something that lots of people require so there must be a solution out there!
Configuring a DocuSign template with custom fields that can be used with Zapier involves a few steps. Zapier allows you to automate tasks between different web apps, including DocuSign, by creating workflows triggered by certain events. In this case, you want to use custom fields in your DocuSign template. Here's a step-by-step guide on how to set it up:
Step 1: Create a DocuSign Template
Log in to your DocuSign account.
Go to the Templates section.
Click "Create Template" or select an existing template to edit.
Step 2: Add Custom Fields to the Template
Within the template editor, drag and drop the custom fields you need onto the document. These can be text fields, checkboxes, date fields, or any other field type that suits your needs.
Click on each custom field to configure its properties. Ensure you give each field a unique name and set any necessary validation or formatting options.
Save the changes to your template.
Step 3: Integrate DocuSign with Zapier
Log in to your Zapier account or create one if you haven't already.
Click "Make a Zap" to create a new Zap (Zapier automation).
For the trigger app, search for and select the app or service that will trigger the use of your DocuSign template. This could be a CRM, email service, form submission tool, etc.
Configure the trigger event. This will depend on your specific use case and the app you selected.
Follow the Zapier prompts to test and set up your trigger.
Step 4: Configure the DocuSign Action
For the action app, search for and select "DocuSign."
Choose the action event you want to perform. In this case, you might select "Create Envelope from Template."
Connect your DocuSign account to Zapier by providing the necessary credentials.
Configure the template to use. Choose the DocuSign template you created earlier.
Map the custom fields from your trigger app to the corresponding custom fields in the DocuSign template. This is where you link the data from your trigger event to populate the custom fields in your document.
Set up any additional actions or conditions as needed for your workflow.
Test the Zap to make sure it's working as expected.
Turn on the Zap to start automating the process of populating and sending documents with your custom fields.
That's it! With these steps, you've configured a DocuSign template with custom fields that can be populated and sent using Zapier whenever a specific trigger event occurs in another app or service. Make sure to adjust the details according to your specific needs and the exact fields and data you want to use.
We're celebrating the Zapier builders making AI transformation happen. Winners get a published story on zapier.com, a trophy, $5,000 cash, and a feature at ZapConnect. Nominate yourself or a peer by July 24th, 2026.

")