How to add files to specific Google Drive folders based on the current month

  • 3 September 2020
  • 5 replies
  • 1265 views
How to add files to specific Google Drive folders based on the current month
Userlevel 7
Badge +11

The Challenge

I want to automate scanned expenses receipts.

The folder structure:

  • expenses inbox
  • 2020
    • 1. Quarter
      • 01_Jan
        • 200105_expense.pdf
    • 2. Quarter
    • 3. Quarter
    • 4. Quarter

My desired workflow:

  • The file with the naming structure YYMMDD_expense.pdf gets added to the expenses inbox folder.
  • A zap would look for the right Year, Quarter and Month and move that file into that folder.

A Proposed Solution

One way to tackle this is to use a Lookup Table (more info) to output the proper folder, depending which month the Zap is triggering in. Then you can use a Formatter step to get you the YYMMDD format, which you can use as the title of the PDF.

The tricky thing about lookup tables is that the incoming value has to be an exact match, so you’ll need the date to show you just the month — the Formatter can do this. 

NOTE: You can use any format (Jan, January, 01, etc) as long as what your Formatter outputs matches the value in your lookup table. This will make more sense as you keep reading below.

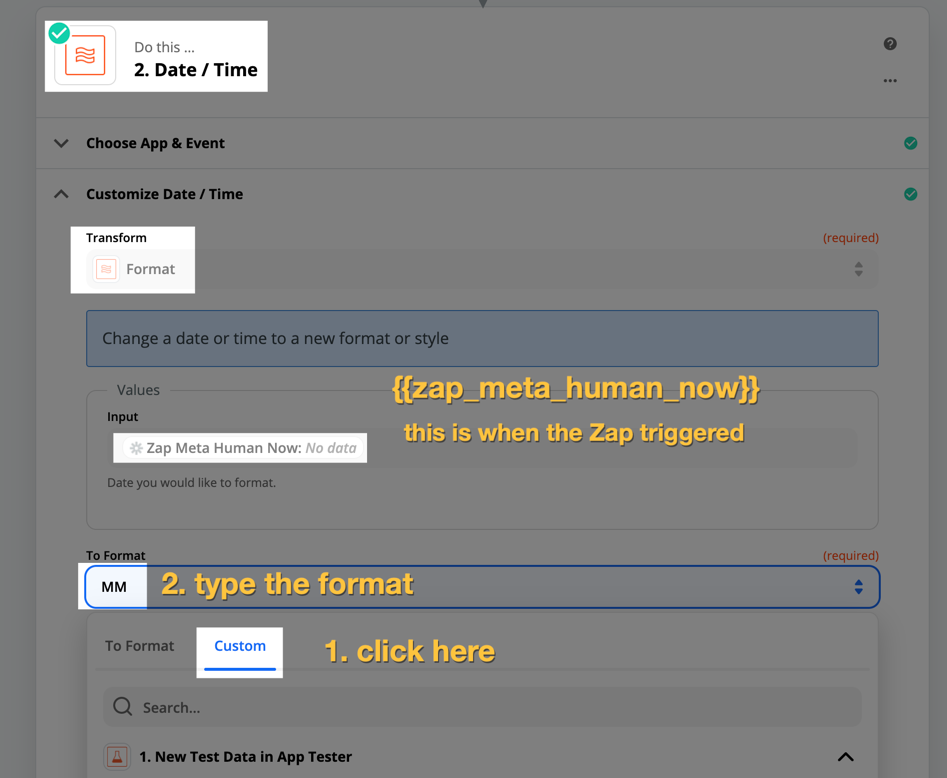
In the image above, you’ll see that {{zap_meta_human_now}}. This is to get the timestamp (more info) of when the Zap triggered, which you then want to format into just MM (this is what I meant in the note above).

Next, you’ll use that output in a lookup table, matching the month (the value on the left — 09 and 10 below) with the ID of the corresponding folder (the value on the right — the-long-ID-string-for-this-folder below).

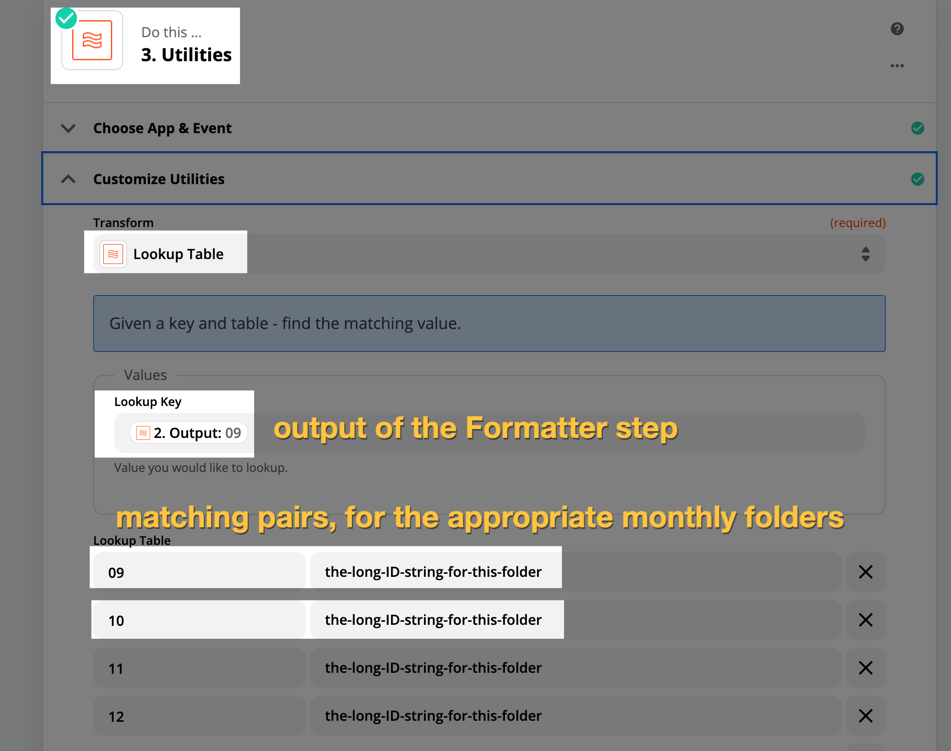
TIP: You can get folder ID by clicking on the folder in Google Drive and copying the very last part of the URL — it should look something like 1UOslWD5txi82ST2eY7ffBxD_bOdfa0yN.

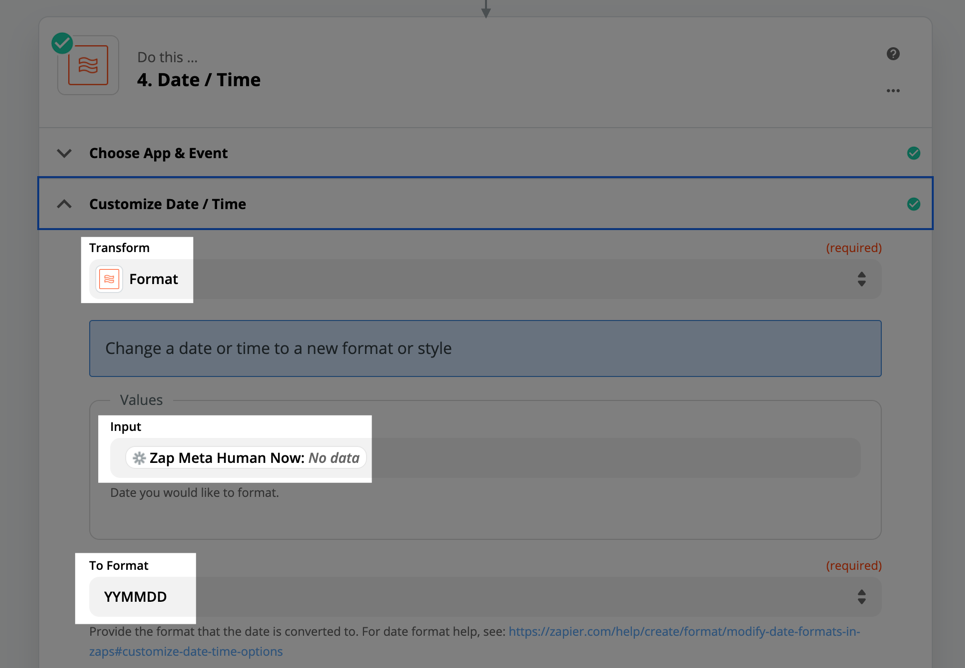
Then for the file name you would do something similar to what I showed above, to get you MM. Except this time you’ll format to YYMMDD.

And finally, you would map the output of the lookup tables into the Google Drive step, using the Custom option instead of selecting a folder from the dropdown...

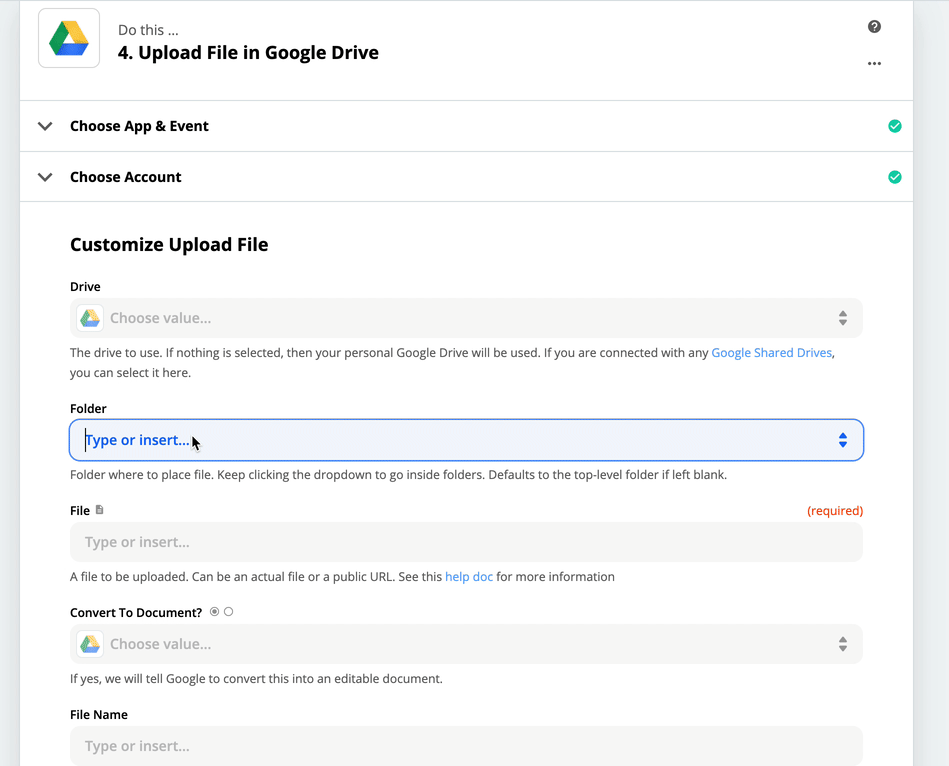
...then creating the title by combining the output of your Formatter step with some typed text:

Hopefully that helps some of y’all out! 

If anyone has an alternative method to this, I’d love to hear it!


5 replies

Userlevel 7
Badge +10

Great stuff @nicksimard !

@nicksimard Hi was wondering what’s the first step? Scheduler?

Userlevel 7
Badge +11

Great question, @MellowSong!

In Nick’s example they appear to just be using our internal tester app that provides fake content for testing purposes. The trigger app and action you’d need to use for your Zap would depend on the type of workflow you’re looking to apply this functionality to.

For example, if you wanted your workflow to start when new expense receipt files are emailed to your Gmail inbox, you could use the New Attachment to trigger the Zap on those attachments. Then you’d follow that up with the Formatter and Google Drive actions outlined above.

Hope that helps to clarify! :)

So you have to use a lookup table for IDs?  You can’t set the ID in the custom field and append a subfolder? 

Like:

<driveFolderID>/<sub-FolderName>

To automate scanned expense receipts with an alternate method, you can utilize Zapier's built-in date and path formatting capabilities. Here's a step-by-step guide:

  1. Set Up the Trigger:

    • Use the "New File in Folder" trigger in Zapier to detect when a new expense receipt (PDF) is added to the "expenses inbox" folder.
  2. Extract Date Information:

    • In the next step, use a Formatter to extract the date from the filename (e.g., 200105_expense.pdf). Use the "Text" action to extract the "YYMMDD" format.
  3. Calculate Year, Quarter, and Month:

    • After extracting the date, use a Code by Zapier step to calculate the Year, Quarter, and Month from the "YYMMDD" format using custom JavaScript code.
  4. Construct the Destination Folder Path:

    • Now, using the "Year," "Quarter," and "Month" obtained in the previous step, create a destination folder path. For example, you can use the "YY/MM Month" structure to represent the folder hierarchy.
  5. Move the File:

    • In the final step, use the "Move File" action to move the scanned expense receipt from the "expenses inbox" folder to the calculated destination folder path.

💡 Expert Help:

  • If you encounter any difficulties during the setup or need further assistance, you can reach out to Zapier support or consult Zapier experts for personalized guidance and solutions.

Reply