
Most of the apps at Zapier are built by developers using the Platform UI, which is a visual builder that allows you to get started quickly by connecting to your API and get your app out there to end-users: https://platform.zapier.com/build/add
In order to connect any software to the Zapier Platform (and all 5000+ other apps supported by the Platform), that software will need to have a publicly-accessible API which you can use to build your Zapier Integration. For an intro to APIs in general, check out: https://zapier.com/learn/apis/
This guide teaches you how to create an example GitHub integration in 15 minutes or less with Zapier Platform UI. Explore Zapier's core features, learn how to add OAuth v2 authentication, triggers, and actions to an integration, and build a working integration. You'll then be ready to use the Zapier visual builder to make an integration for your own app.
Ready to build your example GitHub integration on Zapier? Here’s what you need:
- A Zapier account
If you haven’t used Zapier before, create a free Zapier account. You could also set up this example GitHub Zap that will email you with new GitHub issues, to see how the new integration you’ll set up will work for end users.
- A GitHub Account
You also need a GitHub account with at least one repo and issue. Since this tutorial will walk you through building an example GitHub integration, you need a GitHub account to test the integration. Have your GitHub username and password handy to authenticate your GitHub integration on Zapier once we’ve set up the authentication method, along with the name of the repo you will use to test the integration.
You may also want to keep the GitHub API documentation open in another tab for reference—though we’ll guide you through everything you need to build the integration.
Now you’re ready to build a Zapier integration!
Add a new integration
Open the Zapier Platform and click Start a Zapier Integration. Add a name for this example integration like My GitHub Example, then add a description and a logo, perhaps GitHub’s for this example integration. Below that, answer a few questions about the integration, then click create.
Well done! Now, let's make this new integration do some stuff.
Handling authentication
The first thing to set up is authentication. Your integration defines how Zapier’s Platform authenticates with the API and what data needs to be collected from users to allow access to their accounts. Zapier supports most popular authentication schemes, including basic auth with username and password, API key auth, digest, session, and OAuth v2.
Many Zapier integrations use OAuth v2 authentication to connect user accounts, including Zapier's built-in GitHub integration.
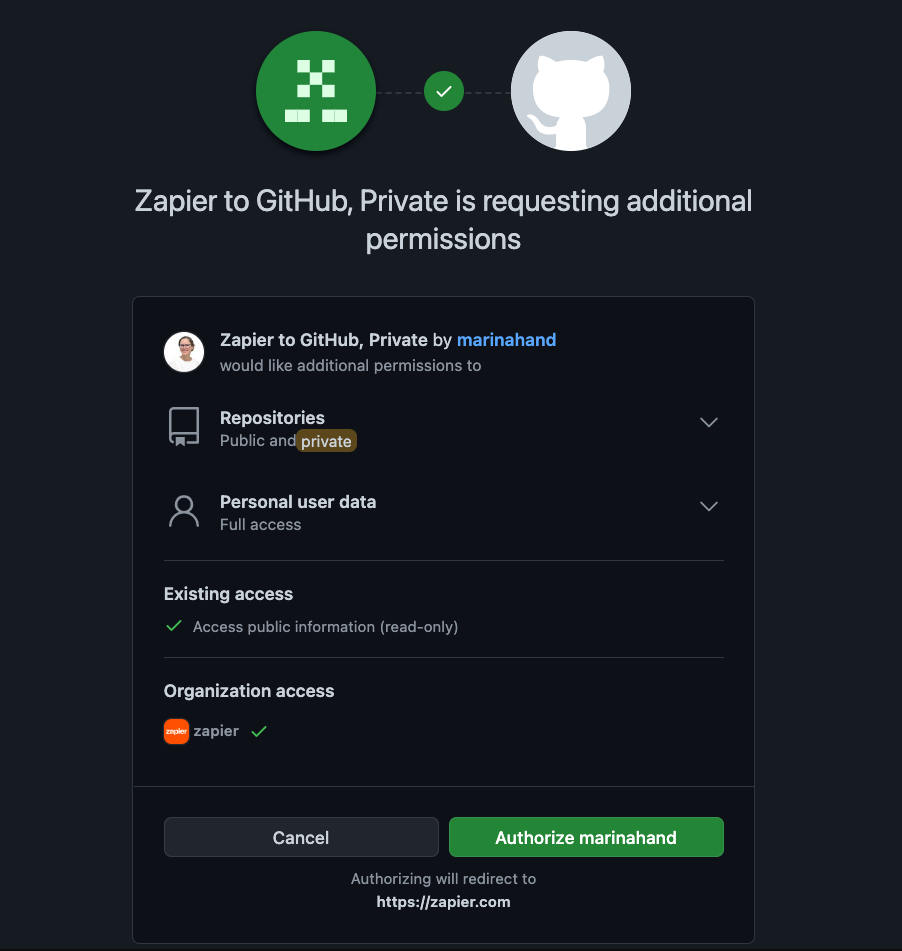
Whenever someone uses your integration in a Zap, they'll first select your app, then will connect their account. That's where the authentication flow comes in. Zapier shows a popup window where users login and select their account with OAuth2, or where they can enter account details with basic auth.
Select Your Authentication Scheme
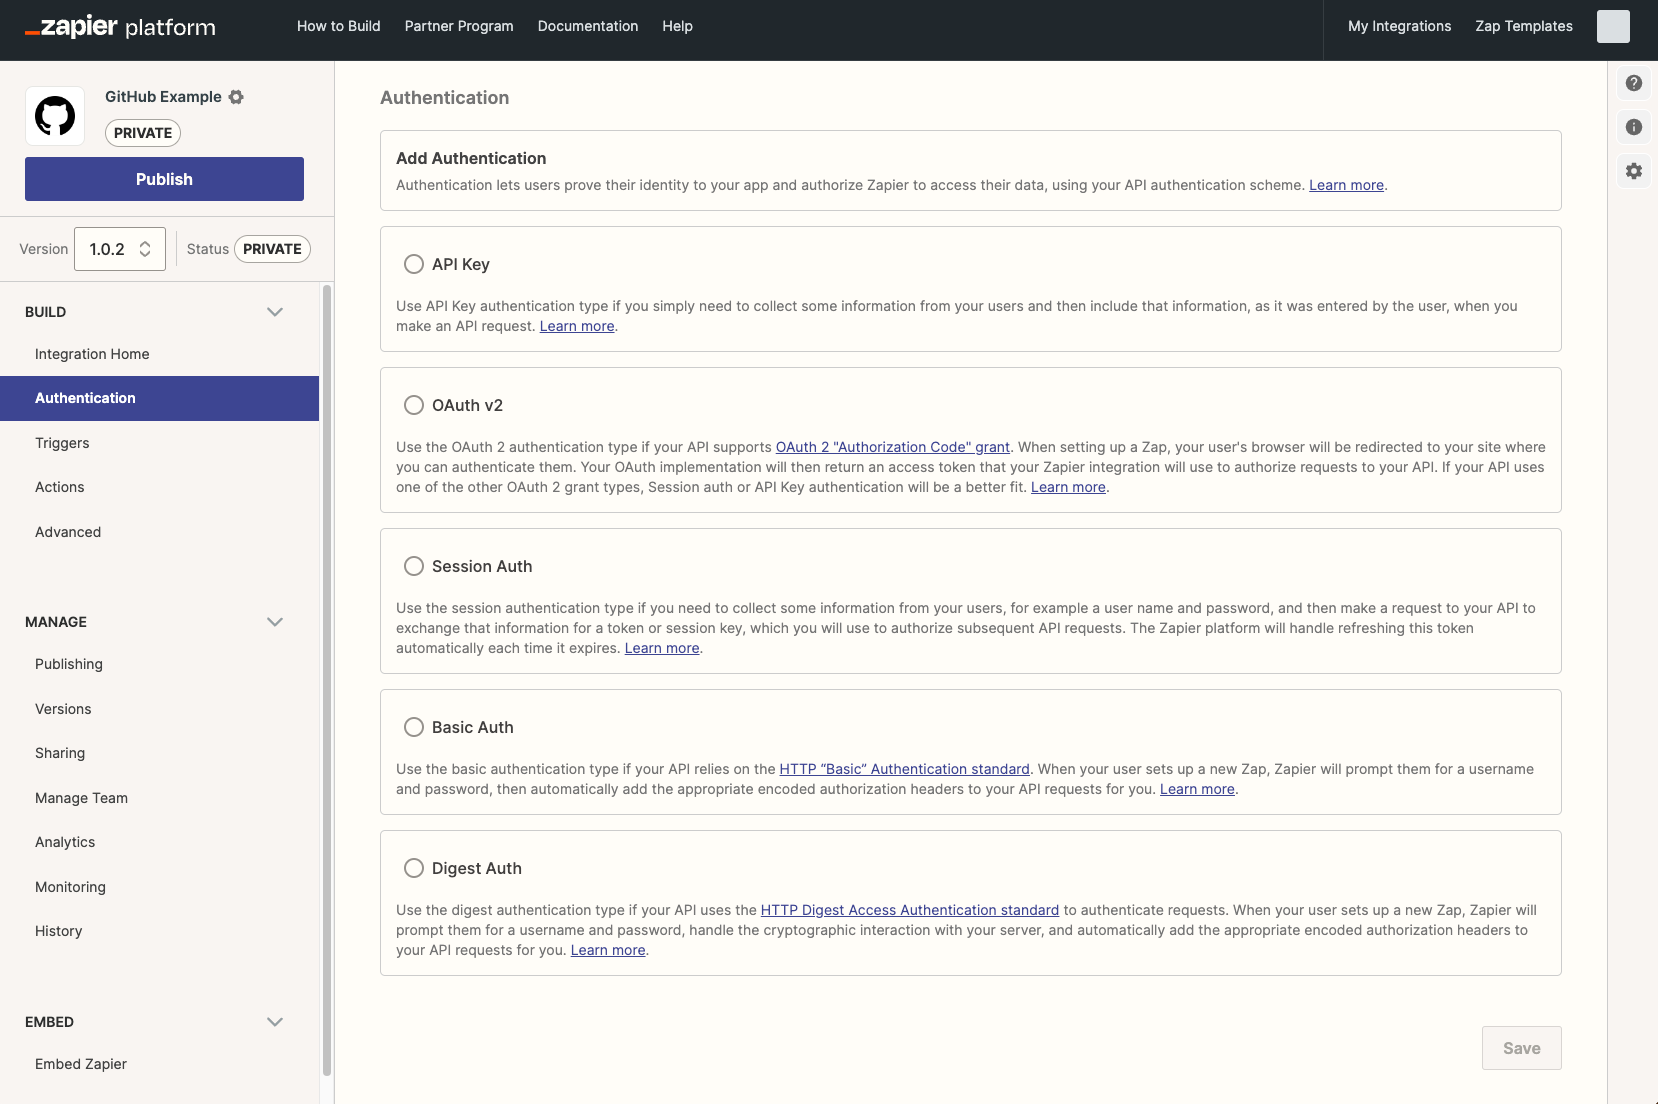
We'll use OAuth v2 in this example GitHub integration, following the steps here. With OAuth2, Zapier sends users to your site to authenticate. Click the Authentication tab in the visual builder, then select OAuth v2 from the menu. Zapier will create a form to complete the required configuration automatically.
Configure Authentication Fields
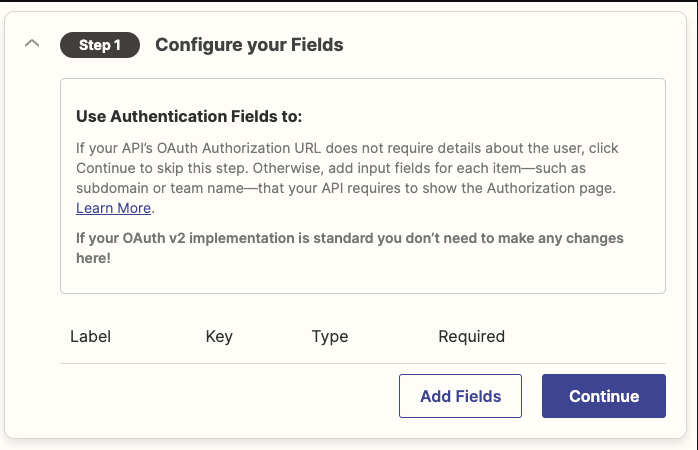
If you add input fields in this section (non-standard for OAuth v2), this will show a form to users with the fields you’ve added before redirecting them to your authorization URL. More on adding an OAuth v2 input form here. For our example GitHub integration, we will not make any changes to this section.
OAuth Redirect URL
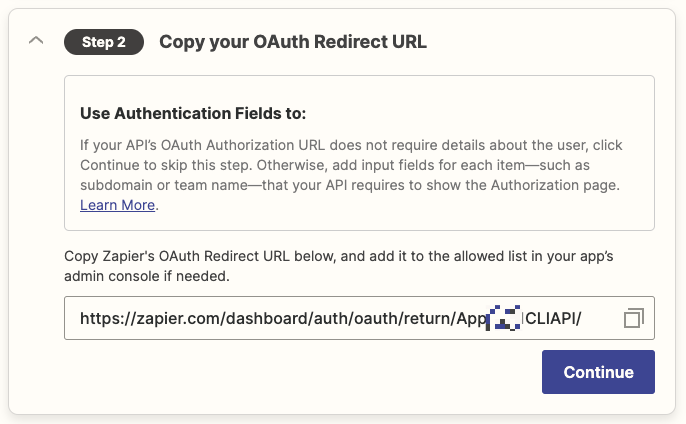
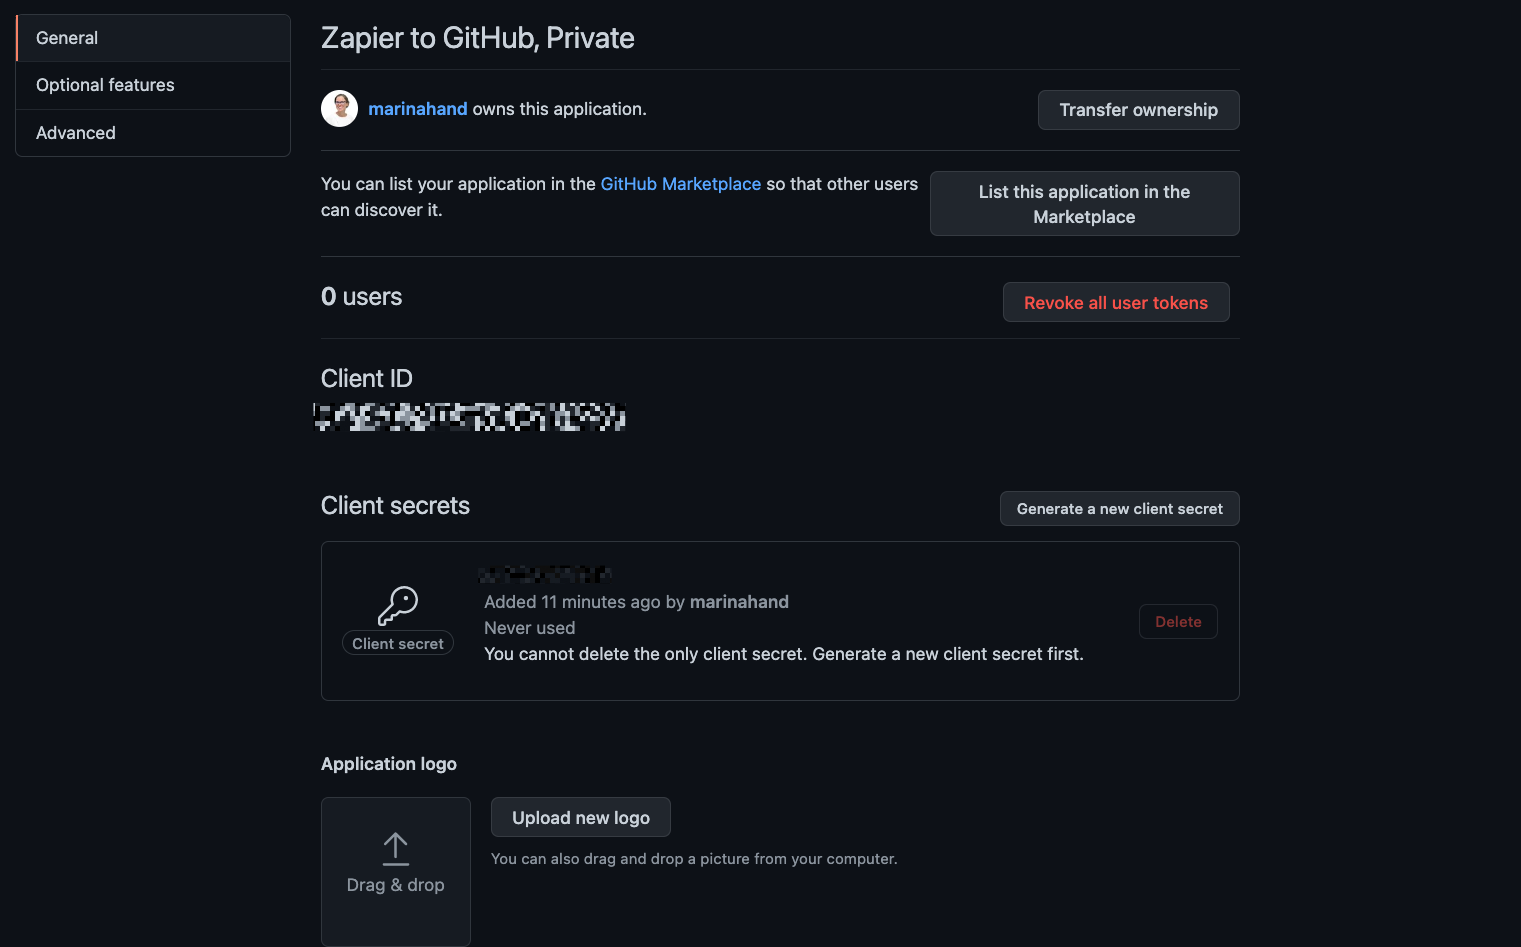
Copy the OAuth Redirect URL generated by Zapier, and add it to the allowed list for the new application you’ve added for the OAuth integration with Zapier - typically this application is created in your app’s application, integration, or API settings. In GitHub’s interface, this field is called the authorization callback URL.
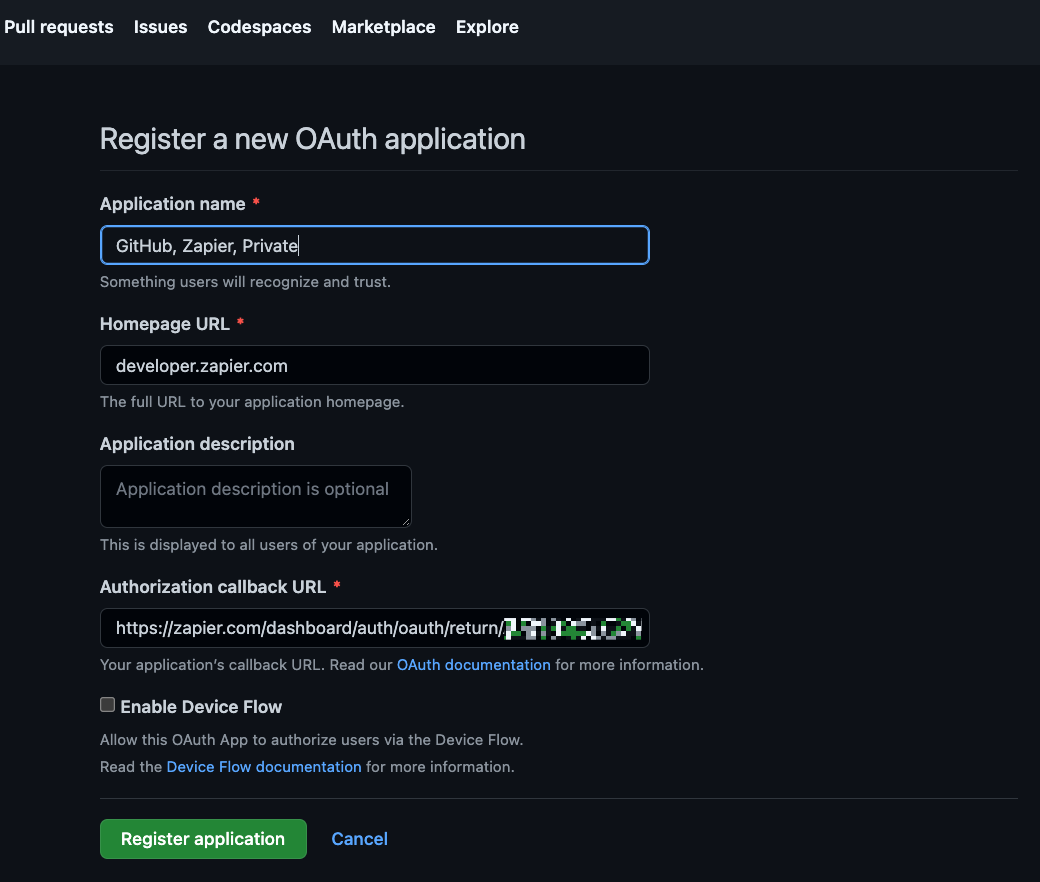
Enter Application Credentials
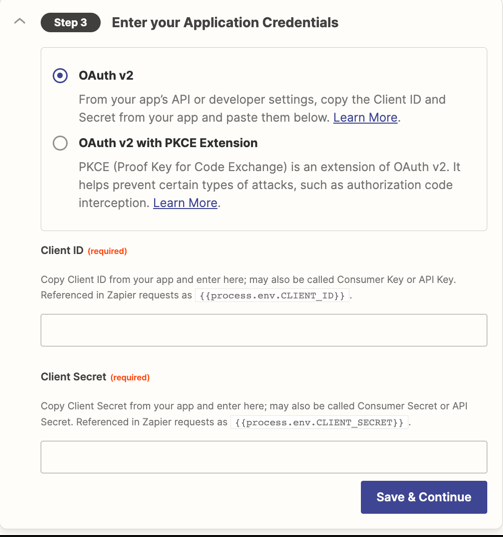
In your new application’s developer settings in GitHub, you’ll receive credentials that Zapier will use to verify itself to your app - called a Client ID and Client Secret.
Copy that data and paste those items in their respective fields. Zapier will use that data along with the authorization URL to receive the request token from GitHub.
Click Save & Continue to save your progress so far.
Add OAuth v2 Endpoint Configuration
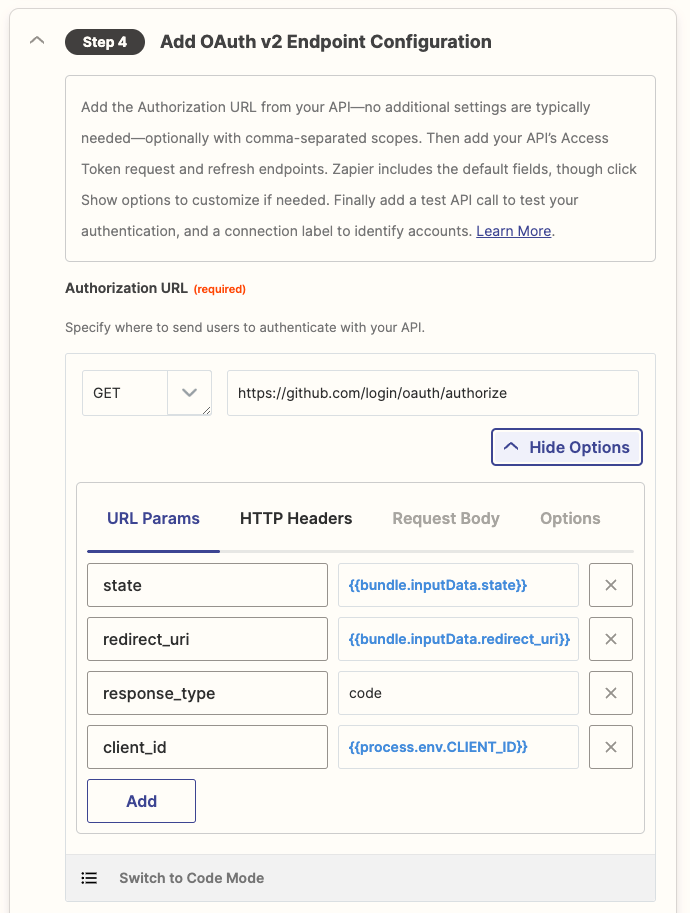
Add the Authorization URL https://github.com/login/oauth/authorize from GitHub’s documentation with the specified GET method.
Selecting Show Options allows you to further specify URL parameters and HTTP headers as needed for the authorization request. By default, Zapier includes client_id, state, redirect_uri and response_type as URL parameters, which you can edit as needed based on your API’s documentation.
For GitHub, we’ll keep the default settings.
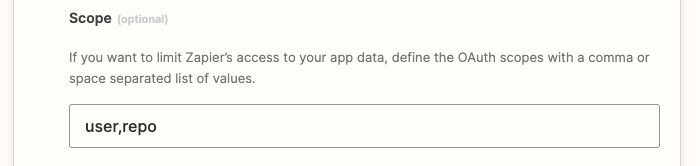
An app’s API documentation will include the available scopes. For this example, we’ll give our app repo and user scopes. You can see all the available scopes for GitHub here.
Next add the Access Token Request URL https://github.com/login/oauth/access_token as a POST call.
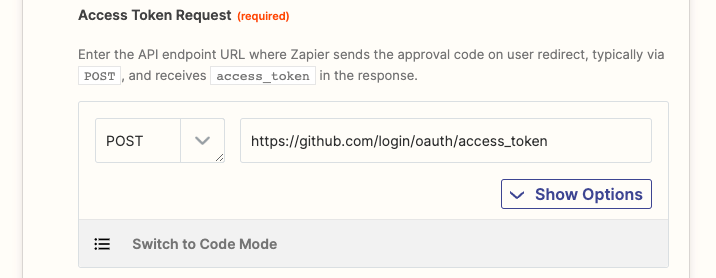
By default, Zapier will pass the client ID, client secret, authorization code, redirect URI, and a standard authorization_code grant type in the API request body. If you need to change that, click the Show Options button and add any additional call details needed.
If your API supports automated token refresh, you would add your API’s Refresh Token Request endpoint here, and check the Automatically Refresh Token box to automatically request a refreshed token if any request receives a 401 from your app. This will help Zapier stay connected to your users’ accounts and enable Zaps to run in the background without interrupting users as long as possible.

For this example for GitHub, we’ll leave this section blank as reviewing the API docs, there is no mention of automated token refresh.
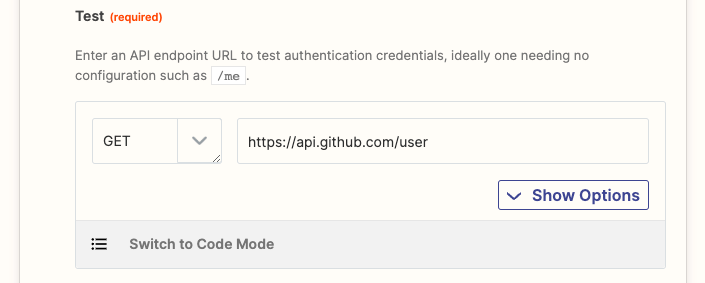
Add an endpoint URL to test the user’s credentials and return a successful authentication message. Here we’ll add GitHub’s user API call https://api.github.com/user to the Test field.
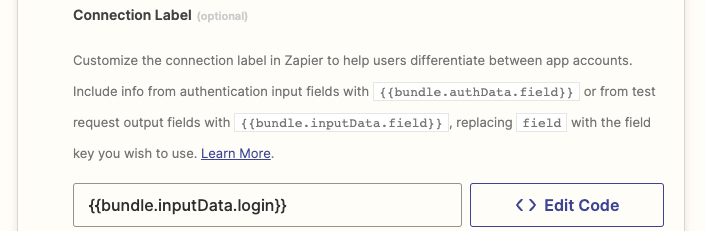
Add a connection label, and users' accounts in Zapier will be personalized to easily distinguish between multiple accounts.
You can also add details to the account. Whenever a new account is authenticated with Zapier, Zapier adds a Connection Label so users can identify accounts and add multiple accounts if desired. Customize this label with output fields from the API call (learn more in our connection label docs).
For GitHub, add {{bundle.inputData.login}} to the Connection Label to include the user's GitHub username along with the app name that Zapier automatically includes.
Test The Authentication
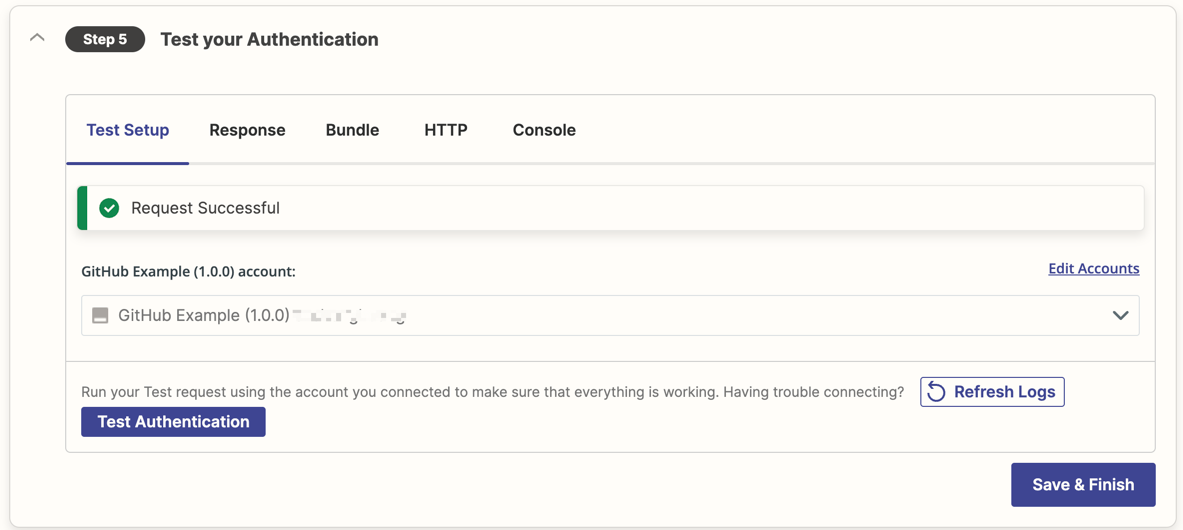
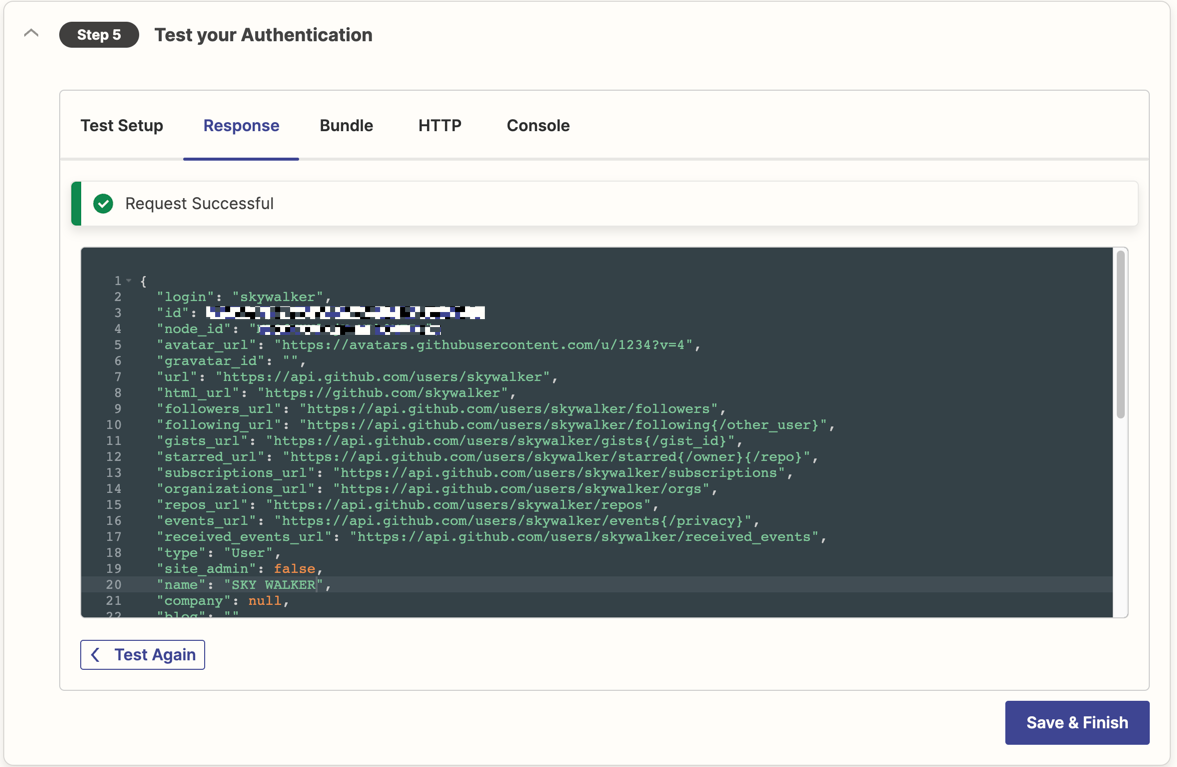
Then test the authentication. Click Sign in, and authorize. If you’re already logged in, the OAuth window will briefly appear and authenticate the app. You can now use this GitHub account to test triggers and actions as you build them into your integration.
When others use your integration, they'll see a similar login flow to connect their GitHub account to Zapier—only there, the popup window will open from the Zap Editor.
Poll for New Data With a Trigger
Let's have our example GitHub integration poll for new GitHub issues in a specified repo, and trigger Zaps if it finds new issues in that repo. We’ll use a GET HTTP method, which is called a polling trigger. Zapier will call this every few minutes for each Zap and check for new data.
Configure Trigger Settings
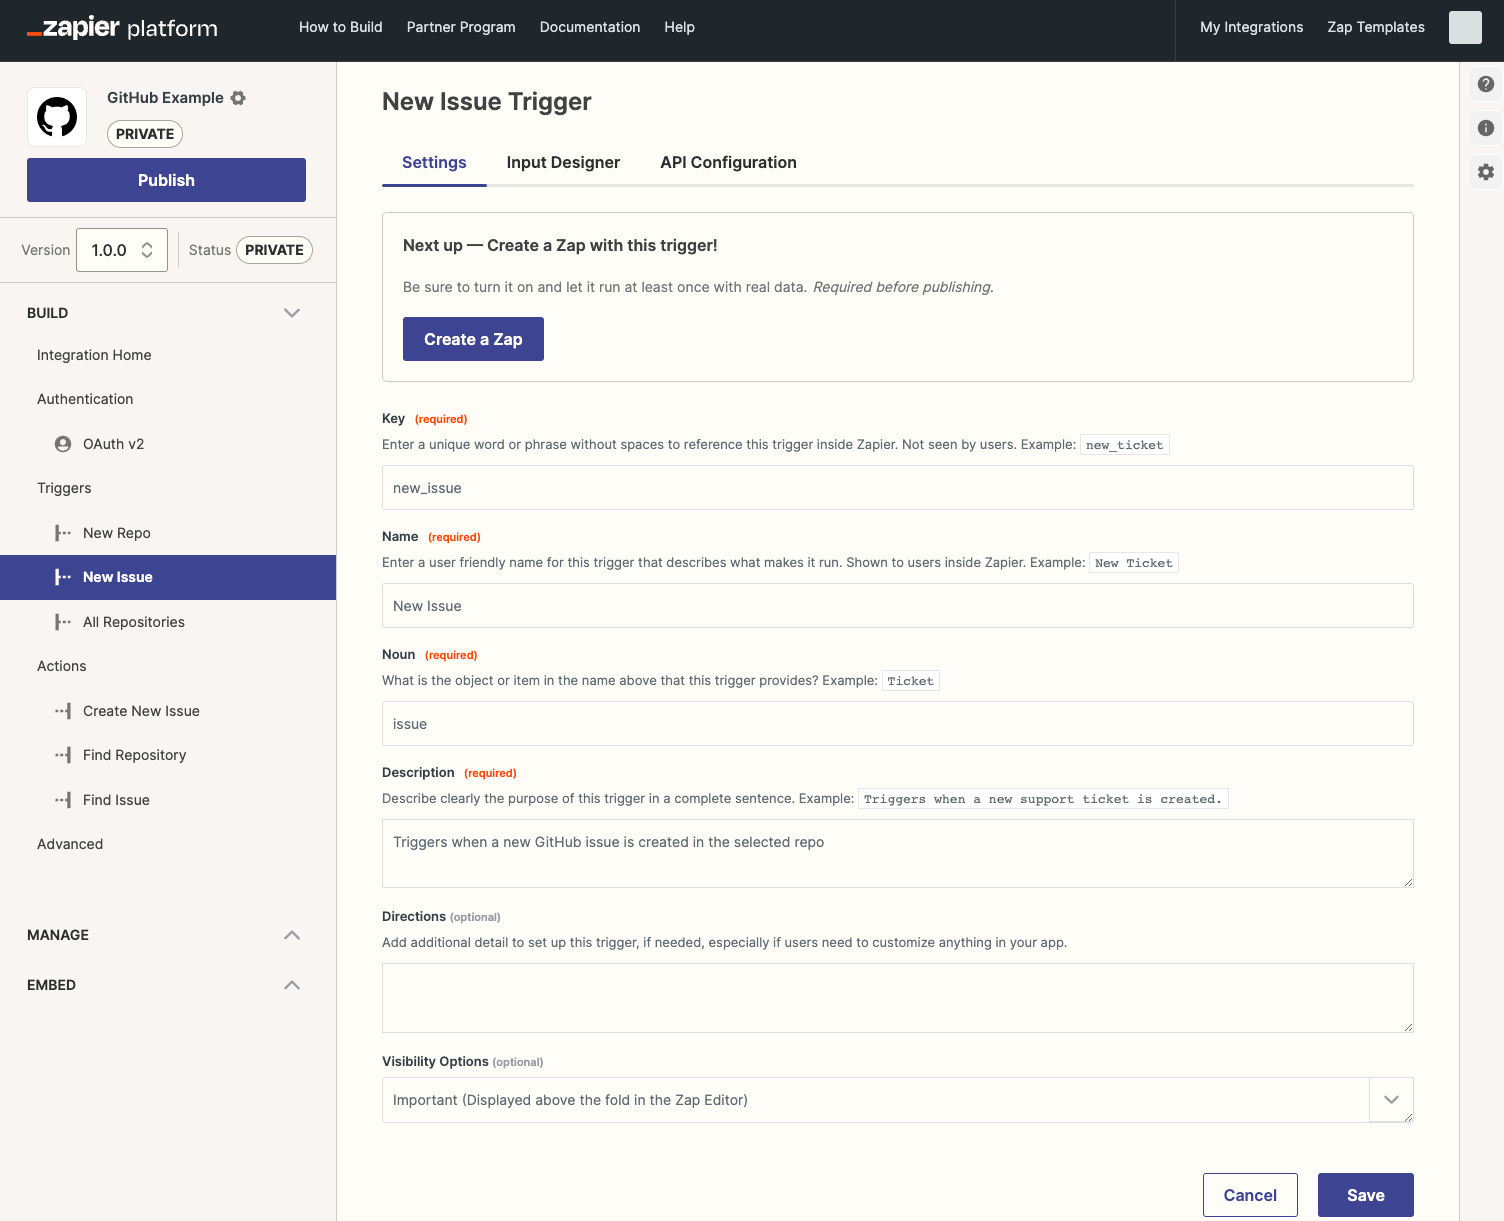
Add a new Trigger, then add Trigger settings. Each trigger includes a:
- Key used internally to reference the trigger
- Name that users see for the trigger
- Noun to describe what object this trigger provides
- Description to explain the trigger to users
Add those details to your GitHub new issue trigger, then save and continue.
Design an Input Field Form
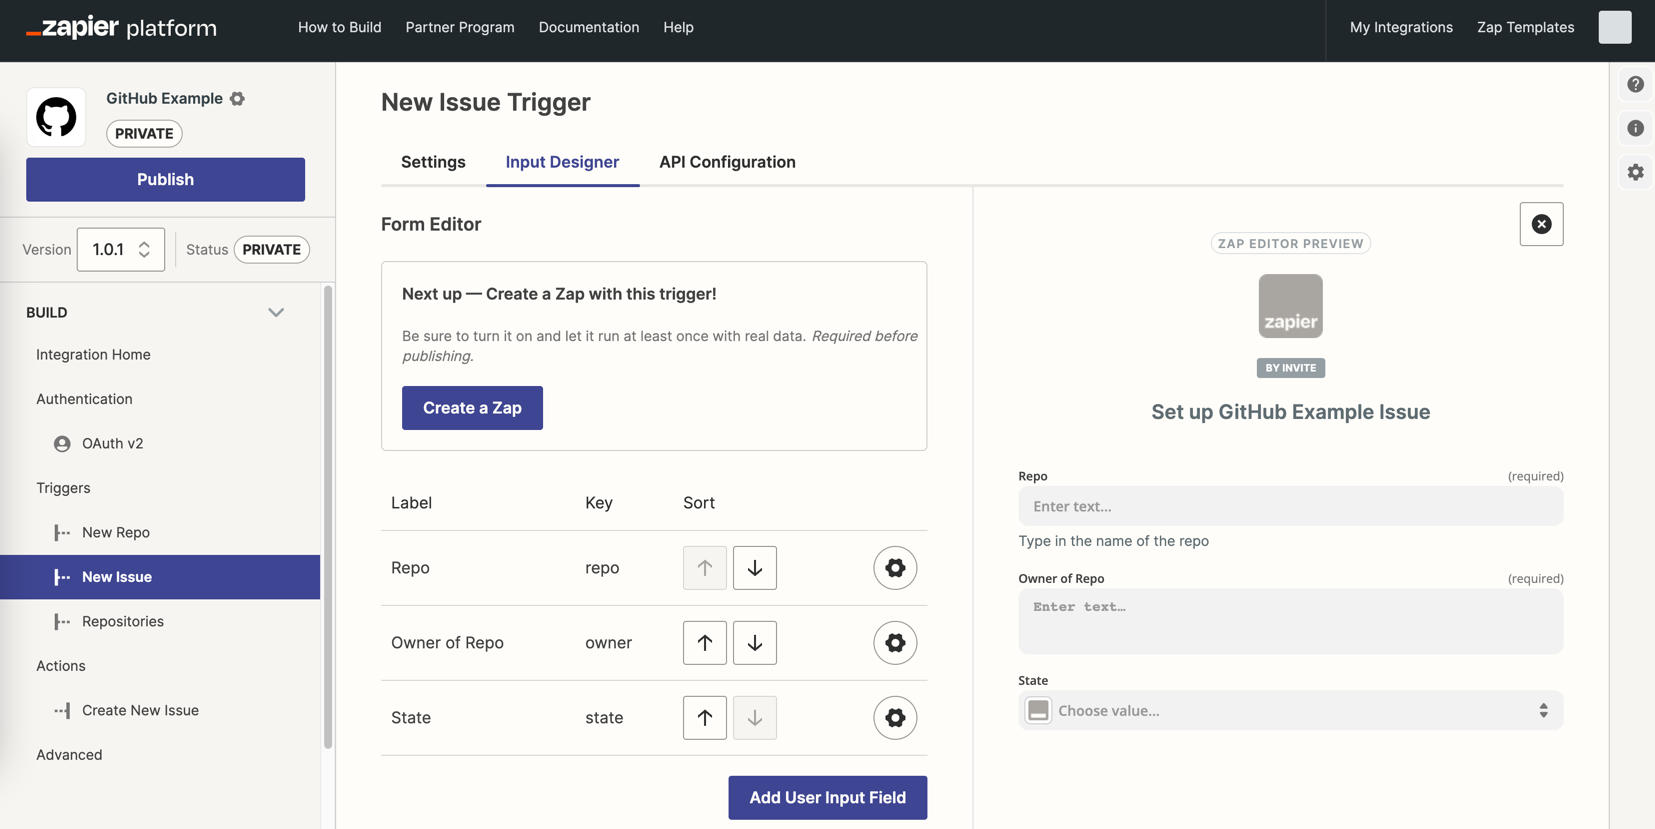
We want to use the List repository issues endpoint detailed here so we’ll need input fields for this trigger as the endpoint is /repos/{owner}/{repo}/issues
Add a Repo Input Field in the Input Designer tab first, where users can add the repository they want to watch for issues. Enter a label, key, and help text for the repo field—and set it as required.
To make this example integration simple, use a string field type where the user can type the repo name into Zapier instead (then for a challenge later, you could try making a dynamic trigger that has Zapier fetch the user's repositories and show them in a dropdown list).
> Learn more about Input Field forms and dynamic dropdowns in our detailed input designer docs.
Your GitHub integration needs an additional input field: an Owner field for users to enter the username of the owner of that repository.
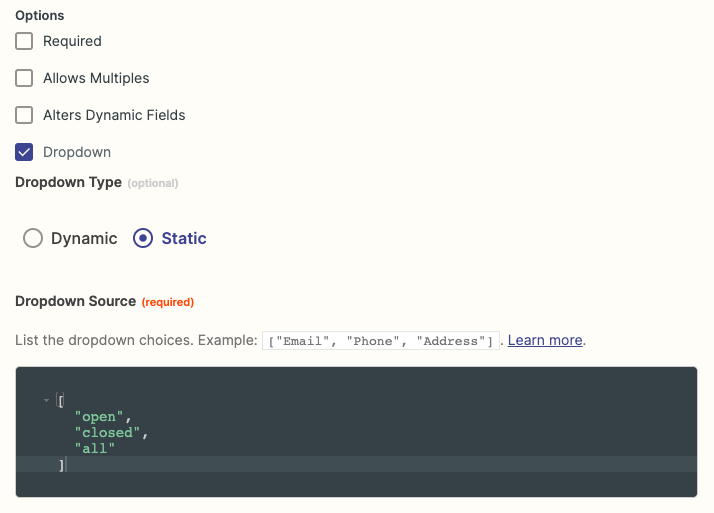
Since State is an available parameter for this endpoint, let’s add that too as it will be useful to be able to choose which type of issues should trigger the Zap. Repeat the steps to add the Owner field then the State field. For the State field, add a default value of open and check the Dropdown box and the Static option. Enter the following in the code box to build your menu, then save your field:
t"open","closed","all"]
Configure Your API
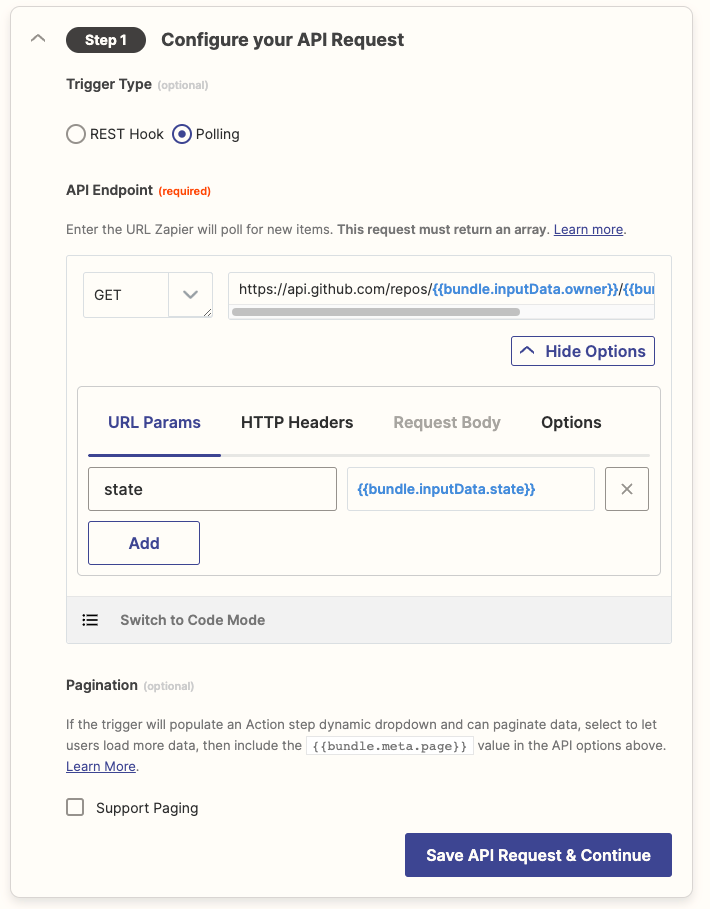
Now, add the GitHub API call. Select the API Configuration tab in the visual builder, choose the Polling option, then enter GitHub’s issue API endpoint in the field:
https://api.github.com/repos/{{bundle.inputData.owner}}/{{bundle.inputData.owner}}/issues
Zapier dynamically replaces the {{bundle.inputData.fieldname}} fields with the text users enter into the respective fields when setting up the trigger. Here, we have Zapier sending the request to GitHub's /repos/{owner}/{repo}/issues endpoint.
Zapier automatically includes every inputField in the URL Params section - we’ll only keep State as the other fields are included in the URL, so you can remove Repo and Owner from URL Params.
The authentication details are automatically included in the HTTP headers section of the GET request.
There is also the option to switch to Code Mode to see the specifics of the request being made, or work in code if that is your preference.
Test Your Trigger
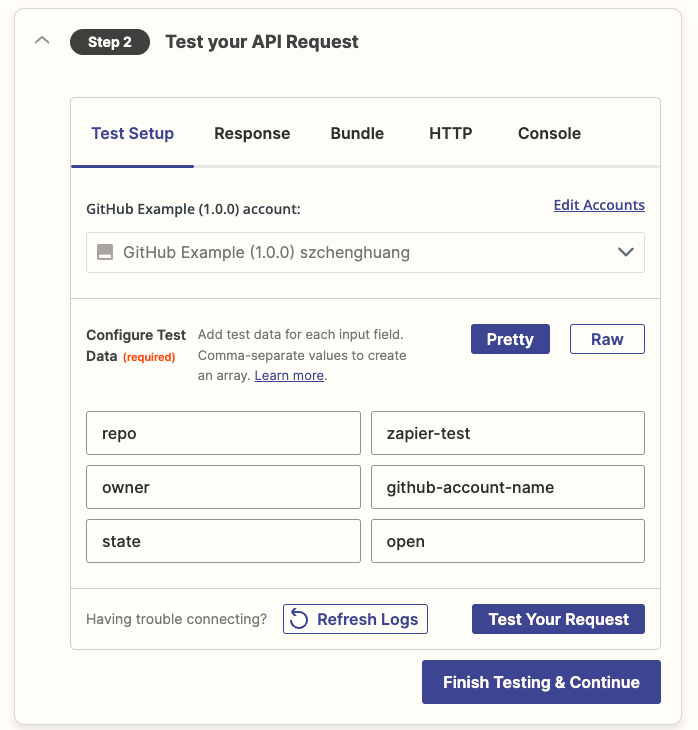
Now test your trigger. Click the Test your API Request step to see the GitHub account you added in the Authentication step ready to use (if not, connect your account first here). Underneath, the Configure Test Data section includes form fields to test your trigger. Enter a real GitHub repository name, the username of the owner of that repository, and optionally a state, then click Test Your Request.
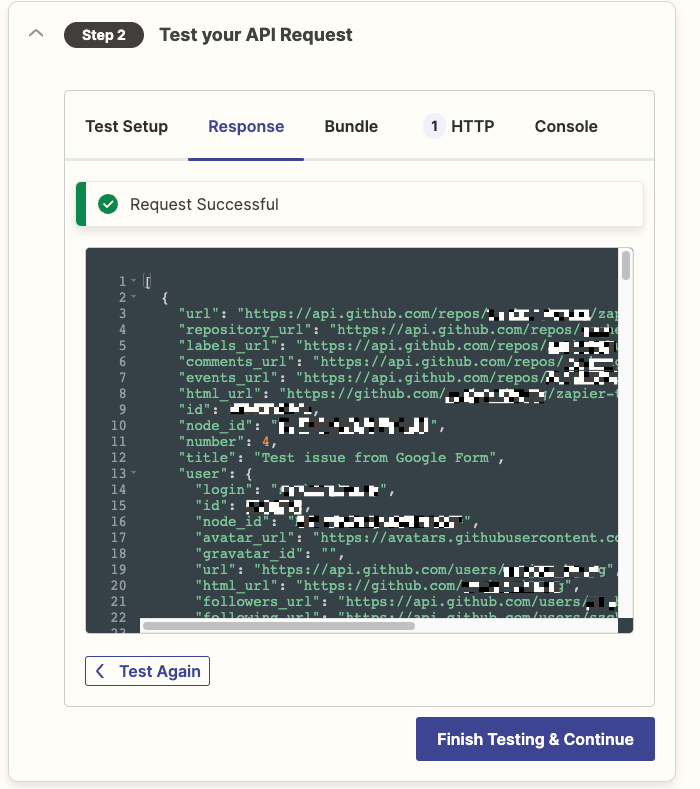
Zapier will find a recent issue from your repo with the matching state and show the raw JSON output in the Response tab. You can see the field names GitHub sends with this API request, along with example data from your GitHub account.
Add Sample Data
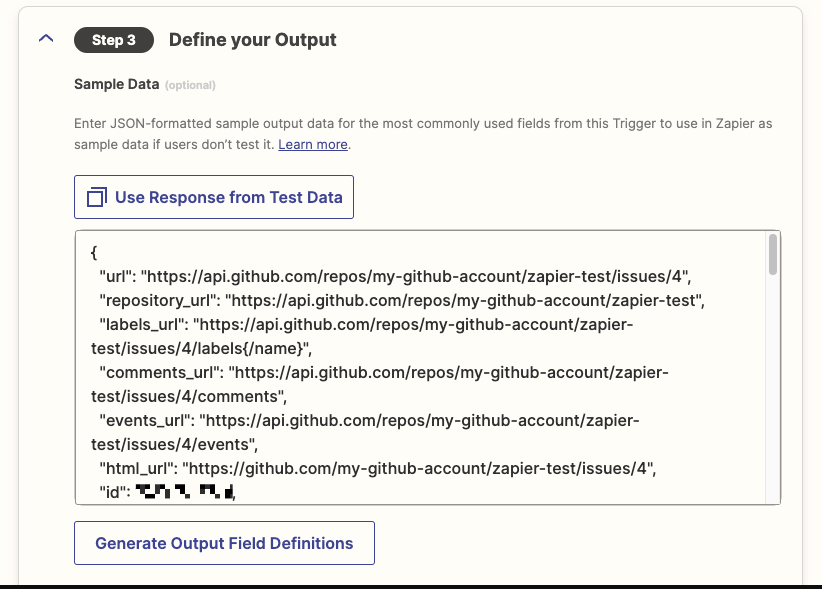
Finally, you need to define sample data so Zapier will always have some example data to use when users set up Zaps, even if they don't test their trigger first.
In the Sample Data field, add fields and example data for those fields with JSON formatting. Only include the most commonly used fields for your integration; for a new GitHub issue, for example, you could use the following code:
{
"body": "This issue is causing problems",
"html_url": "https://github.com/",
"title": "New Issue"
}
Alternatively, you can use the Use Response from Test Data button, but only if your test is expected to contain the same field keys as any user would see.
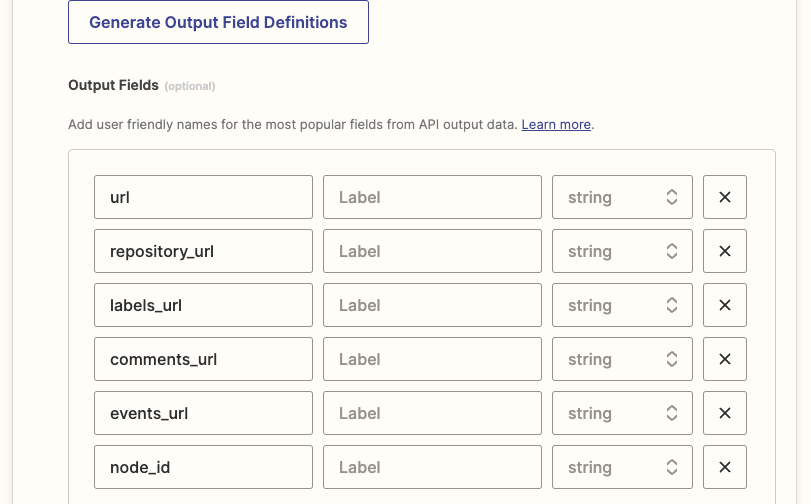
Then click Generate Output Field Definitions to turn your sample data into output fields, and add a friendly, easy-to-read title to each field.
Save your completed trigger, and you can now use your new Zapier GitHub integration to watch for new issues in a Zap.
Add New Data With an Action
Let’s add an Action to our example GitHub integration so Zapier can send data to GitHub. This tells the Zapier Platform how to create the Zap Editor form where users can configure their Zaps and map data to and from the API, then tells it how to make calls to the API endpoint.
Configure Action Settings
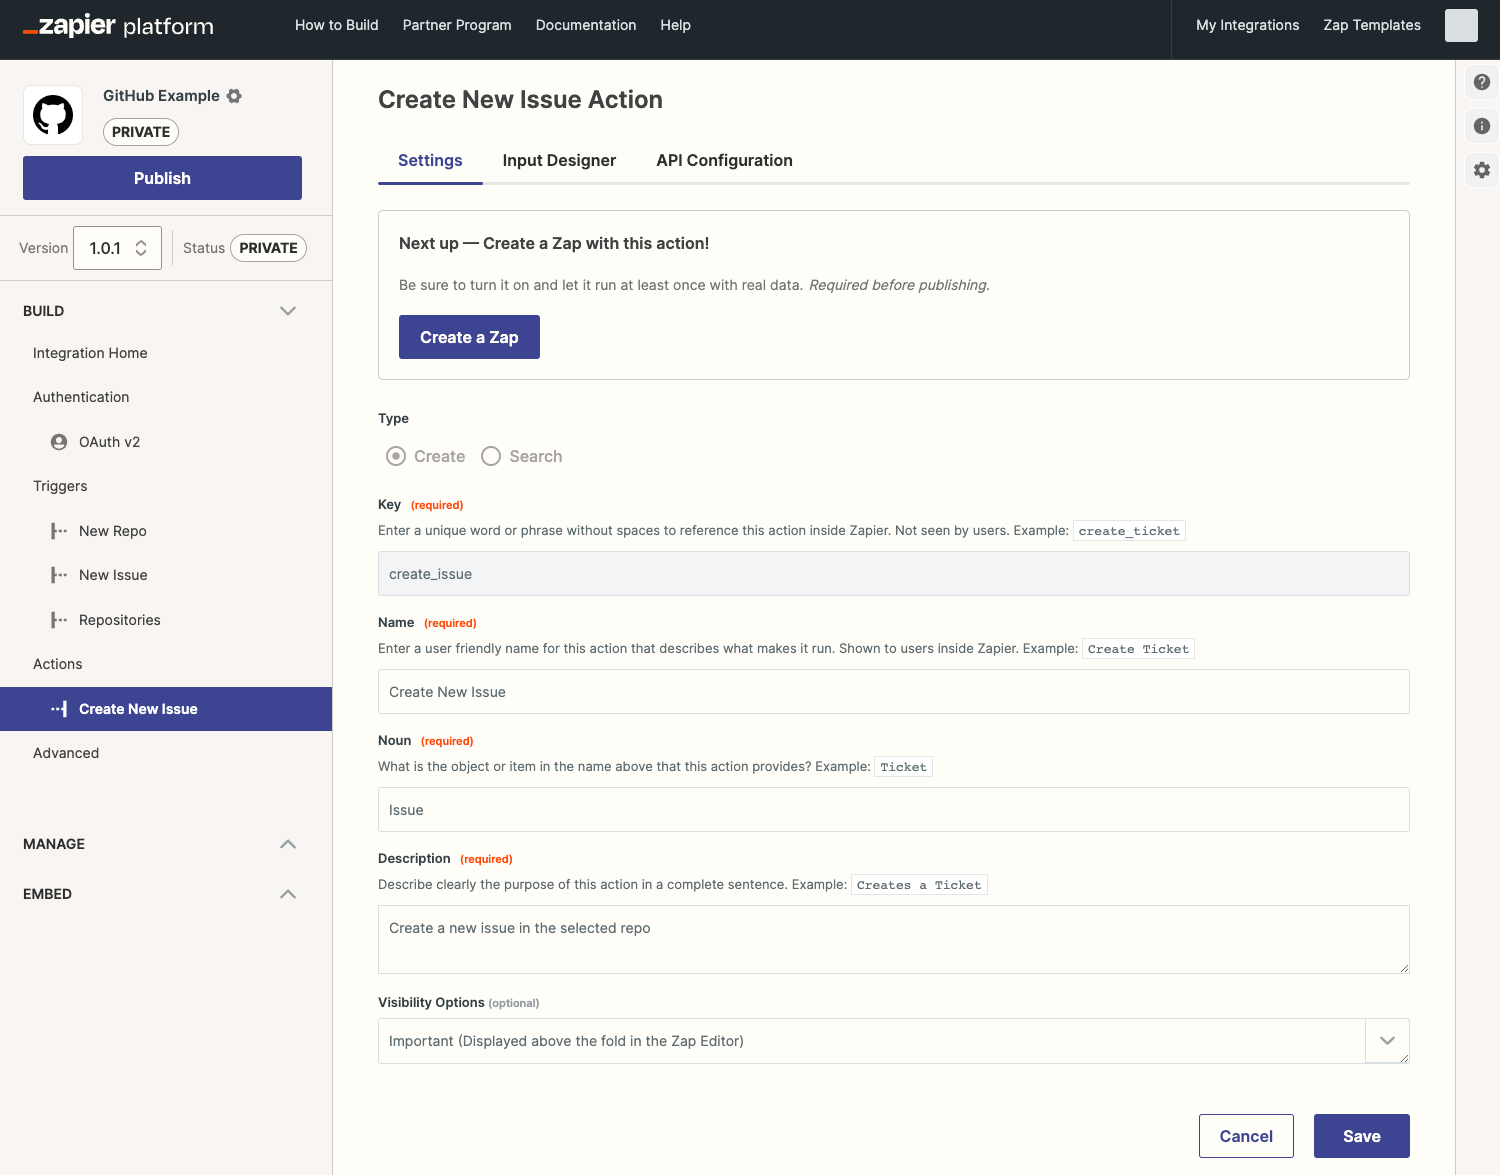
Enter your new action settings, as with your trigger. Select a Create action since this action will create new issues; then include a key, name, noun, and description for an issue. The type of action cannot be changed once created, so you will need to decide whether the response type you expect to use for your action would be better served by a Search or a Create.
Design an Action Input Field Form

Then add the input fields from the Input Designer tab. Select from Input Field that let users enter static text, Dynamic Fields that pull in data from triggers, and Line Item Groups to include line item data.
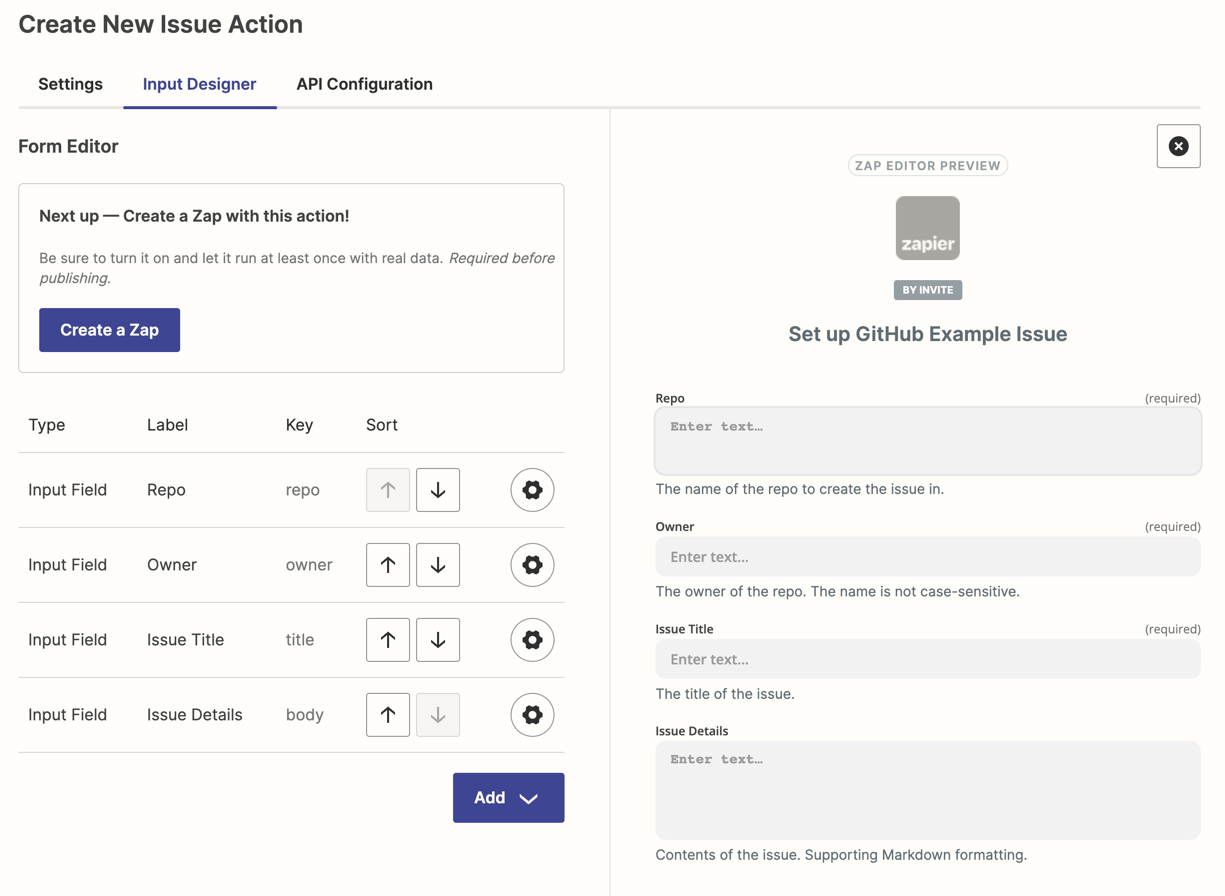
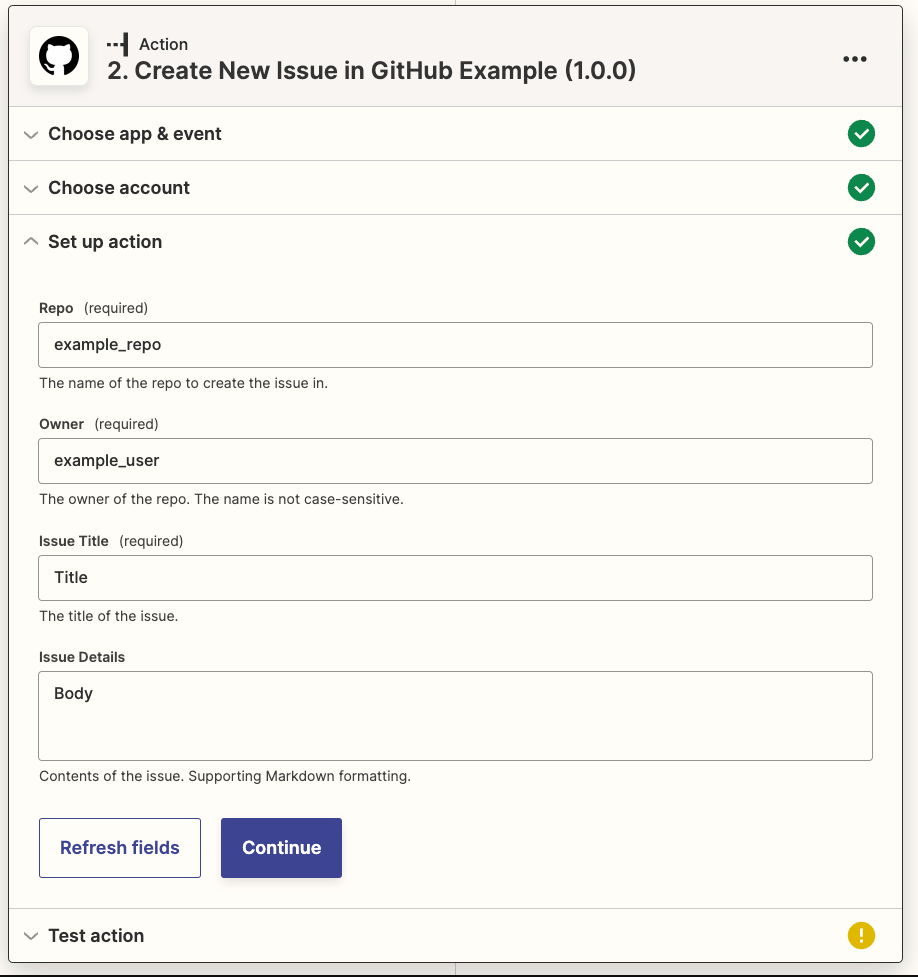
For our example GitHub integration, we need 4 input fields: owner to add the repository's owner, title to list your issue title, repo to add the repository's name, and body to add details about the issue. Add the first three as you did in the Trigger setup, with the default string field type and the owner, title, or repo keys respectively. Then, for the issue details, select a Text field type so users can enter longer text and use the body key.
> Learn more about Input forms in our detailed input designer docs.
Configure Your API
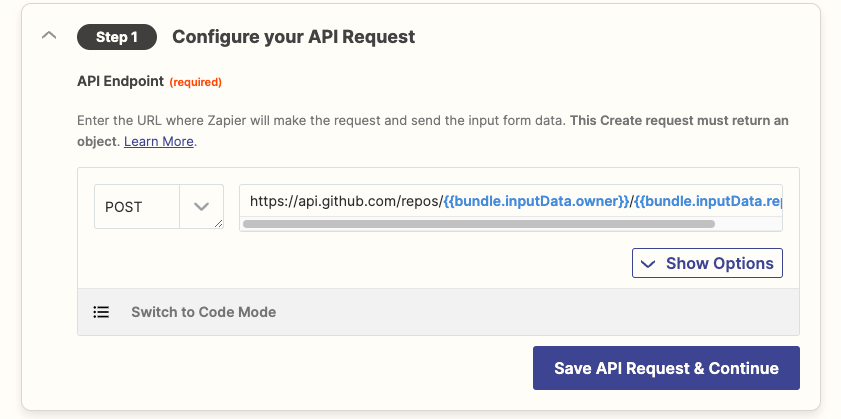
Now, select the API Configuration tab in the visual builder to tell Zapier how to send the data to the API. Select the POST API call, then enter GitHub’s issue API endpoint with the {{bundle.inputData.fields}} fields as with the trigger:
https://api.github.com/repos/{{bundle.inputData.owner}}/{{bundle.inputData.repo}}/issues
Zapier will automatically include the owner and repo from the input fields in your API request body. Click the Show Options button to see the mapped fields and customize/remove them if needed—Zapier includes all the input fields by default - keep the issue title and body that this GitHub endpoint expects in the request body, and use the owner and repo fields in the URL path.
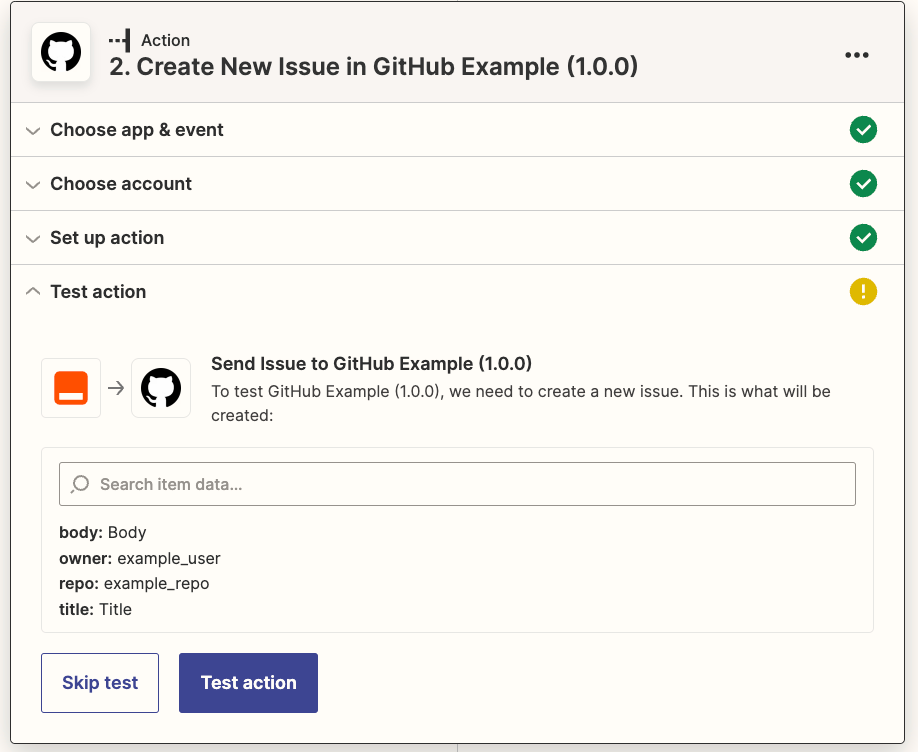
Test Your Action
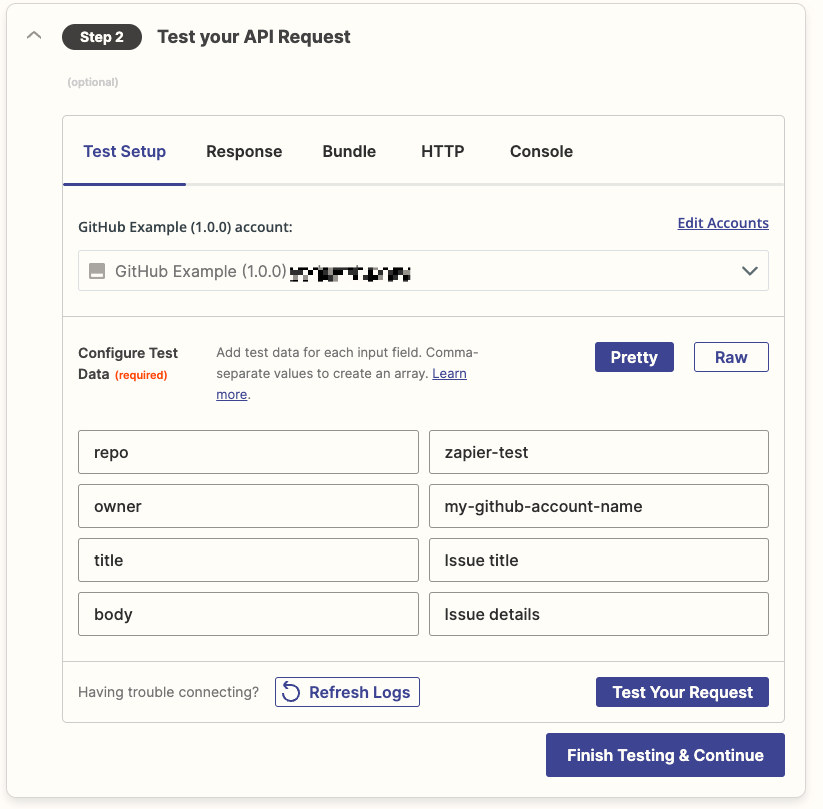
Then test the API request. As with the trigger, add sample data in the Configure Test Data form, using a real GitHub repo along with example text and body for your issue. Click Test Your Result, and Zapier will try creating an issue with your test data.
Define Your Action Output Fields
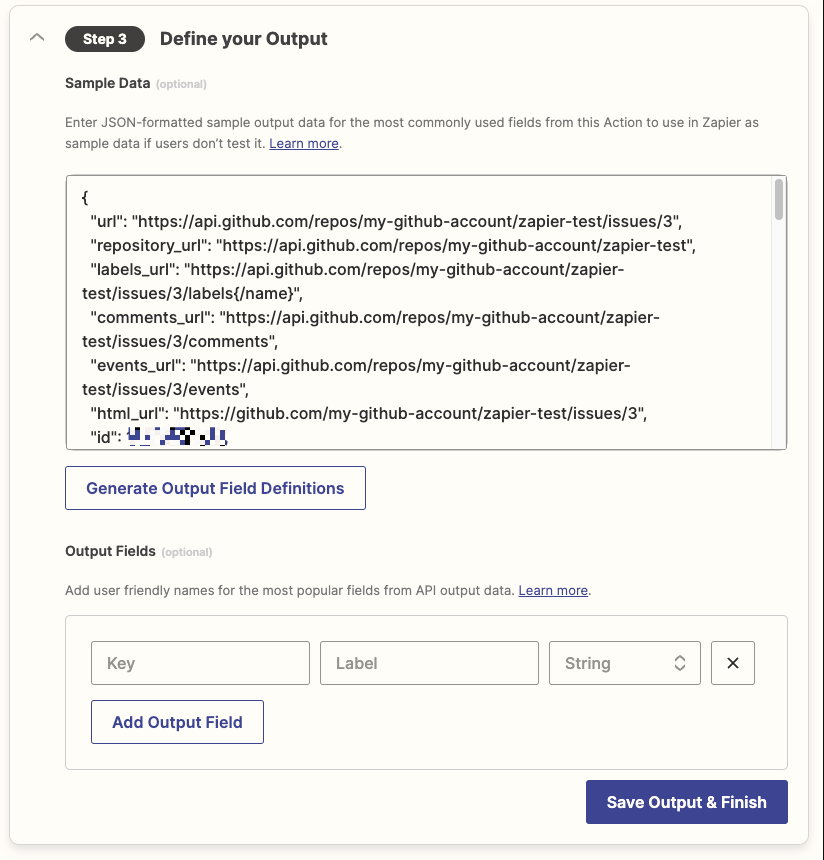
Finally define sample data and output fields, as in the trigger setup, including example JSON data with the most popular fields, and reader-friendly names so users can easily identify which fields to map in subsequent actions. If a label is not specified, the JSON field name on the left will be used.

Save your action, and you now have a complete Zapier integration with authentication, a trigger, and an action!
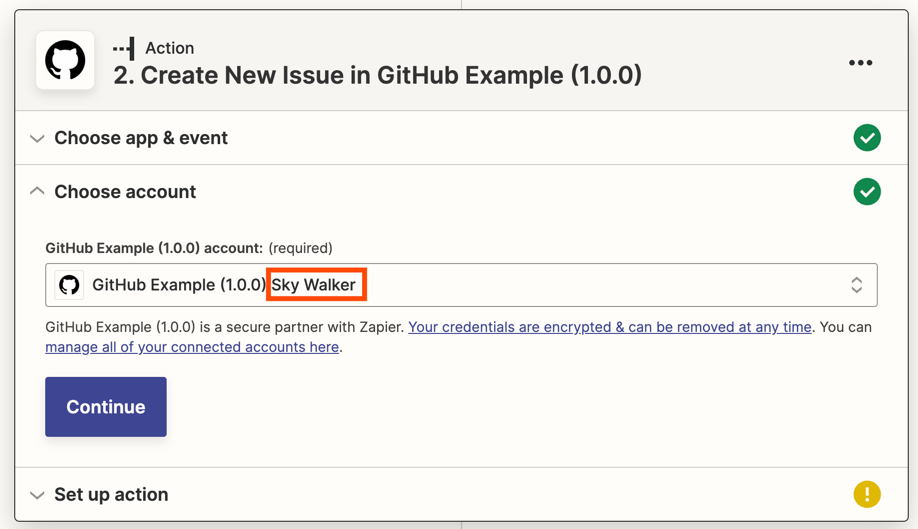
Your Action in Zap Editor


Your GitHub Action's fields let you type in text or map data from previous steps in your Zap so Zapier can copy it into the app. Users clicking into a field can select data from previous steps to use in that field. Then, when the Zap runs, Zapier copies the data that triggered the Zap run and/or any previous steps, and uses it to make the new item in your app—a new GitHub issue in this case.
Test Your Integration
You’ve already tested your GitHub authentication, trigger, and action in the visual builder. Now try using your GitHub integration in a Zap.
Open Zapier, click Create Zap, and search for the My GitHub Example app with the By Invite tag to use your new integration in a trigger or action. Try building Zaps using the trigger and action you created to test your Zapier integration. Want to do more with it? Go back to the visual builder and add more input fields to gather more data or create new triggers and actions to do more with available GitHub endpoints.
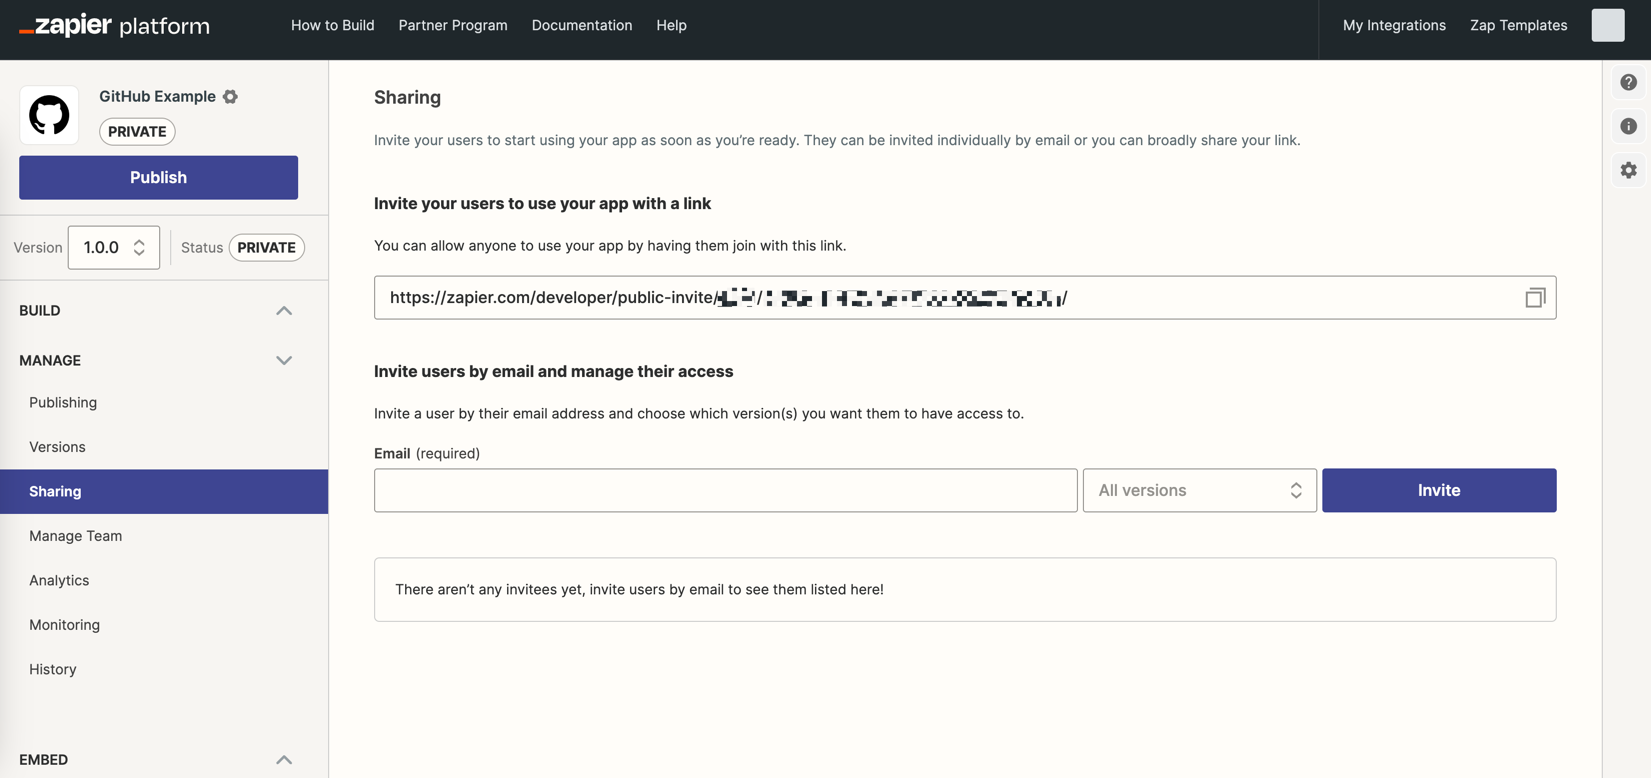
You could also invite others to help test your app—something you won't need with your example GitHub integration, but that will be helpful when you build a new integration with your API. Click the Sharing tab, then copy the link on that page to invite a contact to have access to all versions or enter a contact's email address to send them an invite to try a particular version of your app. Once they accept, they'll be able to search for your integration inside their Zap Editor, and the integration will be ready for use in any Zaps they build.
You’ve just built your first Zapier integration, and used it in your Zapier account! Congrats!
Take a break, then come back and give the Zapier Platform UI a try with your app. Connect your app's API, add the triggers and actions that will be most useful with your app, and build input forms to gather the data your app would need from users. If you get stuck, Zapier Platform’s developer docs will help you learn more about the Zapier platform and build more detailed functionality into your integration—or submit a ticket to Developer Support about any problems you encounter.
Happy building!