


Hi folks! Clint here again with another Workflow Wednesday! As you may know, I’m a huge nerd, and one of my favorite things to do is take screenshots in video games and send them to my other, nerdy friends. Unfortunately, getting those screenshots off the Nintendo Switch onto any other platform is a bit tricky or labor intensive.
That’s where this workflow comes in - we’re going to post screenshots to a special Twitter account directly in the Switch, then automatically upload them to Google Drive using Zapier! This also applies to any Twitter account where you’d like to capture all the images it uploads.
The Challenge
Taking screenshots on the Switch saves them to the internal hard drive OR an SD card. I don’t know about you, but I’m not really looking forward to digging up my SD card converter or yet another USB-C cable to get those off myself.
Instead of doing that every time I want to share my new floor plan in Animal Crossing (yes, I’m still playing), I’d like these to automatically sync to a Google Drive where I can access them from pretty much any device.
The Solution
What I ended up doing was the following:
- I created a special Twitter account just for my Switch screenshots
- I connected it to my Switch using this guide directly from Nintendo
- I made a Zap that uses a combination of a filter and a Looping step to extract all of the images from every tweet on that account and send them to Google Drive
We’re going to focus on Step 3.
The Zap is fairly simple but there are a few quirks we’ll have to account for, namely that Twitter sends images as line items, and we can only upload one image at a time. Here’s a quick outline of the Zap:
- Trigger: My Tweet in Twitter
- This will trigger every time I tweet directly from the special Twitter account I created. You can also use “User Tweet” if you don’t own the Twitter account directly.
- Filter: Only continue if “Entities Attached Media URL” Exists
- We only want to trigger the Zap if there actually is a picture attached. This filter will stop the Zap if it’s just a text tweet.
- Action: Looping by Zapier - Create Loop from Line Items
- Since Twitter sends us the images as line items, we can use Looping by Zapier to upload each image individually. Pass the “Entites Attached Media URL” as the value to Loop. You can leave everything else untouched.
Here’s a screenshot of how mine looks: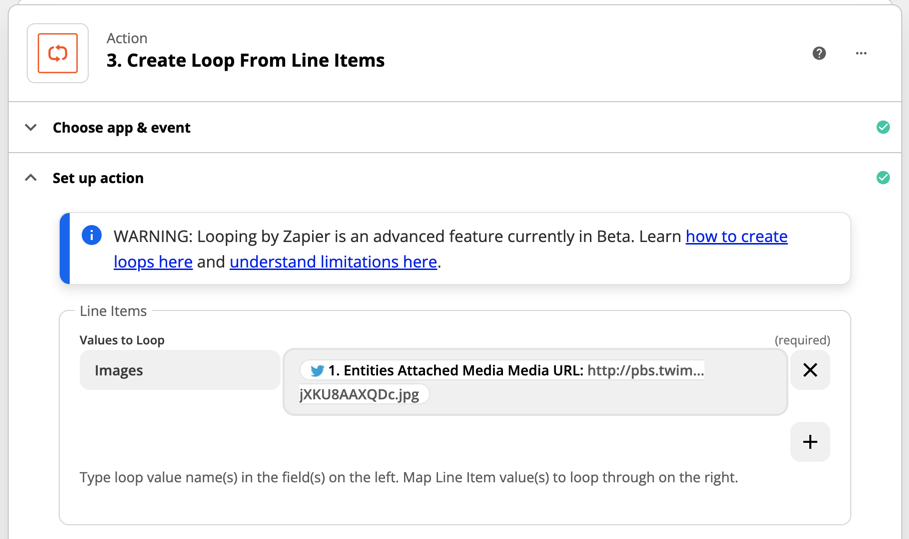
(Click here to view larger)
- Since Twitter sends us the images as line items, we can use Looping by Zapier to upload each image individually. Pass the “Entites Attached Media URL” as the value to Loop. You can leave everything else untouched.
- Action: Upload File in Google Drive
- Use the “Images” field you created in the Loop for the File field. You’ll also want to give the file a unique name - I used a combination of {{zap_meta_human_now}}, which returns the time the Zap runs, as well as the Loop Iteration. Here’s what that looks like:

(Click here to view larger)
- Use the “Images” field you created in the Loop for the File field. You’ll also want to give the file a unique name - I used a combination of {{zap_meta_human_now}}, which returns the time the Zap runs, as well as the Loop Iteration. Here’s what that looks like:
Here’s a template of this Zap for you to get started as well:
https://zapier.com/shared/b85eca5d7e8c26a555217f7e9d859a2c09fe2598
That should do it! Let me know if you come up with any other applications for this...or just feel free to share your favorite Switch screenshots - here’s mine! :)