


We use inSided as our Community platform, and there are times when the Zapier integration is missing something that we need.
Have no fear! inSided has quite a robust API (including webhooks) so we can typically accomplish our desired workflows.
If you use inSided and are wondering how to use one of the following webhooks, this article is for you.
Article events
- article.Created
- article.Replied
- article.ReplyPostContentChanged
- article.ModeratorTagsChanged
- article.Liked
- article.ReplyLiked
Conversation events
- conversation.Started
- conversation.Replied
- conversation.PostContentChanged
- conversation.ReplyPostContentChanged
- conversation.ModeratorTagsChanged
- conversation.Liked
- conversation.ReplyLiked
- conversation.ConvertedToIdea
- conversation.ConvertedToQuestion
- conversation.ConvertedToArticle
- conversation.ConvertedToReply
Question events
- question.Asked
- question.Replied
- question.PostContentChanged
- question.ReplyPostContentChanged
- question.Answered
- question.ModeratorTagsChanged
- question.Liked
- question.ReplyLiked
- question.ConvertedToConversation
- question.ConvertedToIdea
- question.ConvertedToReply
Idea events
- idea.Submitted
- idea.Voted
- idea.Replied
- idea.VotesMerged
- idea.Unvoted
- idea.StatusAssigned
- idea.Trashed
- idea.ModeratorTagsChanged
- idea.ConvertedToQuestion
- idea.ConvertedToConversation
- Ideation events
- ideation.StatusChanged
User events
- IdentityAccess.UserRegistered
- IdentityAccess.UserLoggedIn
Group events
- group.MemberJoined
- group.MemberRequest
- group.MemberLeft
Before We Start
Let’s talk about a few things really quickly, before we jump into the workflow setup.
How Do inSided Webhooks Work?
Taking a look at the available events above (this list may not be updated...please see here for the most accurate list), you can subscribe to those and send data to a Zap that has a Webhooks by Zapier trigger.
What Does That Mean?
Webhooks by Zapier (the trigger in your Zap) will receive the data that inSided sends. If you chose the idea.Voted event, anytime someone votes on one of your ideas, inSided will send data to whichever URLs you’ve instructed them to.
Setting Things Up
Here’s a quick outline of the pieces we need, to make this work:
- A Zap that gives us a URL to send inSided data to (Webhooks by Zapier — Catch Hook)
- A way to subscribe to the inSided event, and provide that URL from above
- Some credentials and API info, to use in our various Zaps
Ok, let’s jump into the setup process.
Step 1. Create a Zap with a Webhooks by Zapier Trigger
We’re putting the cart before the horse a little here, but before doing anything else you should create a Zap that uses the Catch Hook option of Webhooks by Zapier, so you can get this URL:
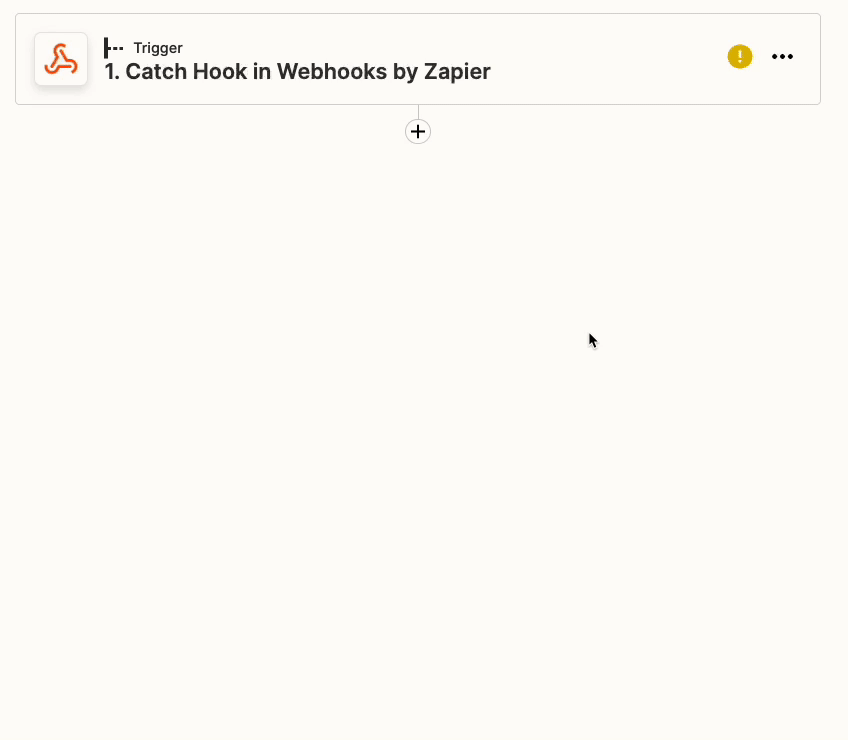
We’ll need this URL in a bit. This will be the Zap that receives the data from inSided (you can add the rest of the steps once we get some test data working).
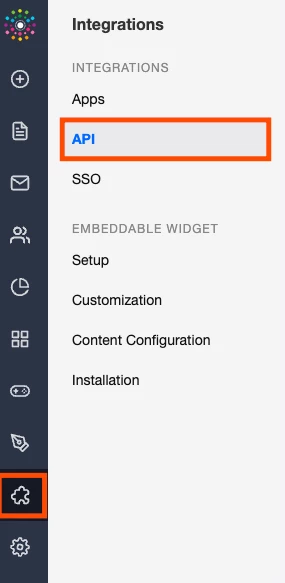
Step 2: Create a Client ID and Secret in your inSided Control Area
In your inSided Control area, navigate here: /settings/api.
On that page you’ll see something like this:

Give it a name, then take note of the Client ID and Client Secret (you won’t be shown the secret again after first creating it).
NOTE: The client id and client secret are very sensitive information, which should absolutely not be shared in public or even with the larger parts of your organization.
Also take note of what’s shown here, under Your API base URL (we’ll need it for the next step):

Step 2: Let’s Make a Zap You Can Reuse
To save yourself a bit of work in the future, in case you ever want to subscribe to other inSided webhooks, you should create a Zap that uses a trigger that allows you to specify the event itself and the URL you’d like to send data to.
One example is the Zapier Chrome extension, which is what I’m using:
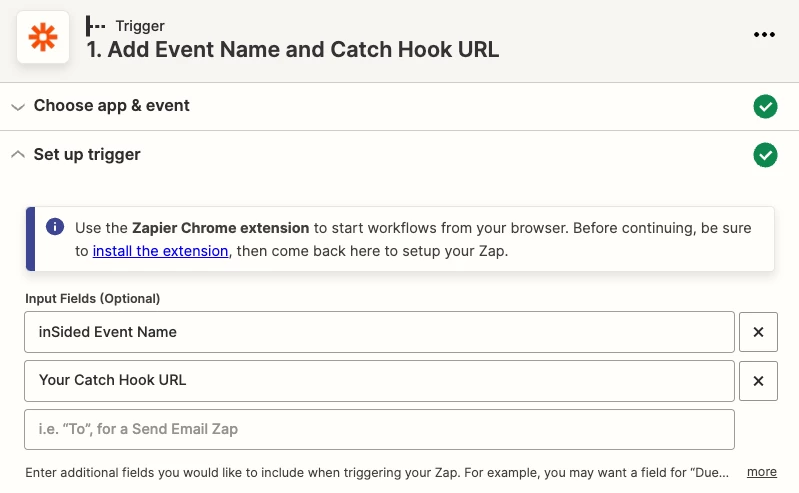
Now, directly from my Chrome browser, I can add the event name (the ones above, like idea.Voted) and the URL, that we got from Step 1 above.
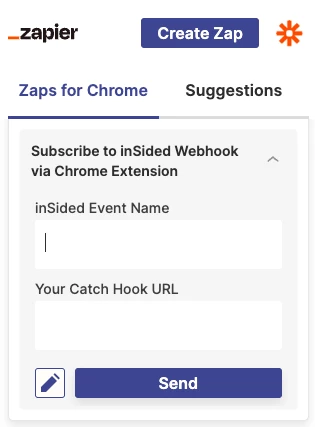
NOTE: You could also use any one of the form apps we integrate with, build a Slack workflow, etc. Use whichever method will allow you to easily fill out a couple of fields and submit it to a Zap.
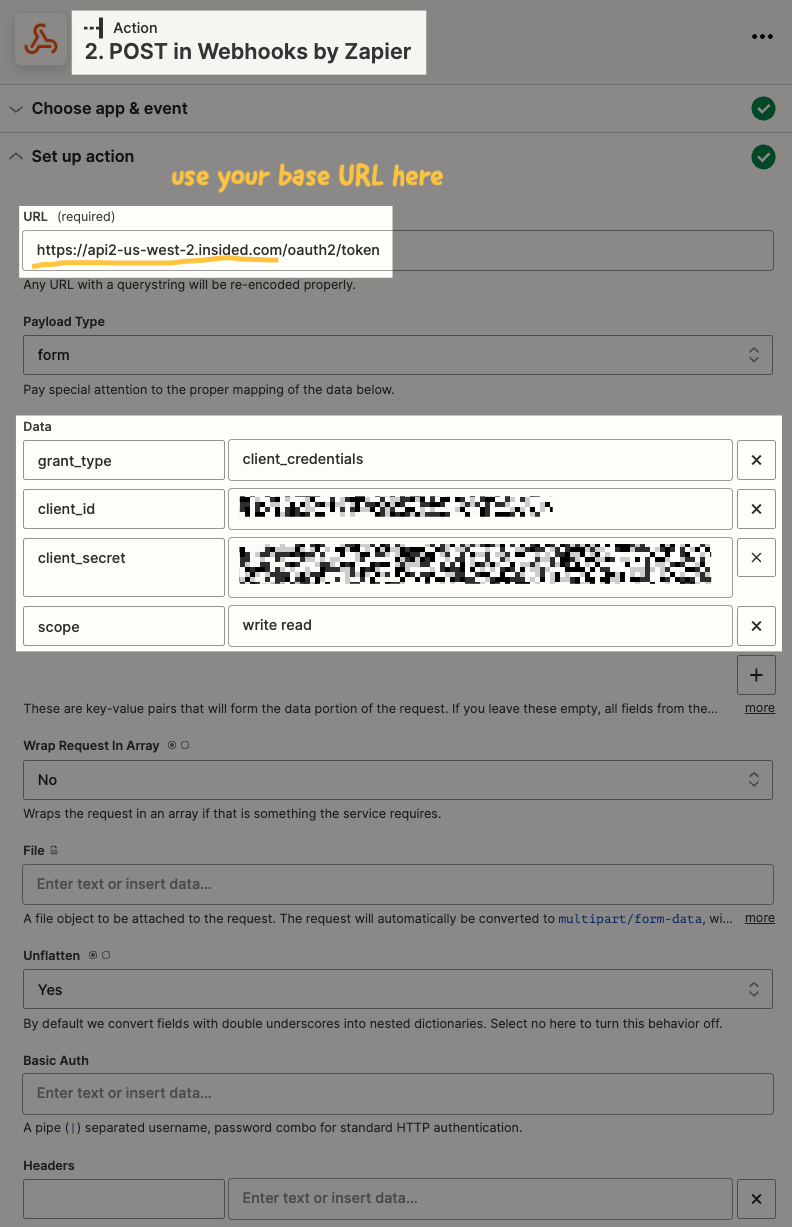
Step 3: You Need a Token in Order to Subscribe to Events
In the same Zap, you can use Webhooks by Zapier — POST to get the token you need. Use the Client ID, Client Secret, and the base URL from above.
Step 4: Put It All Together and Subscribe to the inSided Event
Now that the trigger has provided the event name and the URL of the Zap you want to send data to, and we’ve gotten a token from inSided, let’s subscribe to the event.
NOTE: For testing purposes, the Chrome Extension by Zapier trigger does not pull in samples that you enter in the extension itself (I know, it’s a bummer). So to test the following step, you’ll need to manually type them in. But for the live Zap to run, the fields will be mapped as shown below.
Choose Webhooks by Zapier — POST and add the following information:
Again, use your base URL, followed by /V2/webhooks/ then map the field that contains the event name, followed by /subscriptions.
The Payload Type is json.
Under Data, the URL is the one from your trigger (that is the Catch Hook URL from that other Zap you set up). For the username, it’s the Client ID you got in your inSided Control area, and the secret is the Client Secret you got there.
Under Headers add Authorization on the left, then on the right add Bearer followed by a space then map the token field from the previous Webhook step. It may not be necessary, but just for good measure I add Content-Type and then application/json as a second item under Headers.
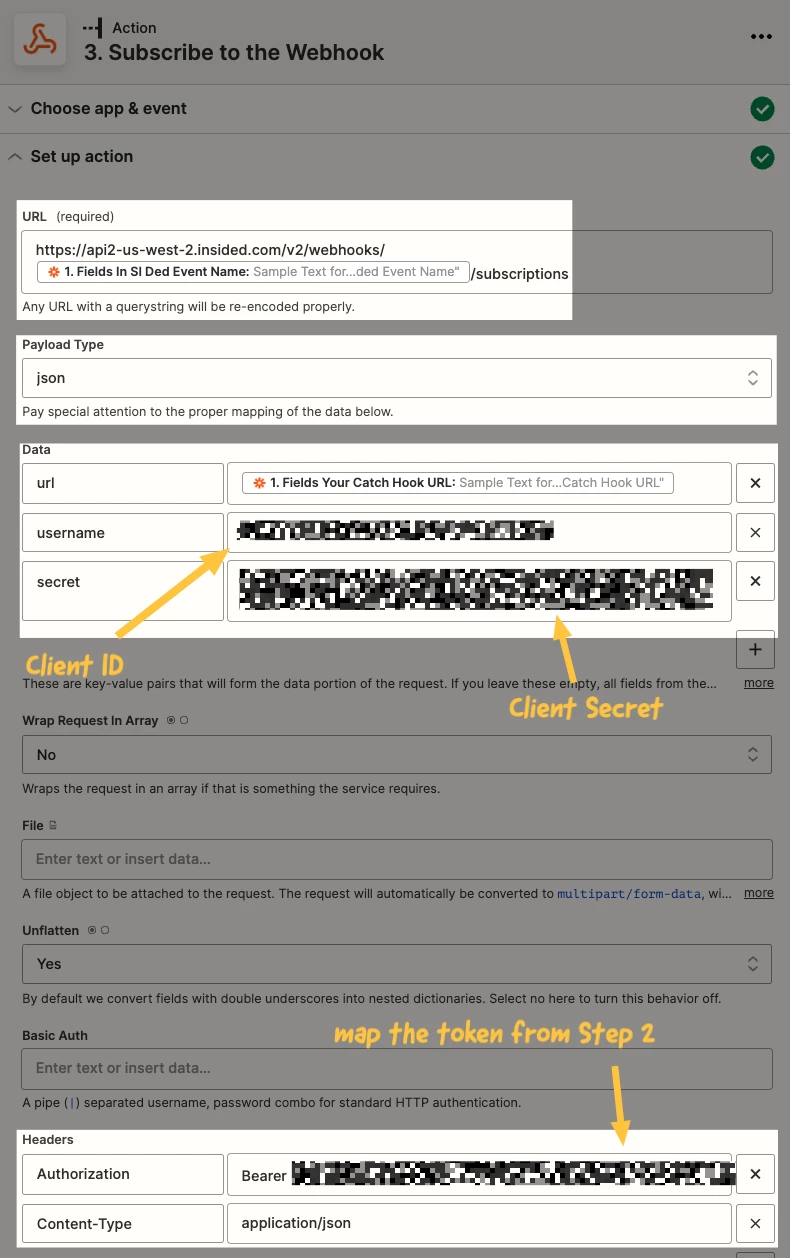
As mentioned above, you can’t test this step with those mapped fields, since the values won’t be recognized by inSided.
You have 2 options:
- Skip the test, turn the Zap on and test it live to see if it works.
- Manually type the data into those areas, test the step to make sure you’ve gotten everything else correct, then go back and map the fields before turning the Zap on.
Wrapping Up
Now you can turn on the Zap that enables you to subscribe to inSided events, then finish the Zap that has the Webhooks by Zapier trigger, in order to complete the rest of that workflow.
In writing this out, I realized that a video would probably be as helpful as (or more helpful than) this article. But I had already completed this, so for now we’ll go with the written piece.
If anything is unclear or you have any questions please don’t hesitate to ask :)