Intro
When you send information to custom apps or apps that don’t have the right action for your needs, you may need to use a Webhooks by Zapier step to customize the way the data is sent.
If you need to send arrays of data (called Line-Items in Zapier) this can be tricky as the POST and PUT Webhooks actions aren’t able to support line-items. If you try to do this, you’ll see the data flattened to a comma separated string which some APIs will recognize, but if they’re expecting a JSON array you’ll see an error or it won’t work as expected.
Let’s take a look at how we can solve this using a “Custom Request” Webhooks Action instead.
Webhooks by Zapier Custom Requests
The description for the Custom Request action reads “fire off a custom request by providing raw details. Very flexible but unforgiving.”
What this means is that the Custom Request action will send exactly what we specify without making any changes. The reason that the POST and PUT actions don’t work is that they may alter the data to make sure it’s in a good format to send. That alteration is what prevents arrays from working.
Now we know how to avoid the alterations, but we have to get everything exactly right without the App guessing what we need.
JSON Body
If we’re sending information containing arrays, we’re most likely going to be using the JSON format, so we’ll focus on that. If you need a reference to how JSON should be structured, there’s a great diagram on json.org.
There are many JSON validators tools out there if you need to check your JSON for errors.
Line-Items to JSON Part 1 (Formatter by Zapier)
Let’s say we have the following line-items from our Trigger:

Let’s take a look at what that would look like as JSON:

We can see that the variable part is between the [square brackets]. We’ll use Formatter by Zapier to generate that part, and simply type in the enclosing text when sending the Webhook Data.
Here’s what Step 2’s Formatter looks like in this scenario:
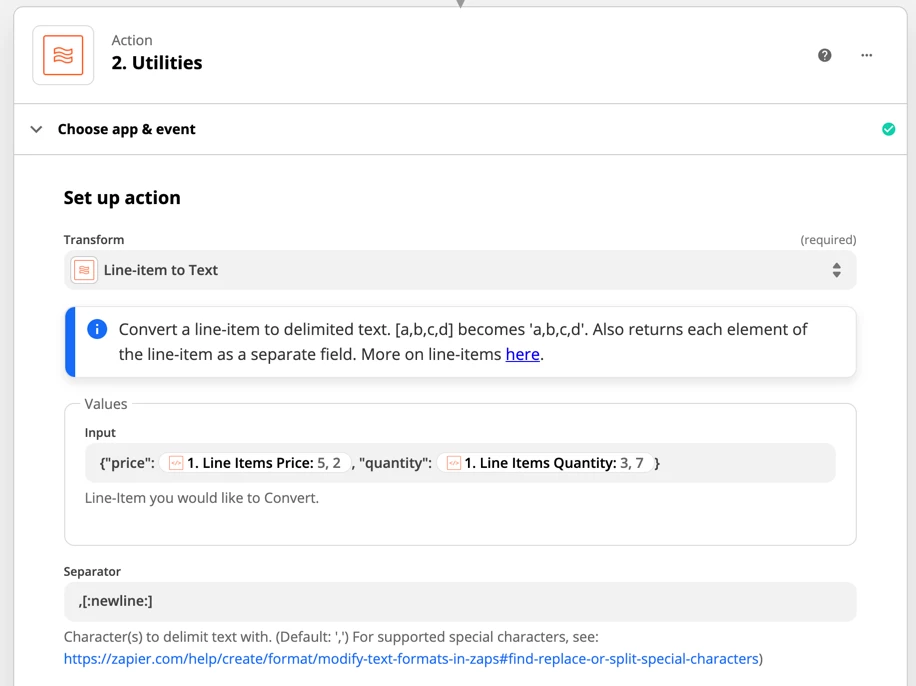
We’re using the Utilities Action and the Line-Item to Text transform to convert multiple line-items into a single block of dynamic text. Here’s the result we’re after:
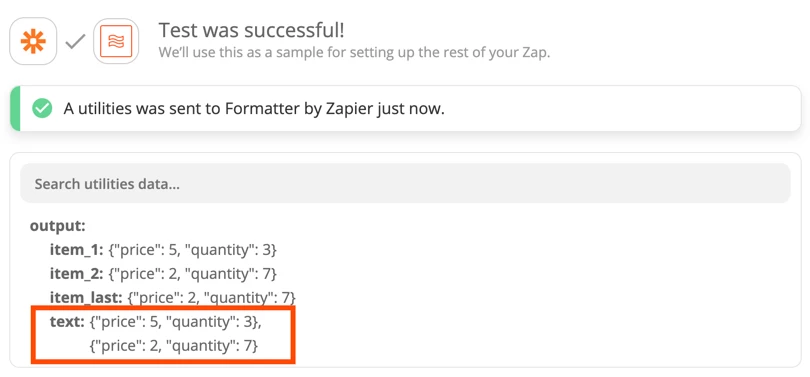
As you can see, one line of text was created for each set of Line-Items that we input. Now, we can take this to our Webhook Step.
Line-Items to JSON Part 2 (Webhooks by Zapier)
The key part of this Step is to wrap our dynamic line-item text from the Formatter Step in it’s containing array, and in this case the key called “lineItems”. The exact structure of this text will be determined by the service you’re sending information to, though.
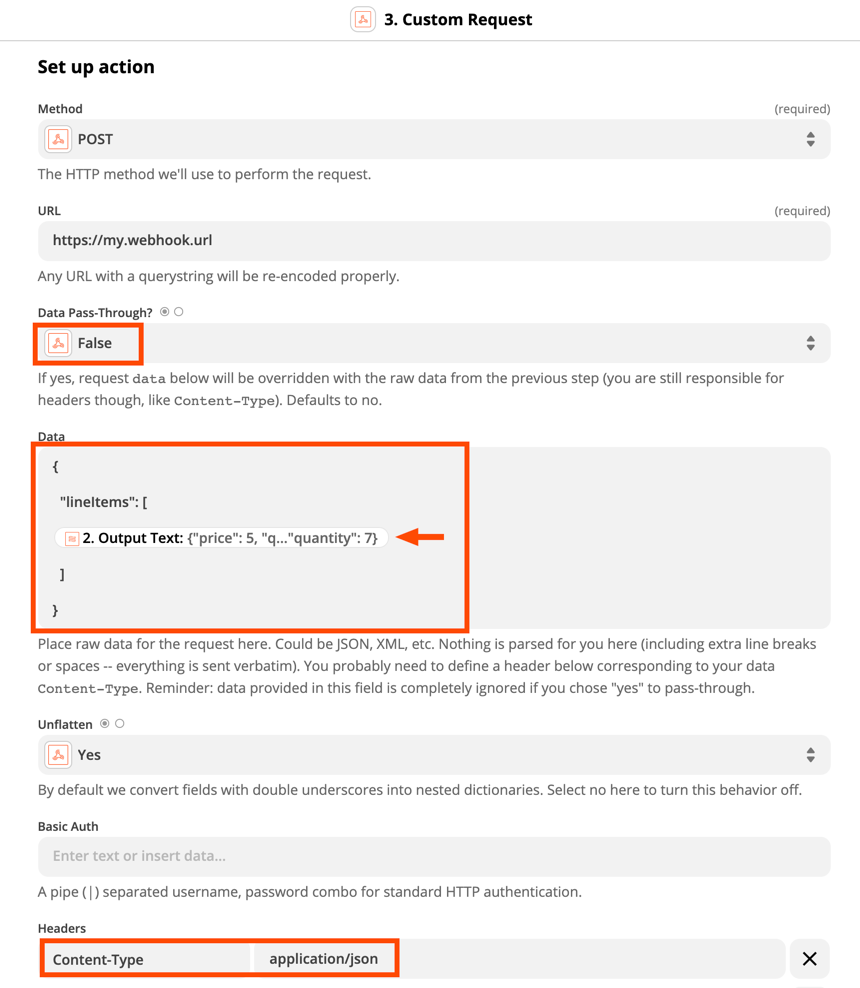
If you have multiple Line-items that need to be sent in this way, you’ll need one Formatter Step for each one.
Conclusion
This will allow you to send line-items via Webhooks Steps in many straightforward cases. For more advanced use cases, you should also check out our Advanced Webhooks blog post.
In this example, we used numbers as the individual values in the line-items, so when creating our JSON, they did not need to be wrapped in “double quotes”. If you were sending text instead, like for a description, you would need to wrap the mapped values in the Formatter Step in double quotes as well.
Please Note
Supporting advanced Webhook setup is outside of the scope of Zapier Support, so if you need help with this, or other code you’re working on, the best place to ask is here in the Zapier community and/or on Stack Overflow. You’re still welcome to ask in Support via our contact form just in case you need logs from a Webhook Step that’s producing an error, or if you think the problem is Zapier specific, but for you may be directed to one of these resources to get help from the community.
We’ll do our best to answer questions you have about it here.

