

Hey friends! This week I’m going to talk about how to create a Zap that will take PDF attachments received in Gmail and upload them into the relevant client folder in Google Drive. This guide specifically talks about how to to this with Gmail and Google Drive, but you can apply the same principles to other similar apps too!
We’ll cover how to take specific PDF file attachments, create a new folder (if one doesn’t already exist) for them in Google Drive, upload the file to that folder. We’ll also get the Zap to send out an email to the client thanking them for sending us the file.
In a rush?
You can download a copy of the Zap template for this workflow here:
Upload PDFs into client's Google Drive folder and send email autoresponder
Setting up the trigger
First up we’ll need to set up the trigger that runs when a new attachment is received in Gmail. To do that we’ll want to select the New Attachment trigger for Gmail. This will trigger the Zap separately for each attachment added to an email.
In the Search String section you’ll want to set up a relevant query to ensure your Zap is only triggering for the right types of emails. For example if I only wanted to trigger for new emails in my inbox emails with the subject line “artwork” then I’d set it up like so:

💡 TIP: Make sure you specify the mailbox for the Label/Mailbox field. I say this as the Sent items folder will also be checked by the trigger step and we won’t want to create an accidental Zap Loop when we send out the auto responder email to the customer later on!
Setting up a Filter
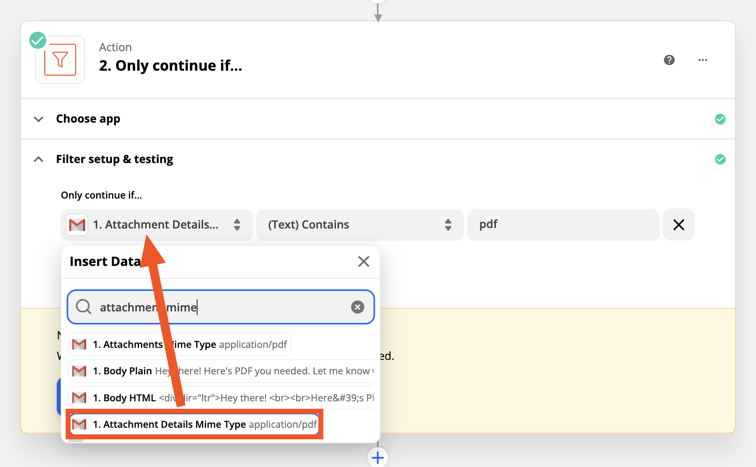
As I’m only wanting to upload PDFs I’m going to add a Filter step use the condition (Text) Contains pdf to ensure that only an attachment with a Mime Type of application/pdf will be uploaded:
Extracting the client name
Now that the Filter is added, let’s keep things super organised by creating a new folder specific to this client (if there isn’t one for them already!). But wait, how do we know what client it is from the email?
Well in most cases the client name is the same as their email domain name so you can use a Formatter (Text > Extract Pattern) step to extract the domain name. You can learn more about using Regex to find and extract text here: Find text with regular expressions in Zaps
If you’re not familiar with Regex that’s ok, you’ll just need to add @(\w+) to the Pattern field to extract the word (domain) that appears right after the @ symbol:
If you’re not familiar with Regex that’s ok, you’ll just need to add @(\w+) to the Pattern field to extract the word (domain) that appears right after the @ symbol:

When we test the step it would then output the word “zapier”. So regardless of what the client's email address is or whether it ends in .com, .org, .uk etc we should be able to always extract the domain name from it. Cool right?
Find/create the folder
Next, you’ll add a Find a Folder action for Google Drive and select the output from the previous formatter step for the Folder Name field. Choose the relevant Drive and Parent Folder as necessary:
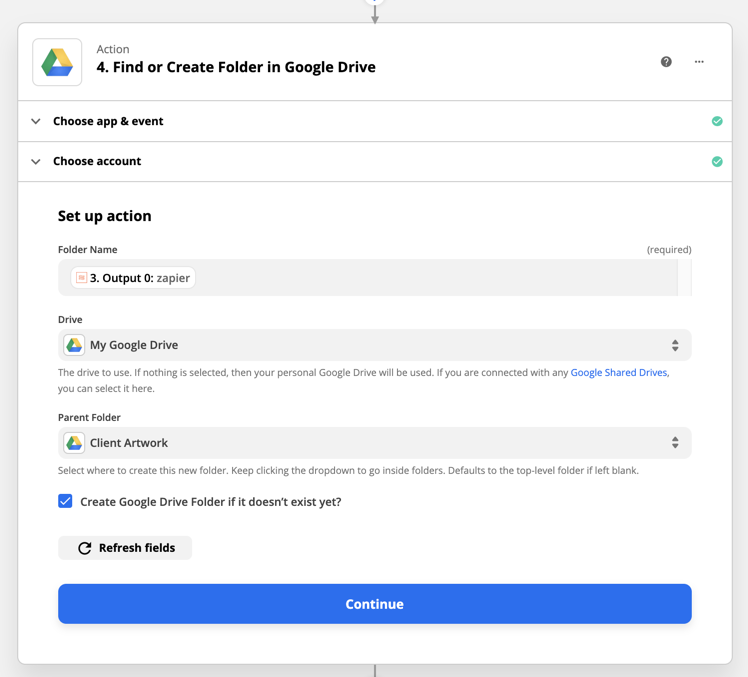
Note that under the Parent Folder field, there’s the option to Create Google Drive Folder if it doesn’t exist yet?. You’ll want to make sure that’s selected so that the Zap can automatically add a new folder!
Note that under the Parent Folder field, there’s the option to Create Google Drive Folder if it doesn’t exist yet?. You’ll want to make sure that’s selected so that the Zap can automatically add a new folder!
Upload the File
Now let’s add an Upload File action and choose the Custom value option on the Folder field. Select the ID number for the folder that was found/created by the previous step.

Next, select the Attachment field from the Gmail trigger step that contains the file:
 Test the step to ensure that will upload the file correctly. I’d also recommend heading over to Google Drive to make sure it definitely worked as expected:
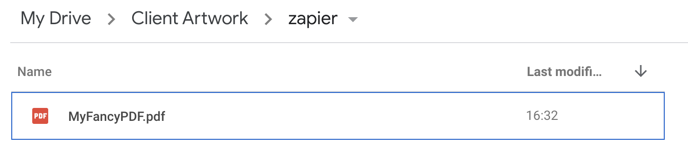 Yay, it worked! 🎉
Set up an autoresponder email
Now, our clients will want us to let them know that we got their really important file, but we’re super busy and don’t have time to respond to every email. So let’s send them an automated email to say thanks and let them know that we’re on it.
To do that we’ll use Gmail’s Send Email action and select the clients email address and name from the Gmail trigger step. In the From field select the email address or alias you want the email to be sent from. Set a From Name and add the message for the email into the Body field:
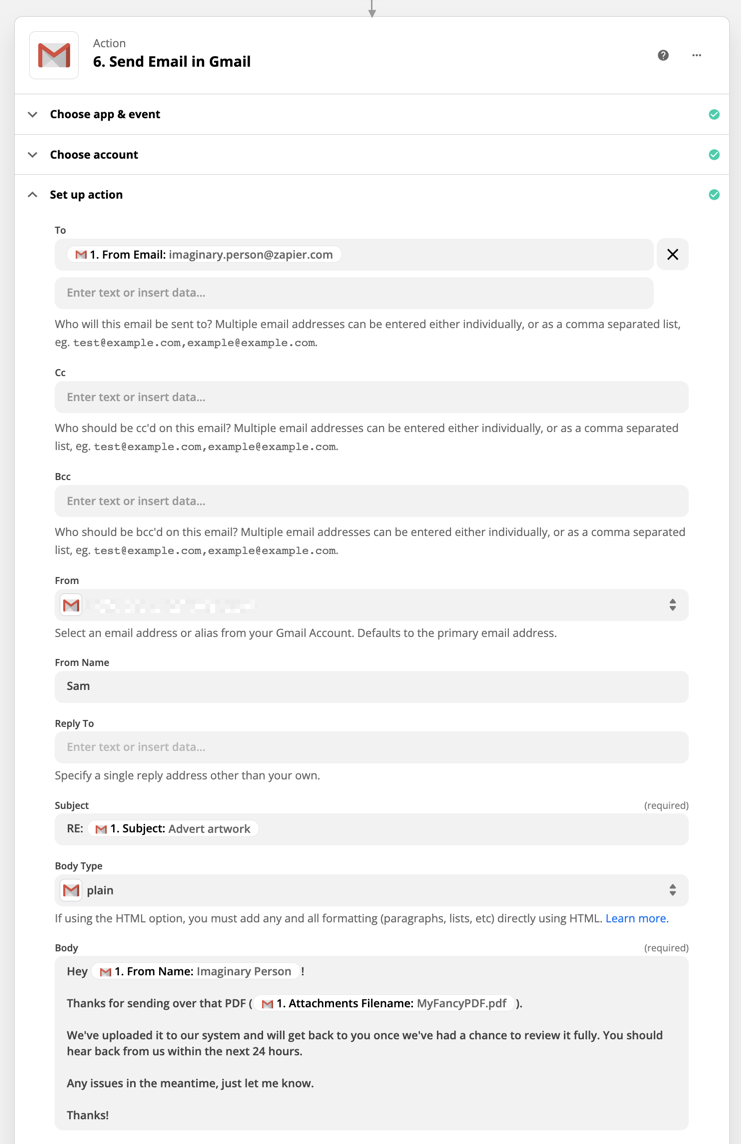
In the above example, I’ve chosen to sent the email as Plain text. But if you select html for the Body Type field you can then include HTML tags in your message. But it’s important to note that not all tags are supported.
You can find out more about the HTML tags that Gmail supports here: What HTML tags are supported in Gmail?
💡TIP: If you’ve got any VIP clients you’d prefer to send out a more personalised email response to manually, a Filter step can be used to check that the sender of the email doesn’t contain their email address.
And if you want to get really fancy, you could use Paths to add some conditional logic to your Zap to carry out different actions based on whether the client is a VIP or not. For example if the sender is a VIP you could get the Zap to send you an urgent SMS to let you know that a VIP client needs a response ASAP.
Wrapping up
If you made it this far, thanks for reading! Don’t stop at just organising uploads into client specific folders and sending out an email? You could add in a Send Direct Message Slack action to alert you when a new file has been uploaded. Or you could create a client-specific Google Sheet spreadsheet instead and add a new spreadsheet row to log details from the email so you can keep a record of everything that’s been received. The possibilities are endless!
I do hope you find this useful and that it inspires you to create lots more time-saving Zaps.
Happy Zapping! ⚡
Happy Zapping! ⚡