


I recently came across a question from a user who was looking to find the State for a New Facebook Lead by using the area code for the phone number the lead entered.
Zapier has great tools already in the product for doing this type of data manipulation and addition. Mostly we would find these tools in our Formatter options.
If we were to exclusively use Zapier tools here we could set up a Zap that does the following:
-
Trigger New Facebook Lead Ad
-
Formatter > Numbers > Format Phone Number (put the numbers in the same format)
-
Formatter > Text > Split Text (isolate the area code)
-
Formatter > Utilities > Lookup Table (find the state by matching on the 3 digit Area Code)
We can also use a Google Sheet in place of Steps 3 and 4 - and my workflow below will step through how to do that - as well as why I prefer the Sheet for this workflow.
Step 1 - Trigger Facebook Lead Ads New Lead
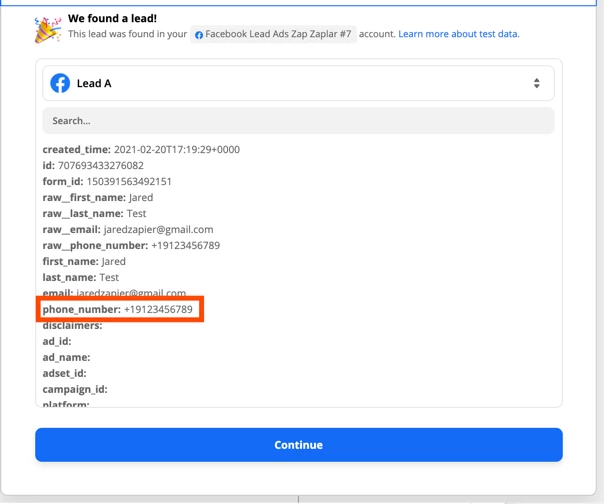
This step is straightforward - the Zap triggers when we get a New Lead from Facebook - and provides us the data for that lead - including Phone Number.
Step 2 - Formatter > Numbers > Format Phone Number
Phone Numbers can come in many different formats.
(912) 345-6789
9123456789
19123456789
+19123456789
That’s not an exhaustive list. ![]()
There are multiple other options with dashes and spaces.
In our example above - Facebook is providing the phone number in this format: +19123456789
However - I’m not sure if they are always going to provide it that way or not.
So I want to add this Formatter Step to the Zap to re-format the number that is provided into the same format each time the Zap runs.
To do that - I’m going to add a Formatter > Numbers > Format Number action to always put the number in the format of 555 800-1212 (National, No Parenthesis).
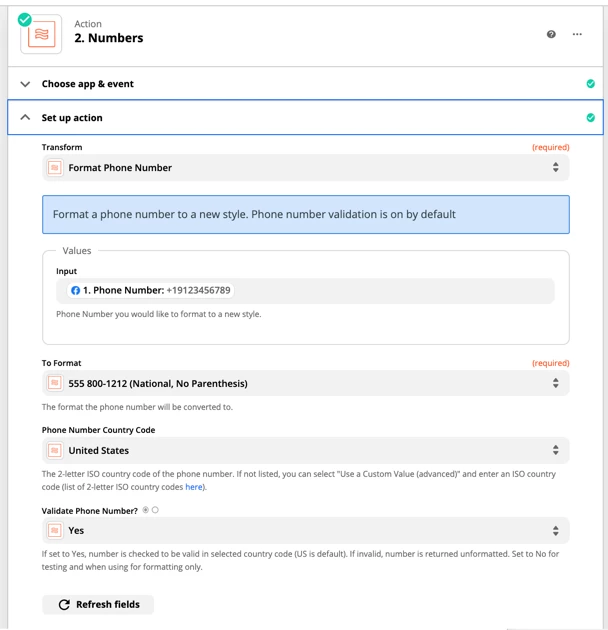
This will then turn my +19123456789 test number into 912 345-6789 - conveniently isolating the 3 character area code (and removing the country code).

Step 3 - Looking Up the State Data by Area Code
As I mentioned above - we could use Zapier’s Formatter tools to do this Lookup by adding 2 additional actions to the Zap.
Step 3 would Split the reformatted Phone Number so we only had the 3 digit area code.
And Step 4 would then use a Lookup Table to find the matching State information for that area code.
There are 2 reasons I prefer using a Google Sheet in this step instead of Zapier’s Formatter Tools.
Reason 1 - The Size of my Lookup Data
There are 333 United States Area Codes. That’s a lot of records to add to the Zapier Lookup Table.
It was easier for me to copy/paste and format these into a Google Sheet - and I can also easily add new Area Codes in the future without making any changes to the Zap.

Reason 2 - We can Lookup Multiple Pieces of Data with 1 Lookup
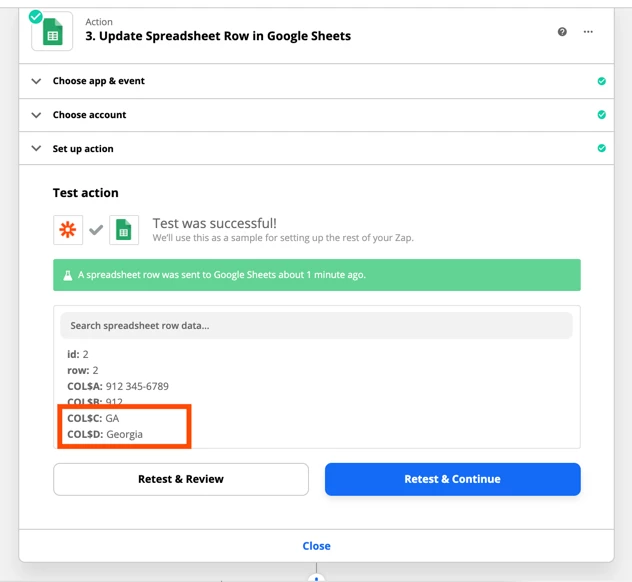
In the screenshot above - we’re able to return both the 2 character State Abbreviation as well as the Full State Name to the Zap with 1 Lookup Step.
This makes my task usage in Zapier more efficient - and allows me to add multiple pieces of data back into the Zap with 1 Lookup action.
Step 3 - Update Spreadsheet Row in Google Sheets
First - here is the Sheet I’m using for this Zap.
If you click that link above - you can just choose File > Make a Copy - and it will create a copy you can use for your own Zap. :)
There are 2 Tabs on this Sheet.
The first one is called “Area Codes” and it has a list of US Area Codes with the corresponding State Abbreviation and State Full Name
And there is a Tab named “Lookup”.
Our Zap is going to Update Row 2 on this Lookup table each time it runs.
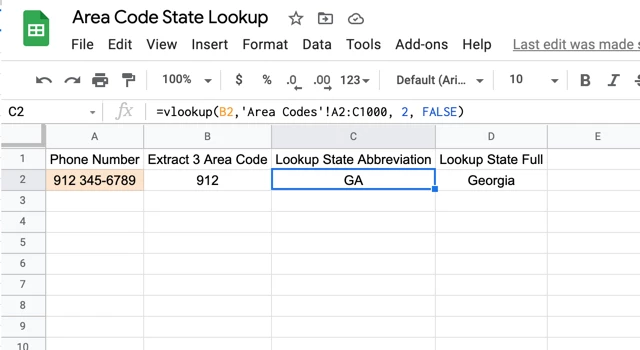
We’re going to save the Phone Number from our Step 2 Formatter Step into Cell A2 each time the Zap Runs.
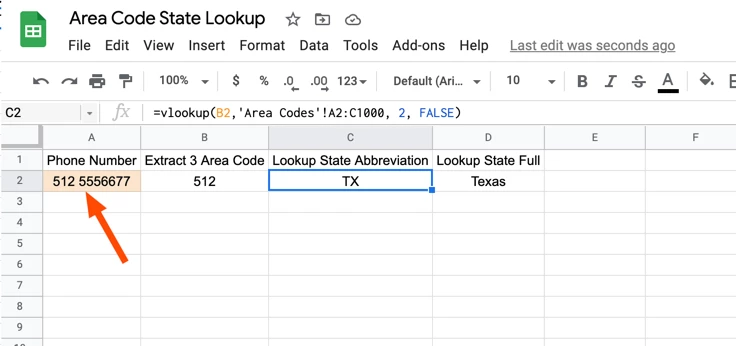
This in turn will trigger the Sheets formulas to Split out just the 3 digit Area Code - and then perform VLookups on the “Area Codes” Tab to find the Matching State.
Here’s how that Update Sheets Row action will look in the Zap Editor.

And when we test that action - we can see that the Sheet is updated and the Extract 3 Area Code, Lookup State Abbreviation and Lookup State Full fields are all updated on the Sheet.
Finally - those values are all returned back to the Zap - where we can now use the State Information in downstream steps.
Summary
Especially with Phone Numbers - the steps aren’t always clear - and there can be more than 1 way (many different ways really) to create the Zap.
The Key Parts to the workflow above are that we need to make sure the phone number is in a consistent format each time the Zap runs.
To do this we’ve added the Formatter > Numbers > Format Phone Number Step.
From there - we can do the Lookup by using Zapier Formatter Steps - or a Google Sheets Update Row action which uses VLOOKUP Formulas on the Google Sheet to find matching States by Area Code.
Sheets can be a great alternative to built in formatter actions in this Zap since it enables us to manage a large lookup table and add new entries with ease.
Additionally - Sheets gives us the ability to lookup multiple pieces of information with only 1 Zapier action - making our Zap as efficient as it can be.