Hey Zappers! I’ve got a fun one today, or at least I think so. Someone recently asked this question on Reddit:

I’ve seen similar questions come up before, so I decided to figure out how to do it. Turns out, it’s not that difficult :) Let’s get started!
Apps We’ll Be Using
- Google Forms (this can be any other form app)
- Airtable (this is where the magic happens)
- Google Docs (where we’ll create the PDF)
- Google Drive (only to change file sharing permissions)
- Gmail (to email the PDF...you can use another app here)
In Airtable
Table 1: where we add form submissions
Each submission for the form will be created as a separate record in this table.
The Setup
Assuming you want to send an email, we’ll have a field for email address, one for name and one for each question on our form.
For each question, we also have a Lookup field for Table 2.

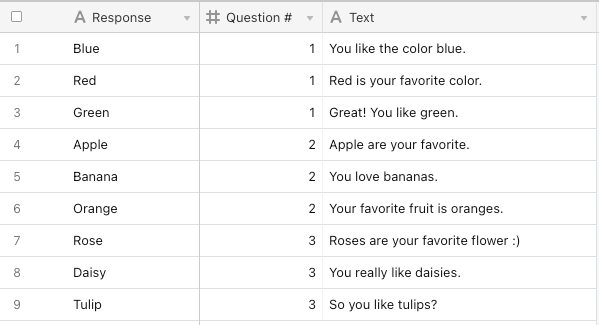
Table 2: to “convert” form answers to custom text
Each possible option from the form will be added as a separate record, including a field for the text we want to output when someone selects this option.
The Setup
You don’t have to include the Question # field, but for simplicity’s sake you may want to. It will make things easier if you have a lot of questions/responses.

The Zap
Trigger
Google Forms: New Form Submission
You can use a different form app here. I chose it because it’s free and we’re using other Google apps.
Actions
If you don’t have to create a document, and would instead like to email the text directly you can cut out Google Docs and Google Drive.
Airtable: Create Record
Map the fields from your trigger step. In this case, that’s Google Forms.

NOTE: Make sure that you’ve added the exact text from your responses into Airtable. That’s how we perform the lookup that gets your custom text.
Google Docs: Create Document from Text
In this case, we’re creating a super basic document with each of our mapped fields inside a paragraph tag. More complex documents are possible, but that’s a whole other article ;)

Google Drive: Add File Sharing Preference

Without this step, the attached PDF will show up like this:

Gmail: Send Email
Now it’s time to send the email with our attached PDF.

If you want to, you can make the subject and body of the email dynamic by including information from the form (like name, for example).
Wrapping Up
There you have it! A 4-step Zap and some Airtable creativity will allow you to create custom documents/emails based on form submissions :)
Shared Zap
If you’d like a head-start or to see how the Zap is created, here’s a shared Zap for you.
Airtable Base You Can Copy
Likewise, here’s an Airtable base you can copy or look at, to get an idea of how the lookup fields work.


